
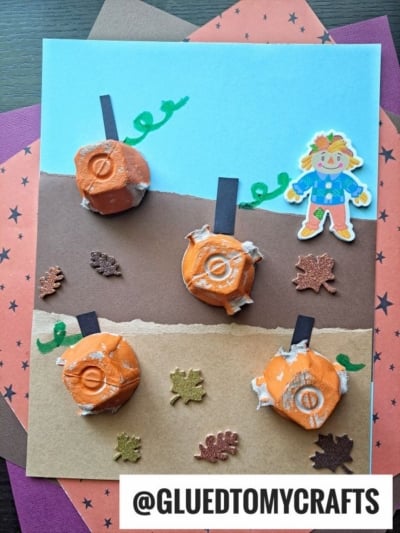
We are upcycling everyday materials into this fun Egg Carton Pumpkin Patch kid craft idea! It’s a mixed media tutorial that I hope inspires you today!

Pumpkin Patch Egg Carton Craft
Have you ever considered incorporating egg cartons into your crafts? They are practically free and the circular compartments can be transformed into anything your heart desires!
We already have a few popular ideas on Glued To My Crafts using these inexpensive cardboard materials (like our egg carton spiders, owls, and reindeer posts). However, in today’s blog post, we will be focusing on a fall-themed idea – creating a pumpkin patch!
This kid-friendly craft tutorial is perfect for older children who can handle scissors and glue responsibly. You can find the detailed step-by-step instructions below. I encourage you to recreate it with your child today!
Happy crafting, my friends! Don’t forget to share pictures of your pumpkin patch art made from an egg carton on our Facebook page. I’m sure they will turn out amazing!
Now, let’s dive into the tutorial. Keep scrolling for more details! #gluedtomycrafts
RELATED —> Pumpkin Patch Frame

Looking for fun and easy craft ideas for kids? Check out this upcycled egg carton pumpkin patch craft that is sure to make creativity bloom.
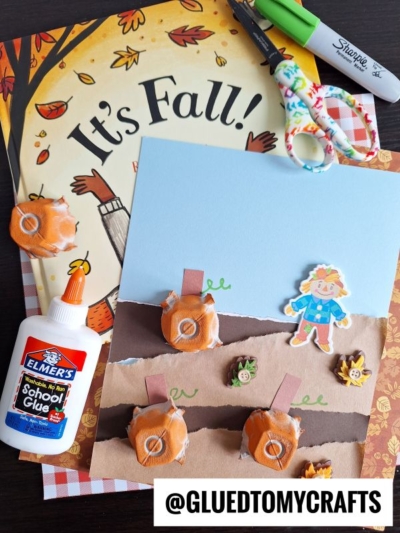
Craft Supplies:
- Cardboard Egg Carton
- Orange Craft Paint
- Paint Brush
- Scissors
- Blue/Brown/Black Cardstock
- Thick Tacky Glue
- Green Paint Crayon
- Fall Stickers
Directions:
- First make sure you have a good working area where your finished project can lay FLAT for drying, after you are done crafting. If you need to transport your craft after creating it, working on a large cookie sheet beforehand, would be great for moving it afterwards.
- Now let’s craft! Separate your clean, empty egg carton into two pieces. The lid and the compartment area. Discard the lid into the trash {or save for another day} while saving the section with the compartments.
- Next using scissors, cut apart your egg carton compartments, one section at a time and trim them down so they lay flat. Each section will be a pumpkin.
- Have your child paint each egg carton piece they just trimmed up, completely orange. Set aside each piece to let them dry completely.
- Grab your blue and brown cardstock. Tear the brown cardstock in half {hamburger style} to make the “dirt” in the pumpkin patch. You want it slightly rigid so that’s why I suggest tearing, versus cutting the brown cardstock. Keep in mind, it doesn’t need to be completely straight either!
- Once done, use some glue to attach the torn piece to the blue cardstock, to complete the pumpkin field look. Set aside.
- Now grab the black cardstock. Trim out small rectangular stems for each egg carton pumpkin section. Set aside.
- Next, it’s time to start gluing down the egg carton pumpkins into their field. Grab the thick tacky glue and put a good layer of glue on the back of each painted egg carton pumpkin piece and place it down on the paper, on the brown cardstock section. Repeat for each piece.
- To finish your egg carton pumpkin patch, glue down the black cardstock stems you previously made and draw some simple squiggle greenery around the patch, with the paint crayon.
- Add any other embellishments you see fit. Set it aside to allow your piece to dry for a few hours before displaying proudly for all to see!
Book Suggestions:
Here are some recommended books that beautifully complement our craft idea. You can conveniently purchase them through our affiliate links on Amazon.
- Goodbye Summer, Hello Autumn by Kenard Pak
- It’s Fall! by Renée Kurilla
- Pick A Pumpkin by Patricia Toht
- The Berenstain Bears and the Prize Pumpkin by Stan Berenstain
- It’s Pumpkin Day, Mouse! by Laura Numeroff
- The Biggest Pumpkin Ever by Steven Kroll
- Halloween in the Orchard by Phyllis Alsdurf
- The Roll-Away Pumpkin by Junia Wonder
- Pumpkin Jack by Will Hubbell
RELATED —> Paper Plate Scarecrow
Pretty easy, right? And of course, you can change out a few things to match what you have on hand or what your child’s imagination is running with. We always love incorporating glitter and rhinestones into our projects too 🙂
Looking for more fall themed kid craft ideas? Be sure to also check out our Pom Pom Painted Pumpkin Patch and Pumpkin Monster craft posts! Both of which are super fun and easy!
One last note – don’t forget to come join our private community on Facebook! We’ll be waiting for you come find us!
RELATED —> Pumpkin Patch At Night

Upcycled Egg Carton Pumpkin Patch Craft
Here’s your checklist of supplies to bring this craft to life:
- 1 Cardboard Egg Carton
- Craft Paint
- Cardstock Paper
- Tulip Puffy Paint
Prepare your creative haven by laying down a protective cover before the crafting magic begins!
Directions:
- First make sure you have a good working area where your finished project can lay FLAT for drying, after you are done crafting. If you need to transport your craft after creating it, working on a large cookie sheet beforehand, would be great for moving it afterwards.
- Now let's craft! Separate your clean, empty egg carton into two pieces. The lid and the compartment area. Discard the lid into the trash {or save for another day} while saving the section with the compartments.1 Cardboard Egg Carton
- Next using scissors, cut apart your egg carton compartments, one section at a time and trim them down so they lay flat. Each section will be a pumpkin.
- Have your child paint each egg carton piece they just trimmed up, completely orange. Set aside each piece to let them dry completely.Craft Paint
- Grab your blue and brown cardstock. Tear the brown cardstock in half {hamburger style} to make the "dirt" in the pumpkin patch. You want it slightly rigid so that's why I suggest tearing, versus cutting the brown cardstock. Keep in mind, it doesn't need to be completely straight either!
- Once done, use some glue to attach the torn piece to the blue cardstock, to complete the pumpkin field look. Set aside.Cardstock Paper
- Now grab the black cardstock. Trim out small rectangular stems for each egg carton pumpkin section. Set aside.
- Next, it's time to start gluing down the egg carton pumpkins into their field. Grab the thick tacky glue and put a good layer of glue on the back of each painted egg carton pumpkin piece and place it down on the paper, on the brown cardstock section. Repeat for each piece.
- To finish your egg carton pumpkin patch, glue down the black cardstock stems you previously made and draw some simple squiggle greenery around the patch, with the puffy paint.Tulip Puffy Paint
- Add any other embellishments you see fit. Set it aside to allow your piece to dry for a few hours before displaying proudly for all to see!


Grab our favorite books via our Amazon affiliate link! In our Amazon storefront you will find books, toys and craft supplies we absolutely love using for our Glued To My Crafts tutorials!