
Get those creative juices flowing with some Halloween spirit! This recycled egg carton spider craft is sure to spark imagination and fun for the kiddos.
Plus these creepy crawly spiders make so great Halloween decorations on the cheap!

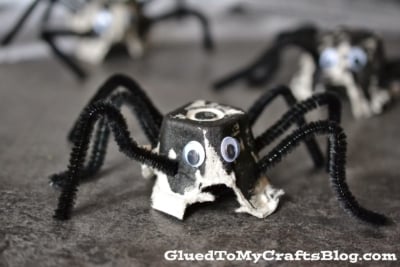
Cardboard Egg Carton Spider Craft
One of my most favorite things to share on Glued To My Crafts is kid craft tutorials using recycled materials. That’s why I’m so excited for today’s Egg Carton Spider art project idea! It’s actually a childhood craft favorite of mine and it’s perfect for the Halloween season we are in!
Since we do a ton of kid crafts in our home, I have to find ways to cut corners and stay on budget. Using recycled items are a fun way to get creative and save a few dollars too. We go through a ton of eggs, so egg cartons are always available for us to craft with.
On that note, with a few simple steps and a little imagination – your child can make these creepy {but cute} egg carton spiders in no time. They make for a fun afternoon activity with young children, that turn into adorable decorations afterwards. You could even use them for a Halloween party activity or table decor if you choose!
So on that note, are you ready to learn the “how to” for this craft? Let’s grab our supplies and check out the full tutorial below for this easy egg carton spider idea!
Happy crafting, my friends! Don’t forget to snap a few pictures of your friendly spider creations and share them on our Facebook page! We can’t wait to see your little guys in action! #gluedtomycrafts
RELATED —> Popsicle Stick Spiders

Keep your little ones busy and creative this Halloween season! With a few old egg cartons, some paint, and some imagination, your kids can make spooky spiders that are sure to impress.
Craft Supplies:
- Cardboard Egg Carton
- Black Craft Paint
- Black Pipe Cleaners
- Foam Paint Brush
- Craft Scissors
- Small Wiggle Eyes
- School Glue or Hot Glue Gun
Directions:
- First cut apart your egg carton. You will want the pieces to lay flat. Each section will be a spider’s body.
- Next have your child paint each egg carton piece completely with the black paint.
- Set aside to let them dry completely.
- Cut your pipe cleaners into thirds. I did two pipe cleaners for each egg carton piece. When cut in thirds, each spider had six legs.
- Using scissors, carefully poke six small holes along each egg carton piece.
- Place your pipe cleaner in the hole and bend to look like a spider leg.
- To finish your spiders, give them life by gluing two googly eyes on the front of the egg carton piece to make the spider’s face.
- Then display them proudly for ALL to see!
RELATED —> Handprint Halloween Keepsake

Pretty easy, right? And of course, you can change out a few things to match what you have on hand or what your child’s imagination is running with. There are no rules saying you can’t have orange or pink spiders. You can also use items like toilet paper rolls or Styrofoam cups to replace the egg carton. It’s all about having fun and getting crafty with your child!
With Halloween just a few weeks away, will you be adding this simple DIY egg carton spider kid craft to your list? I sure hope so!
For more kid friendly tutorials for the season, be sure to check out these past Halloween crafts, listed below! #gluedtomycrafts
- Cupcake Liner Spider
- Paper Plate Frankenstein
- Marble Art Spider
- Halloween Gnome Keepsake
- Popsicle Stick Halloween Gnome
- Popsicle Stick Spiders
- Halloween Eyeball Frame
- Stained Glass Ghosts

Recycled Egg Carton Spider Craft
Here’s your checklist of supplies to bring this craft to life:
- 1 Egg Carton
- Craft Paint black
- Pipe Cleaners black
- Wiggle Eyes
Prepare your creative haven by laying down a protective cover before the crafting magic begins!
Directions:
- First cut apart your egg carton. You will want the pieces to lay flat. Each section will be a spider’s body.
- Have your child paint each egg carton piece completely black. Set aside to let them dry completely.
- Cut your pipe cleaners into thirds. I did two pipe cleaners for each egg carton piece. When cut in thirds, each spider had six legs.
- Using scissors, carefully poke six small holes along each egg carton piece. Place your pipe cleaner in the hole and bend to look like a spider leg.
- To finish your spiders, give them life by gluing two wiggle eyes on the front of the egg carton piece.
- Then display them proudly for ALL to see!

CLICK HERE TO PRINT THE DIRECTIONS FOR THIS CRAFT