Glued To My Crafts

Join thousands of others who have gotten GLUED to our craft tutorials!

  • Home
  • Safety Guidelines
  • Seasonal Themes
    • New Years
    • Valentine’s Day
    • St. Patrick’s Day
    • Spring
    • Easter
    • Mother’s Day
    • Summer
    • Father’s Day
    • Patriotic
    • Halloween
    • Thanksgiving
    • Fall
    • Winter
    • Christmas
    • Snowmen
    • Story Time
  • About Us
  • Amazon Storefront
  • Monthly Themes
    • January Craft Ideas
    • February Craft Ideas
    • March Craft Ideas
    • April Craft Ideas
    • May Craft Ideas
    • June Craft Ideas
    • July Craft Ideas
    • August Craft Ideas
    • September Crafts
    • October Crafts
    • November Crafts
    • December Crafts
  • Collection Posts
    • 20+ Creative Paper Bag Craft Ideas for Kids to Enjoy Today
    • 20+ Plastic Egg Stamp Crafts for Spring Fun
    • 30+ Creative Thumbprint Craft Ideas for Spring Fun
    • Craft Ideas for Kids Using Egg Stickers
    • Thumbs Up! 50+ Creative Thumbprint Crafts for Kids
    • 40+ Insect Craft Ideas For Kids
    • 50+ Craft Ideas For Kids Using A Plastic Fork As A Paint Brush
    • 30+ Puffy Paint Craft Ideas For Kids To Try Today!
    • 20+ Fun and Easy Paper Bowl Crafts for Kids
    • Pete The Cat Craft Ideas: Fun & Easy Projects for Kids
    • Transform Coffee Filters into 40+ Stunning DIY Projects
    • Transform Crepe Paper Streamers into 60+ Stunning Crafts
    • Pie Server Stamped Craft Ideas Kids Will Adore
    • Paint Splat Pie Craft Idea For Kids

Cupcake Liner Spider On Paper

When engaging in craft activities, it is important for young children to have adult supervision at ALL times. It is also recommended to use supplies that are suitable for your child's age. Feel free to modify materials or steps to meet your specific requirements. Please refer to our safety guidelines for more information.

As an Amazon Associate I earn from qualifying purchases. This post may contain affiliate links. For more information, please see our disclosure policy.

UPDATE FOR 2026 - To reduce storage costs and download fees, we recently made some changes to our website. The password for all our files this year is GLUEDTOMYCRAFTS2026. No sign-up is required to download our free printables! You can enjoy our printables without creating an account or paying for Box.com. Simply follow the download instructions on our FAQ PAGE.

Not ALL Halloween crafts have to be scary!! Make this "not so" creepy-crawly Cupcake Liner Spider friend in no time with your child today!
SKIP THE FLUFF AND PRINT THE DIRECTIONS
Cupcake Liner Spider On Paper

Spook-tacular craft alert! Enjoy a festive Halloween season with this cute cupcake liner spider on paper tutorial! It’s sure to get your creative juices flowing!

Cupcake Liner Spider - Art Project Idea For Halloween

SUPER EASY Spider Muffin Cup Liner Art Project Idea For Halloween

Not ALL Halloween crafts have to be scary or overly complicated! I’ll show you how YOU and your child can make this “not so” creepy-crawly Cupcake Liner Spider friend in no time!

With simple supplies like a large purple cupcake liner, our FREE provided spider web printable and a little bit of your imagination – this craft is not only NOT scary BUT it’s also really inexpensive & fun for ALL ages!

So gather up those simple materials and let your “wicked whimsy” creative side shine this Halloween season! You can find the full tutorial for this paper spider kids craft below, as well as the free spider web download to use! Be sure to join your child in the making as well and print off a copy for you as well!

I’ll let you get to it now. Happy crafting with your little ones, my friends! Don’t forget to share pictures of your cupcake liner spiders with us on our Facebook page or tag us on Instagram to see! I can’t wait to admire your #cutenotscary spider crafts! #gluedtomycrafts

RELATED: Cupcake Liner Bats and Paper Straw Spider

Cupcake Liner Spider - Art Project Idea For Halloween

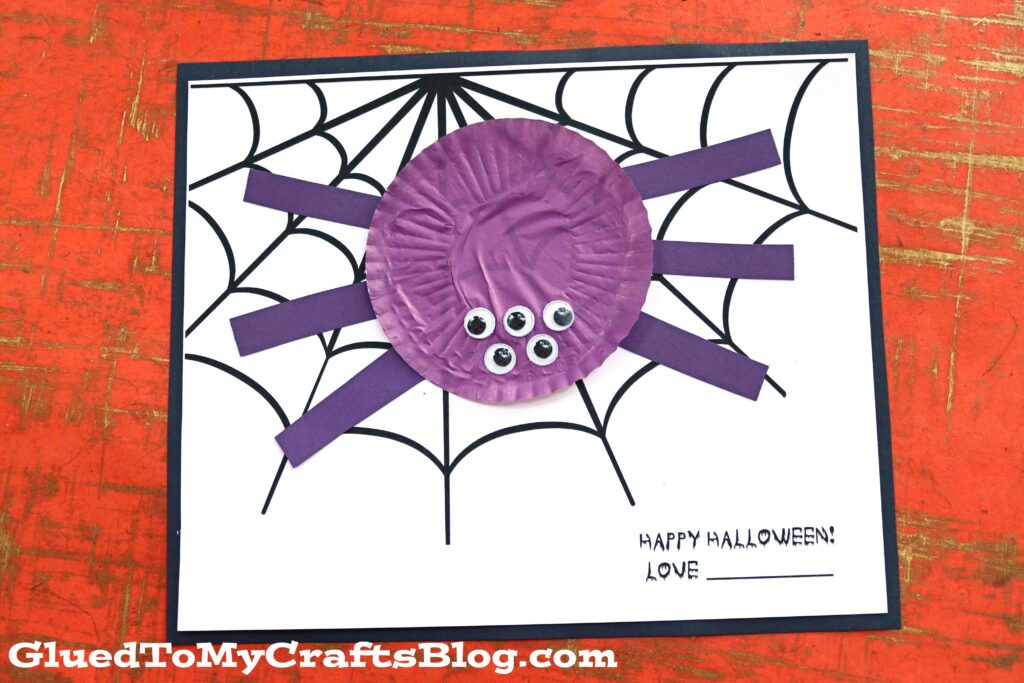
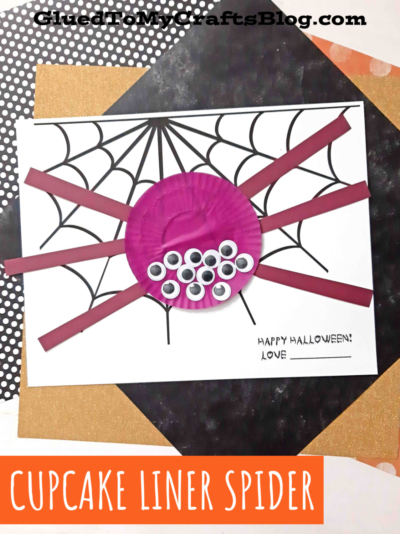
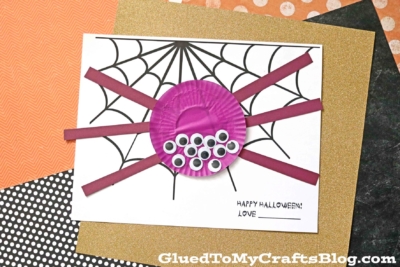
Who’s ready to see the sweetest spider you’ll ever meet? This cupcake liner spider is just too cute to pass up and will definitely add some extra cuteness to your walls!

Craft Supplies:

  • Large Purple Cupcake Liner
  • Purple Cardstock Paper
  • Spider Web Printable – on our landing page
  • White Cardstock Paper
  • Glue Stick or School Glue
  • Medium Sized Wiggle Eyes
  • Craft Scissors

Directions:

  • First things first – go ahead and print the free provided file {listed above} on a single sheet of white cardstock. You only need one print per Halloween spider craft.
  • Once you have the file printed, grab your purple cupcake liner and glue stick.
  • Go ahead and flatten out the cupcake liner with your hands.
  • Next glue down the cupcake liner in the center of the spider web design.
  • Once the cupcake liner is down, grab your purple cardstock and trim out some spider legs from it. I did three for each side of the spider but you are welcome to add more/less for yours.
  • To finish your Cupcake Liner Spider, simply glue the cardstock pieces in their designated spots, as well as the wiggle eyes to give it life.
  • Then add other embellishments you see fit and display proudly for all to see!
  • Don’t forget to share pictures with us! #gluedtomycrafts

RELATED —> Paper Plate Spider

Cupcake Liner Spider On Paper

Are you looking for more fun Halloween kid crafts on Glued To My Crafts?

Then be sure to check out these past posts from us, listed below, for even more spooky inspiration that is fuss-free and pair nicely with today’s cupcake liner spider art project idea!

  • Fright Night Paper Plate Craft
  • Eyeball Frame Decoration
  • Popsicle Stick Witch Hats
  • Halloween Black Cat
  • Paper Plate Spider
  • Paper Plate Witch
  • Spider Mason Jar Card
  • Watercolor Spider Web
  • Purple Cat Keepsake
  • Egg Carton Spider
  • Plate Spider Web

stacey-signature-2023


Cupcake Liner Spider On Paper
PRINT

Cupcake Liner Spider On Paper

Not ALL Halloween crafts have to be scary!! Make this "not so" creepy-crawly Cupcake Liner Spider friend in no time with your child today!

Here’s your checklist of supplies to bring this craft to life:

  • Cardstock Paper
  • Halloween Printable - on our landing page
  • Cupcake Liners
  • Wiggle Eyes
  • Glue Stick or School Glue
  • 1 Scissors
  • Halloween Book Recommendations - link to our Amazon shop

Prepare your creative haven by laying down a protective cover before the crafting magic begins!

Directions:

  • First print out our provided printable, in color, on a single sheet of white cardstock paper. You only need one print per craft.
    Cardstock Paper
  • Once you have the file printed, grab your purple cupcake liner and glue stick.
    Cupcake Liners
  • Go ahead and flatten out the cupcake liner with your hands.
  • Next glue down the cupcake liner in the center of the spider web design.
  • Once the cupcake liner is down, grab your purple cardstock and trim out some spider legs from it. I did three for each side of the spider but you are welcome to add more/less for yours.
  • To finish your Cupcake Liner Spider, simply glue the cardstock pieces in their designated spots, as well as the wiggle eyes to give it life.
    Wiggle Eyes
  • Then add other embellishments you see fit and display proudly for all to see!
    Cupcake Liner Spider On Paper
MINI-HEARTS-page-separator-logo-gluedtomycrafts

click-here-to-head-to-our-landing-page-gluedtomycrafts

NEED MORE HELP DOWNLOADING OUR FREE PRINTABLES? PLEASE REFER TO OUR FAQ PAGE

CLICK HERE TO PRINT THE DIRECTIONS FOR THIS CRAFT

If you've enjoyed our content or have any thoughts to share, we'd love to hear from you! Mention @gluedtomycrafts or tag #gluedtomycrafts on Instagram!


Craft Activity Safety Guidelines:

Always Ensure Adult Supervision - Young children should be supervised at all times when engaging in craft activities. This is essential to keep them safe and ensure materials are used correctly. Use Age-Appropriate Supplies - Choose craft supplies that are suitable for your child’s age. Check labels for recommendations and avoid items with small parts or sharp edges for younger children. Modify as Needed - Feel free to adapt materials or steps to meet your child's abilities and safety needs. For example, substitute scissors with safety scissors if necessary. Keep an Eye on Allergies - Be mindful of potential allergens in craft materials like glue, paint, or certain fabrics. Opt for non-toxic and hypoallergenic options whenever possible. Organize and Secure Supplies - Keep all craft tools and materials organized. Store sharp objects, small parts, and potentially hazardous items out of reach when not in use. Following these guidelines will ensure that crafts remain fun, creative, and, most importantly, safe for everyone involved!


OUR PRIVACY POLICY

OUR COPYRIGHT POLICY

  • Email
  • Facebook
  • Instagram
  • Pinterest
  • Twitter
  • YouTube

LOOKING FOR SOMETHING?

EXPLORE OUR SITE:

TRENDING TODAY:

  • A pink hand-shaped bookmark with red heart stickers and star confetti surrounds a round note that reads a heartfelt message about love and reading. The image is from GluedToMyCraftsBlog.com. Handprint Bookmark Keepsake: A Gift That Holds Your Spot
  • A colorful craft project featuring a yellow felt moon, sparkly stars, and heart shapes, with glue and a heartfelt message. Torn Paper Love You To The Moon and Back Card Craft Idea For Kids
  • A handmade card with a rocket drawing, hearts, and messages of love. Felt hearts and an envelope are around it. Handprint Rocket Keepsake - I Love You Because
  • A vibrant Valentine's Day craft showcasing a torn-paper bumblebee with googly eyes on a white sheet, accompanied by the text "MY VALENTINE!" The scene is decorated with felt hearts, heart-shaped gems, and patterned papers, with a glue bottle and crafting supplies adding to the creative atmosphere. Torn Paper Bee My Valentine Card Craft Idea For Valentine's Day
  • Flat lay of a torn paper dandelion craft featuring a white sheet with a black dandelion outline. Torn yellow, pink, and purple paper pieces are glued to the dandelion head, simulating seeds. Surrounding the craft are Elmer's glue, felt hearts, paper flowers, and patterned scrapbook paper. The text 'MAKING WISHES, ONE PIECE OF PAPER AT A TIME.' and 'GluedToMyCraftsBlog.com' are printed on the white sheet. Torn Paper Dandelion Craft: Making Wishes, One Piece at a Time
  • A flat lay of handmade Valentine’s Day cards and decorations, including paper flowers, felt hearts, an envelope, and printed cards with romantic poems, arranged on a gray and pink background. Capture Memories With These 6 Handprint Flower Poems
  • A colorful handprint craft made from purple paper with glitter edges sits on a multicolored polka dot background. A round tag with a poem is attached below, tied with red and white string. Flowers are visible in the corner. Easy Handprint Flower Craft with Poem – Perfect Spring DIY for Kids
  • A purple paper butterfly made from handprint cutouts is decorated with glitter and a smiling face. A round poem about sending love is in the center. The background is colorful and the GluedToMyCraftsBlog.com watermark is visible. Handprint & Popsicle Stick Butterfly Poem Keepsake
  • A craft project with yellow crepe paper fries in a red-striped paper container, a label reading Youre UN-FRY-GETTABLE!, red heart decorations, Elmers glue, and a roll of yellow crepe paper on a purple background. Torn Crepe Paper Fries Craft Idea For Kids
  • A spring-themed craft featuring pink and purple paper flowers, small decorative bees, and a “Spring has sprung, so let’s get our creativity blooming!” sign on a blue background—perfect for pairing with Spring Printables. Crepe Paper & Fingerprint Daisy Spring Paint Brush Craft

© 2012–2026 Glued To My Crafts
All activities should be supervised by an adult at all times. Please refer to our safety guidelines for more information.


Please note that all the content of the website, including printables, are for classroom and personal use only. This means that any digital item you download from our site can be used for non-commercial use only. We kindly request that you do not reproduce or sell our creations. We appreciate your understanding and cooperation in respecting our content and intellectual property rights.

Accessibility Adjustments

Powered by OneTap

How long do you want to hide the toolbar?
Hide Toolbar Duration
Select your accessibility profile
Vision Impaired Mode
Enhances website's visuals
Seizure Safe Profile
Clear flashes & reduces color
ADHD Friendly Mode
Focused browsing, distraction-free
Blindness Mode
Reduces distractions, improves focus
Epilepsy Safe Mode
Dims colors and stops blinking
Content Modules
Font Size

Default

Line Height

Default

Color Modules
Orientation Modules