Don't go BATTY trying to think of creative crafts for the kids to do this Halloween!

In a world where digital distractions are everywhere, finding engaging and educational activities for kids can be a challenge. What if you could combine creativity and fun in a simple craft project?

Crafting is a fantastic way to bond with your kids while igniting their creativity. With Halloween around the corner, why not make some spooky yet adorable bat crafts using cupcake liners?
This easy and fun DIY project is perfect for kids of all ages. Not only does it keep them entertained, but it also enhances their fine motor skills. In this post, we’ll guide you through creating your very own cupcake liner bats, step by step. Let’s get crafting!


Get crafty with the kiddos this weekend and try out our fun cupcake liner bat card craft! This easy, but impressive project is sure to bring a smile to everyone’s face.
Craft Supplies:
Ensure you have all the materials needed for the craft within reach. For the cupcake liner bat craft, you’ll need:
- Mini Black Cupcake Liners
- Gray Cardstock Paper
- Black Cardstock Paper
- White Cardstock Paper
- Glue Stick
- Small Wiggle Eyes
- Scissors
- Thin Tip Black Marker
Directions:
Follow these simple steps to create your very own cupcake liner bats.
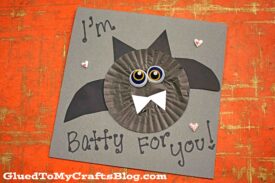
- First things first – make your card. I went with a regular 5×5″ square card shape out of gray colored cardstock. You just need to make sure your black cupcake liner will fit on the front of your card. I went with a shade of dark gray for a Halloween theme but feel free to change it up!
- Now you are ready for the “bat” part. Grab your black cupcake liner and flatten it out with your fingers.
- Put some glue on the back of your flattened cupcake liner piece and glue it onto your card front.
- If the edges are sticking up, add more glue so it really sticks down on the paper.
- Next up – the embellishments. Grab all your sheets of cardstock and the scissors.
- Cut out some bat wings, triangular ears and fangs.
- To finish your Cupcake Liner Bat Card, simply glue the cardstock pieces you just cut out, in their designated spots, as well as the wiggle eyes to give it life.
- Take the Sharpie marker to write clever sayings like “I’m batty for you” around the design.
- Then add other embellishments you see fit and give away proudly!
Story Time Recommendations:
Take a look at these book recommendations that complement our craft tutorial perfectly.
- I’m Not Scary by Raahat Kaduji
- Bats at the Library by Brian Lies
- It’s Raining Bats & Frogs by Rebecca Colby
- Stellaluna by Janell Cannon
- There Was an Old Lady Who Swallowed a Bat! by Lucille Colandro
- Fiona the Fruit Bat by Dan Riskin
RELATED —> Handprint Bat Keepsake

AFFILIATE LINK – PAIR OUR CRAFT IDEA WITH THE “THERE WAS AN OLD LADY WHO SWALLOWED A BAT” BOOK
Are you looking for more fun Halloween kid crafts from us? Check out these past posts, listed below, for more spooky inspiration from your pals at Glued To My Crafts!
- Paper Plate Fright Night
- Eyeball Frame Decor
- Styrofoam Cup Bat
- Paper Plate Black Cat
- Paper Plate Witch
- Cupcake Liner Spider
- Chalk Art Bat In The Night
- Wooden Spoon Bat
- Paper Plate Bat

Cupcake Liner Bat Craft Idea For Kids
Don't go BATTY trying to think of creative crafts for the kids to do this Halloween!
Here’s your checklist of supplies to bring this craft to life:
- Cardstock Paper black, gray and white
- Cupcake Liner black
- 2 Wiggle Eyes
Prepare your creative haven by laying down a protective cover before the crafting magic begins!
Directions:
- First things first - make your card. I went with a regular 5x5" square card shape out of gray colored cardstock. You just need to make sure your black cupcake liner will fit on the front of your card. I went with a shade of dark gray for a Halloween theme but feel free to change it up!
- Now you are ready for the "bat" part. Grab your black cupcake liner and flatten it out with your fingers.Cupcake Liner
- Put some glue on the back of your flattened cupcake liner piece and glue it onto your card front.
- If the edges are sticking up, add more glue so it really sticks down on the paper.
- Next up - the embellishments. Grab all your sheets of cardstock and the scissors.
- Cut out some bat wings, triangular ears and fangs.Cardstock Paper
- To finish your Cupcake Liner Bat Card, simply glue the cardstock pieces you just cut out, in their designated spots, as well as the wiggle eyes to give it life.2 Wiggle Eyes
- Take the Sharpie marker to write clever sayings like "I'm batty for you" around the design.
- Then add other embellishments you see fit and give away proudly!

Grab our favorite books via our Amazon affiliate link! In our Amazon storefront you will find books, toys and craft supplies we absolutely love using for our Glued To My Crafts tutorials!
If you've enjoyed our content or have any thoughts to share, we'd love to hear from you! Mention @gluedtomycrafts or tag #gluedtomycrafts on Instagram!