
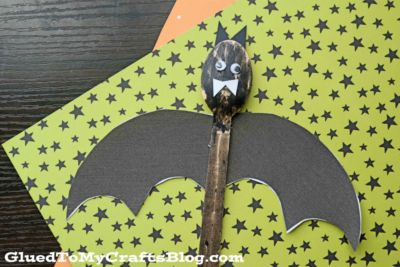
Let your child’s imagination do the talking with this fun wooden spoon bat puppet craft! With just a few supplies they can create something truly magical to enjoy during the Halloween season!

Wooden Spoon Turned Bat Puppet For Halloween
Don’t go BATTY trying to think of creative crafts for the kids to do this Halloween! This Wooden Spoon Bat – Kid Craft is as simple as it gets PLUS it’s not expensive either!!!
Then use your newly created Craft Spoon Bat friend as decor, place him in some Dirt Pudding for a Halloween party OR have a fun afternoon full of puppet play with a whole collection of them!
So gather up those simple materials and let your “bat crazy” creative side shine this Halloween season! You can find ALL the details you need to know, along with the FREE bat wing printable below!
Happy crafting with your little ones, my friends! Please don’t forget to share pictures with us of your wood bat creations on our Facebook page when you are done! #gluedtomycrafts
RELATED —> Cupcake Liner Bat Cards

Follow our steps to create a wooden spoon bat puppet that will add some fun to your Halloween festivities!
Craft Supplies:
- Wooden Craft Spoons
- Black Craft Paint
- Paint Brush
- Small Paper Plate
- Free Bat Printable – on our landing page
- White Cardstock Paper
- Black Cardstock Paper
- Craft Scissors
- Small Wiggle Eyes
- Low-Temp Hot Glue or Tacky Glue
Directions:
- First print the bat wing template above on white cardstock.
- Using scissors, have children trim out the bat wings from the printable. One printable will makes TWO WINGS FOR ONE BAT. Once cut out, set aside.
- Out of the remaining white cardstock, cut out two small triangle fangs for your hat.
- At this point in time, you should cut out some triangle “ears” for the bat, from the black cardstock.
- Set all the paper pieces aside till the last step.
- Now grab your craft paint, the small paper plate, the wooden spoon and the paint brush.
- Squirt a small amount of black paint on the paper plate.
- Paint your wooden spoon completely black. This is the body of the bat.
- Once done, set aside to let it dry completely.
- To finish off the Wooden Spoon Bat – simply glue the cardstock pieces in place and add the wiggle eyes so they can see.
- Then add other embellishments you see fit {like glitter, rhinestones etc.}
- To display, you can add magnets to the back or hot glue some string for easy hanging!
RELATED —> Paper Plate Bat

Are you looking for even more fun Halloween themed craft tutorials? Maybe something to pair along with today’s wooden spoon bat tutorial?!
Then be sure to check out these past posts, listed below from Glued To My Crafts, for some even more spooky craft inspiration!
- Stained Glass Frankenstein
- Paper Plate Witch
- Cupcake Liner Spider
- Craft Stick Bat
- Spider Mason Jar Card
- Handprint Bat
- Styrofoam Cup Bat
- Chalk Art Bat

Wooden Spoon Bat Puppet Craft
Here’s your checklist of supplies to bring this craft to life:
- 1 Scissors
Prepare your creative haven by laying down a protective cover before the crafting magic begins!
Directions:
- First print out the bat wing template on white cardstock paper.
- Using scissors, have children trim out the bat wings from the printable. One printable will makes TWO WINGS FOR ONE BAT. Once cut out, set aside.
- Out of the remaining white cardstock paper, cut out two small triangle fangs for your hat.
- At this point in time, you should cut out some triangle "ears" for the bat, from the black cardstock.
- Set all the paper pieces aside till the last step.
- Now grab your craft paint, the small paper plate, the wooden spoon and the paint brush.
- Squirt a small amount of black paint on the paper plate.
- Paint your wooden spoon completely black. This is the body of the bat.
- Once done, set aside to let it dry completely.
- To finish off the Wooden Spoon Bat – simply glue the cardstock pieces in place and add the wiggle eyes so they can see.
- Then add other embellishments you see fit {like glitter, rhinestones etc}
- To display, you can add magnets to the back or hot glue some string for easy hanging!


NEED MORE HELP DOWNLOADING OUR FREE PRINTABLES? PLEASE REFER TO OUR FAQ PAGE