Create a spooky Stained Glass Frankenstein Head with this fun Halloween craft! Perfect for kids, using simple materials to spark creativity and festive fun.

Banish boredom this Halloween season with our SUPER easy Stained Glass Frankenstein Head kid craft idea!

Kids will love anything cute and colorful! This #cutenotscary idea hits the mark on everything! Easy supplies, steps and design. You can even add your own spooky spin by changing up some of the materials or what face their green Frankenstein makes!
All you need is contact paper, green tissue paper and black cardstock paper to make it happen this Halloween season! Hopefully this Stained Glass Frankenstein idea, is something you can really sink those crafty fangs into!
Are you ready to recreate it today? Well then – find all the details below in our quick tutorial!
Happy crafting, my friends! Don’t forget to FOLLOW US ON FACEBOOK so you never miss a new tutorial from us this season! #gluedtomycrafts

Get creative and unleash your inner Dr. Frankenstein! Make something totally unique with this fun stained glass Frankenstein head craft!
Craft Supplies:
- Black Cardstock Paper
- Green Tissue Paper
- Scissors
- Clear Contact Paper
- Black Sharpie Marker
- Eyeball Stickers
- Stapler
Directions:
- First grab your craft scissors and ONE sheet of black cardstock paper.
- Fold/cut the black cardstock in half. You can either reserve the other half for another craft day or make TWO stained glass Frankenstein face pieces at once {or go big and skip this step all together!}
- Next trim out a rectangle frame shape from the black cardstock paper. You will want to make sure you don’t cut any of the sides. Your rectangle frame can be as big or as small as you like. Make sure to keep the black cutout from the inside of the cardstock, for the steps at the end. Set aside.
- Now grab your green tissue paper. Cut/tear some small 1 inch squares. Set aside.
- Grab your clear contact paper. Cut out TWO pieces that are bigger than the black frame cutout you just made.
- Remove the backing from one piece of contact paper. Lay it on a flat, clean surface.
- Place the black frame cutout in the center of the contact paper.
- Next have children decorate the inside of their frame however they like with the green tissue paper. They will want to make sure the mosaic design fills ALL of the empty space up. You can also add glitter inside if desired.
- Once they are done decorating their piece. grab the second piece of contact paper.
- Peel off the backing and place it on top of the other piece of contact paper, moving your hand around to “squish” everything together.
- Use your scissors to trim out the frame/remove the excess contact paper.
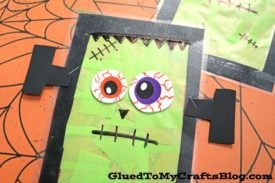
- Grab your black Sharpie marker and draw on facial embellishments to give the Frankenstein life. Add the eye stickers as well.
- Finally – remember that rectangle shape you cut out in the beginning? Cut out TWO bolts from it, for the side of Frankenstein’s head. Staple them to your finished piece.
- Now you are finished! Display your finished Stained Glass Frankenstein piece proudly on a window with washi tape for everyone to see!!!
RELATED —> Popsicle Stick Frankenstein

We are creepin’ in with TONS of new stuff on Glued To My Crafts! We can’t stop sharing – have you seen them all?!
CRUSH the boredom blues this spook-tacular holiday by checking out our Stained Glass Pumpkins, Halloween Beaker and Yarn Witch crafty posts! BOO-YAH – they are ALL amazing, so be sure to bookmark them as well! Not to mention, they would pair nicely with today’s Stained Glass Frankenstein tutorial – hint hint!

Stained Glass Frankenstein Craft Idea For Halloween
Create a spooky Stained Glass Frankenstein Head with this fun Halloween craft! Perfect for kids, using simple materials to spark creativity and festive fun.
Here’s your checklist of supplies to bring this craft to life:
- Cardstock Paper
- Tissue Paper
- Clear Contact Paper
- Embellishments
Prepare your creative haven by laying down a protective cover before the crafting magic begins!
Directions:
- First grab your craft scissors and ONE sheet of black cardstock paper.
- Fold/cut the black cardstock in half. You can either reserve the other half for another craft day or make TWO Frankenstein face pieces at once {or go big and skip this step all together!}
- Next trim out a rectangle frame shape from the black cardstock. You will want to make sure you don't cut any of the sides. Your rectangle frame can be as big or as small as you like. Make sure to keep the black cutout from the inside of the cardstock, for the steps at the end. Set aside.
- Now grab your green tissue paper. Cut/tear some small 1 inch squares. Set aside.
- Grab your clear contact paper. Cut out TWO pieces that are bigger than the black frame cutout you just made.
- Remove the backing from one piece of contact paper. Lay it on a flat, clean surface.
- Place the black frame cutout in the center of the contact paper.
- Next have children decorate the inside of their frame however they like with the green tissue paper. They will want to make sure the mosaic design fills ALL of the empty space up. You can also add glitter inside if desired.
- Once they are done decorating their piece. grab the second piece of contact paper.
- Peel off the backing and place it on top of the other piece of contact paper, moving your hand around to "squish" everything together.
- Use your scissors to trim out the frame/remove the excess contact paper.
- Grab your black Sharpie marker and draw on facial embellishments to give the Frankenstein life. Add the eye stickers as well.
- Finally - remember that rectangle shape you cut out in the beginning? Cut out TWO bolts from it, for the side of Frankenstein's head. Staple them to your finished piece.
- Now you are finished! Display proudly on a window with washi tape for everyone to see!!!

CLICK HERE TO PRINT THE DIRECTIONS FOR THIS CRAFT
If you've enjoyed our content or have any thoughts to share, we'd love to hear from you! Mention @gluedtomycrafts or tag #gluedtomycrafts on Instagram!