Get your little ones creative juices flowing with this fun and easy popsicle stick & yarn witch craft! Let their imaginations soar and see what spooky magic they can create.
Halloween is just around the corner, and what’s better than adding a sprinkle of spooky charm to your home with some easy and fun crafts?
If you’re looking for a Halloween DIY project that’s perfect for kids and adults alike, we’ve got a winner for you. This popsicle stick and yarn witch craft is not only budget-friendly but also a creative way to spend some quality time with your loved ones. By the end of this tutorial, you’ll have a cute witch decoration that’s perfect for hanging on walls, doors, or adding to your Halloween display.
Get ready to grab some popsicle sticks, yarn, and a bit of Halloween spirit! Here’s how to make your own yarn-wrapped witch.

Looking for a spook-tacular craft idea to keep your little ones busy? Get creative with this easy popsicle stick and yarn green witch craft! It’s sure to be a Halloween favorite!
Craft Supplies:
Before you begin, make sure you have the following supplies ready. Most of these are easily available at your local craft store or even online:
- Jumbo Popsicle Sticks – 3 per craft
- Green Craft Paint
- Paint Brush
- School Glue or Hot Glue Gun
- Craft Scissors
- Black Cardstock Paper
- Gray or Black Craft Yarn
- Washi Tape or Halloween Stickers
Directions:
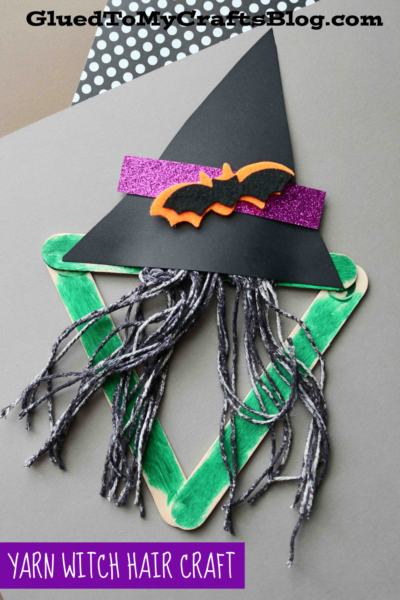
- Start with the witch’s head. Paint three popsicle sticks completely green.
- Once painted, glue the three popsicle sticks together to form a triangle. This will create the base for your witch craft. Allow it to dry for a few minutes before moving on.
- While the triangle dries, cut a small triangle from black cardstock to serve as the witch’s hat.
- Decorate the hat with washi tape, Halloween stickers, or any embellishments you like, then set it aside.
- Now, grab some yarn to make the witch’s hair. Cut several long strips, around 12 inches or longer. You can trim or adjust the length later to achieve your desired look.
- Attach the yarn to one side of the popsicle stick triangle by either tying or gluing it in place. Add as much hair as you’d like until the witch’s locks are full!
- Once the hair is secured, glue the cardstock hat onto the top of the triangle, covering where the yarn is tied or glued.
- Add any final embellishments, such as glitter, rhinestones, or extra details to make your witch truly magical.
- Let the craft dry completely before putting it on display. Enjoy your spooky creation!
Book Suggestions:
Here are some recommended books that beautifully complement our craft idea. You can conveniently purchase them through our affiliate links on Amazon.
- Room on the Broom by Julia Donaldson
- The Little Witch Who Lost Her Broom! by Elaine Bickell
- The Witch’s Cat and The Broomstick Blunder by Kirstie Watson
- Ten Flying Brooms by Ilanit Oliver
- How to Catch a Witch by Alice Walstead
- There’s a Witch in Your Book by Tom Fletcher
- It’s Raining Bats & Frogs by Rebecca Colby
RELATED —> Paper Plate Witch House

This popsicle stick and yarn witch craft is a fun, easy way to get into the Halloween spirit. Whether you’re crafting solo or with friends and family, these simple witches will bring a whimsical and spooky vibe to your holiday celebration.
With just a few materials and your creativity, you can transform plain popsicle sticks into magical Halloween decorations.
Want to keep the craft fun going? Get ready to be wowed with our popular Thumbprint Ghost Haunted House and Paint Splat Witch’s Magic Ball craft posts!
We also have a great FREE community YOU can join for even more crafty ideas this time of year! Join our private Facebook group and enjoy some old fashioned craft time with us!
