
We are conquering up another paint splat idea but this time it’s right in line with the upcoming Halloween season! Be sure to keep on scrolling to see our Paper Plate & Paint Splat Witch’s Magic Ball kid craft idea come to life!
Paint Splatter & Paper Plate Witch’s Magic Ball
It’s a playful handcrafted idea that is fun for the upcoming “spook-tacular” Halloween season! My goal is for YOU to really “sink your teeth” into this magical DIY witch craft idea!
So what are you waiting for?! If you haven’t given our popular “paint splat” technique a try, this is the craft idea to dive into! No two pieces will be alike and the fun & funky print design will be simply mystical for the holiday season! Every kid {and adult} can make their magic potion come to life, just how THEY like it! Super fun, right?
Now let’s be crafty together this Halloween season by checking out the full tutorial below!
Happy crafting, my friends! Don’t forget to share pictures of your paper plate witch’s magic ball creations on our Facebook page to admire when you are done!
RELATED —> Popsicle Stick Spell Book


Unleash your inner witch! Get creative with this paint splat magic ball craft and use all the colors of your imagination!
Craft Supplies:
- White Paper Plates – 1 per craft
- Green Tulip Puffy Paint
- Purple Tulip Puffy Paint
- Halloween Stickers
- Loose Craft Glitter
- Black Cardstock Paper
- Scissors
- Stapler
- Baby Wipes
Directions:
- Please make sure you have a good working area that can get dirty because paint will squeeze out of the sides of this craft!!!
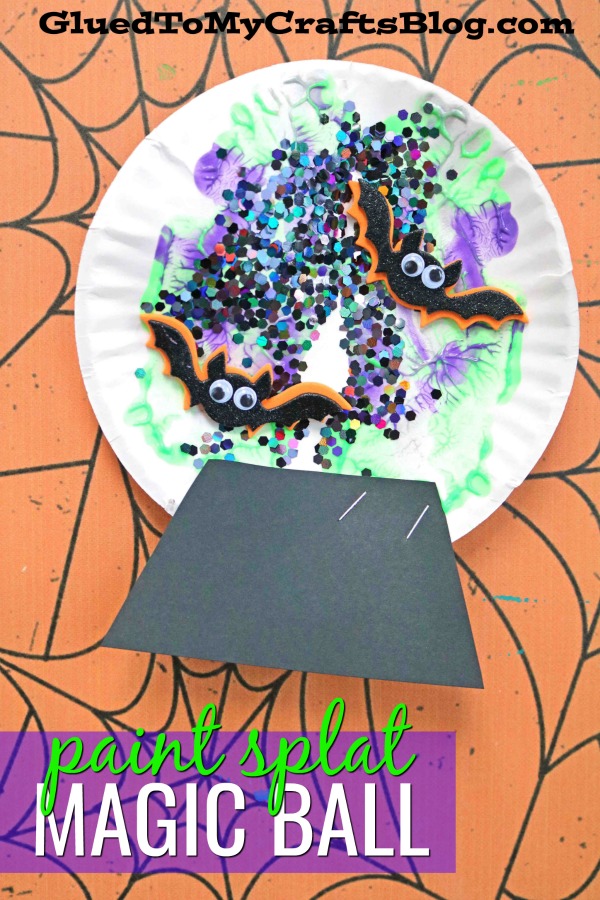
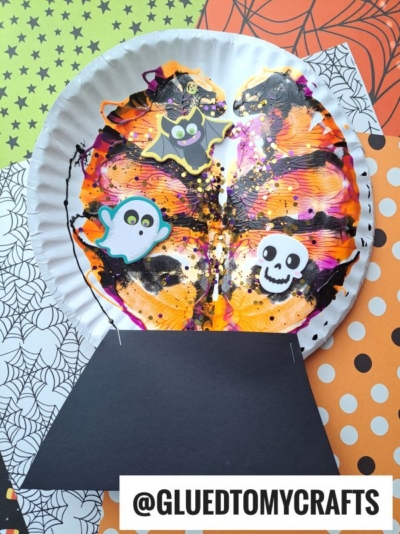
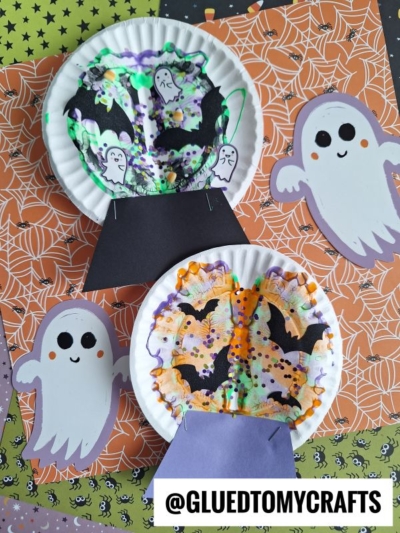
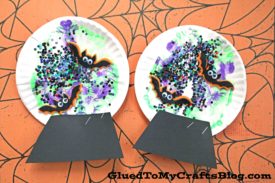
- First fold your paper plate in half {one per magic ball craft you want to make.}
- Unfold and squirt some green/purple paint on one side of the paper plate {I like the Tulip Puffy Paint for this particular step since it’s in a nice controlled squirt bottle} Be sure to keep the paint inside the paper plate and not place too much down.
- Once the paint is down, go ahead and fold/squish your paper plate together again. Be sure to rub your hand all over the folded piece, so the paint will cover your the inside nicely {paint WILL more than likely squeeze out the sides, so be sure to pay attention to that and clean up with baby wipes!}
- Now carefully unfold your piece to reveal your “marbled magic” design inside. Sprinkle some glitter/rhinestones on top of the wet paint if desired to create more texture.
- Grab your black cardstock. Cut out a piece that your magic ball will sit on. Imagine the bottom of a snow globe.
- Go ahead and staple that to the decorated paper plate piece.
- To finish the Paper Plate Halloween Snow Globe craft, add your Halloween themed stickers on top. Set aside to let it dry completely before displaying proudly.
RELATED —> Paper Plate Witch House
Be sure to also check out our Cotton Ball Ghost Cupcake post for another crafty idea that is great your fright-night fun!!
BTW – don’t forget to share pictures with us on your various social media sites using #gluedtomycrafts in the descriptions. We can’t wait to hear from YOU!
Paint Splat Witch's Magic Ball Craft Idea For Halloween
Here’s your checklist of supplies to bring this craft to life:
Prepare your creative haven by laying down a protective cover before the crafting magic begins!
Directions:
- Please make sure you have a good working area that can get dirty because paint will squeeze out of the sides of this craft!!!
- First fold your paper plate in half {one per magic ball craft you want to make.}
- Unfold and squirt some green/purple paint on one side of the paper plate. Be sure to keep the paint inside the paper plate and not place too much down.
- Once the paint is down, go ahead and fold/squish your paper plate together again. Be sure to rub your hand all over the folded piece, so the paint will cover your the inside nicely {paint WILL more than likely squeeze out the sides, so be sure to pay attention to that and clean up with baby wipes!}
- Now carefully unfold your piece to reveal your "marbled magic" design inside.
- Sprinkle some glitter/rhinestones on top of the wet paint if desired to create more texture.
- Grab your black cardstock. Cut out a piece that your magic ball will sit on. Just imagine the bottom of a snow globe.
- Go ahead and staple that to the decorated paper plate piece.
- To finish the Paper Plate Halloween Snow Globe craft, add your Halloween themed stickers on top.
- Set aside to let it dry completely before displaying proudly.

Grab our favorite books via our Amazon affiliate link! In our Amazon storefront you will find books, toys and craft supplies we absolutely love using for our Glued To My Crafts tutorials!
