Create a spooky Popsicle Stick Spell Book Craft this Halloween! Perfect for kids, using simple materials to inspire creativity and festive fun.

Halloween is just around the corner, and that means it’s time to start thinking about spooky crafts that are fun for kids and adults alike. If you’re looking for a simple yet striking DIY project to add a little magic to the season, we’ve got just the thing for you.
This popsicle stick spell book craft tutorial combines creativity and Halloween vibes perfectly. Whether you’re decorating your home, hosting a craft night, or looking for activities for your kids, this craft is guaranteed to charm everyone who sees it.
Get your glue guns ready—we’re about to create something spellbinding!
Mix and match your favorite materials, while brewing up a custom piece that will be simply fab-BOO-lous for any witch out there!
Craft Supplies:
Before jumping into the crafting process, make sure you have the following materials on hand:
- Jumbo Popsicle Sticks – 9 per craft
- Black Craft Paint
- Brown Craft Paint
- Foam Paint Brushes
- Small Paper Plate
- Hot Glue Gun
- Black Cardstock Paper
- White Cardstock Paper
- Scissors
- Plastic Centipede Party Favors
Directions:
Once you’ve gathered everything, it’s time to get creative!
- Start by gathering your materials: NINE jumbo popsicle sticks, craft paint, a paper plate, and paint brushes.
- Squeeze TWO paint colors onto the paper plate.
- Paint TWO of the jumbo popsicle sticks black, and the remaining SEVEN a dark brown. Set them aside to dry completely.
- Once the paint is dry to the touch, heat up your glue gun and get ready to assemble.
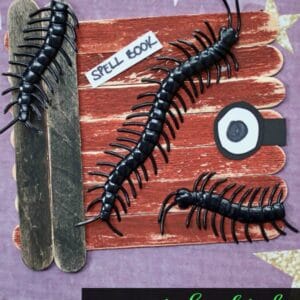
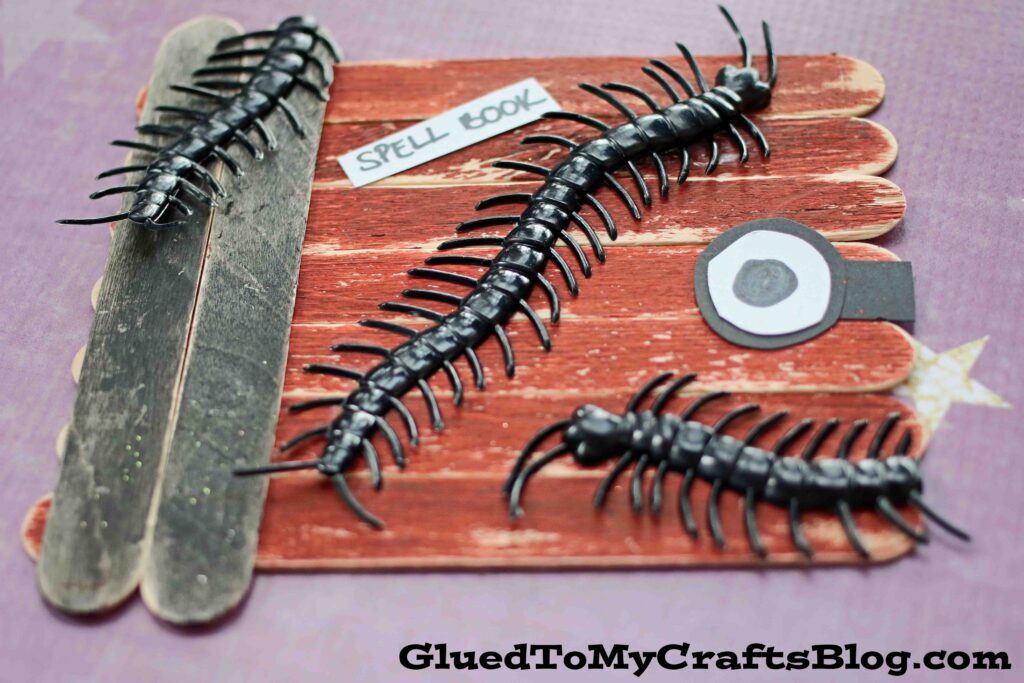
- Arrange the seven brown popsicle sticks side by side in a straight row.
- Take the two black-painted sticks and glue them across the top and bottom of the row, perpendicular to the others. These will act as the “binding” of your spell book.
- Now, it’s time to personalize! Grab your plastic bugs, colored cardstock, and scissors.
- Cut out paper embellishments like labels, wording, or a creepy eyeball clasp for added detail.
- Glue your paper decorations onto the popsicle stick book. Then, position and hot glue the plastic bugs wherever you like. You can even cut the bugs apart to make them resemble stitching or give them a spooky Halloween vibe.
- Finish your by adding any final touches you see fit. Let everything dry completely before displaying. Popsicle Stick Spell Book
- Showcase your masterpiece proudly for everyone to admire! And don’t forget to snap a picture and share it with us using #gluedtomycrafts on Facebook or Instagram.
RELATED —> Paper Plate Witch House

Our clever kids craft tutorials make it super easy to create a ghoulish and extra memorable Halloween!
Before you click away, be sure to check out our Thumbprint Spider, Popsicle Stick Eyeballs and Skeleton Friends kids craft posts!
Have something to say? Want to show off your creations? Join the conversation on our Facebook page. We love hearing from YOU!

Popsicle Stick Spell Book Craft Idea For Halloween
Create a spooky Popsicle Stick Spell Book Craft this Halloween! Perfect for kids, using simple materials to inspire creativity and festive fun.
Here’s your checklist of supplies to bring this craft to life:
- 9 Jumbo Popsicle Sticks
- Craft Paint brown and black
- Cardstock Paper
- Decorative Plastic Centipedes
- 1 Scissors
Prepare your creative haven by laying down a protective cover before the crafting magic begins!
Directions:
- Start by gathering your materials: NINE jumbo popsicle sticks, craft paint, a paper plate, and paint brushes.
- Squeeze TWO paint colors onto the paper plate.
- Paint TWO of the jumbo popsicle sticks black, and the remaining SEVEN a dark brown. Set them aside to dry completely.
- Once the paint is dry to the touch, heat up your glue gun and get ready to assemble.
- Arrange the seven brown popsicle sticks side by side in a straight row.
- Take the two black-painted sticks and glue them across the top and bottom of the row, perpendicular to the others. These will act as the "binding" of your spell book.
- Now, it’s time to personalize! Grab your plastic bugs, colored cardstock, and scissors.
- Cut out paper embellishments like labels, wording, or a creepy eyeball clasp for added detail.
- Glue your paper decorations onto the popsicle stick book. Then, position and hot glue the plastic bugs wherever you like. You can even cut the bugs apart to make them resemble stitching or give them a spooky Halloween vibe.
- Finish your by adding any final touches you see fit. Let everything dry completely before displaying. Popsicle Stick Spell Book
- Showcase your masterpiece proudly for everyone to admire! And don’t forget to snap a picture and share it with us using #gluedtomycrafts on Facebook or Instagram.

CLICK HERE TO PRINT THE DIRECTIONS FOR THIS CRAFT
If you've enjoyed our content or have any thoughts to share, we'd love to hear from you! Mention @gluedtomycrafts or tag #gluedtomycrafts on Instagram!