

Halloween is just around the corner, and it’s the perfect time to get crafty! If you’re looking for a fun, simple, and spooky project to do with your kids or friends, today’s unique “popsicle stick eyeball” craft idea is the way to go!
Not only are these eyeballs made from craft sticks easy to make, but they also add a creepy-cool touch to your Halloween decorations.
In this blog post, we’ll guide you through everything you need to know to create these ghoulishly delightful crafts. Get ready to have a spook-tacular time!

These creepy-cute eyeballs can be used in a variety of ways. Hang them around your home, incorporate them into a Halloween wreath, or use them as part of a larger spooky display. The possibilities are endless, making this craft a versatile addition to your Halloween festivities.
Craft Supplies:
Before you start, gather all the materials you’ll need. Here’s a handy list to get you started:
- Mini Popsicle Sticks
- School Glue
- White Craft Paint
- Foam Paint Brush
- Paper Plate
- Loose White Craft Glitter
- Red Elmer’s Glitter Glue
- Colored Cardstock Paper
- Paper Craft Scissors
- Large Craft Buttons
Having everything ready beforehand will make the crafting process smoother and more enjoyable. It’s also a good idea to lay down some newspaper or a crafting mat to protect your work surface. Once you have all your materials, you’re ready to get crafting!
Directions:
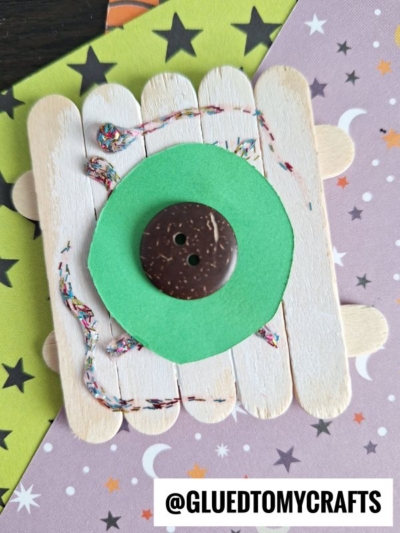
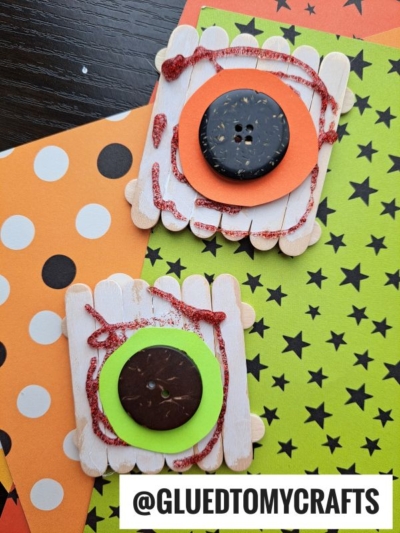
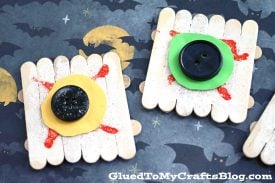
- Start by creating the base for your popsicle stick eyeball. Glue together EIGHT mini popsicle sticks: lay six sticks side by side, then glue two across the back to secure them, forming a “fence” shape.
- Let the glue dry completely before moving to the next step. Repeat this process for each eyeball you plan to make.
- Once dry, grab your white craft paint, a paper plate, and a paintbrush. Squeeze some paint onto the plate and coat your popsicle stick base entirely in white.
- While the paint is still wet, sprinkle white craft glitter on top to add sparkle. Shake off any excess glitter into the trash.
- Next, use red glitter glue to draw small squiggly “veins” over the painted surface to give it that eerie eyeball look.
- On cardstock paper, cut out a small circle to serve as the pupil of the eye. Place this circle onto the red glitter glue while it’s still wet.
- To finish, glue a large craft button in the center of the pupil to complete the look of your eyeball.
- Set your creation aside to dry completely before displaying it proudly.
- For added functionality, you can hot glue a magnet or a string to the back for easy hanging or displaying.
Your finished popsicle stick eyeball craft can be a standalone decoration or part of a larger Halloween setup. Consider pairing them with other DIY projects like painted pumpkins, spooky lanterns, or eerie garlands. The cohesive look will make your home feel fully decked out for the holiday!
RELATED —> Paint Splat Cauldron
At Glued To My Crafts we don’t exactly follow the traditional “Halloween” rules around here. We love the holiday but like to keep it #cutenotscary around here!
So on that note, come check out our super adorable Eyeball Flowers, Witch Potion Bottles, and Paper Plate Witch House craft posts to see what I’m talking about!

Popsicle Stick Eyeball Craft Idea For Halloween
Here’s your checklist of supplies to bring this craft to life:
- School Glue
- 1 Scissors
Prepare your creative haven by laying down a protective cover before the crafting magic begins!
Directions:
- Start by creating the base for your popsicle stick eyeball. Glue together EIGHT mini popsicle sticks: lay six sticks side by side, then glue two across the back to secure them, forming a "fence" shape.
- Let the glue dry completely before moving to the next step. Repeat this process for each eyeball you plan to make.
- Once dry, grab your white craft paint, a paper plate, and a paintbrush. Squeeze some paint onto the plate and coat your popsicle stick base entirely in white.
- While the paint is still wet, sprinkle white craft glitter on top to add sparkle. Shake off any excess glitter into the trash.
- Next, use red glitter glue to draw small squiggly "veins" over the painted surface to give it that eerie eyeball look.
- On cardstock paper, cut out a small circle to serve as the pupil of the eye. Place this circle onto the red glitter glue while it’s still wet.
- To finish, glue a large craft button in the center of the pupil to complete the look of your eyeball.
- Set your creation aside to dry completely before displaying it proudly.
- For added functionality, you can hot glue a magnet or a string to the back for easy hanging or displaying.

CLICK HERE TO PRINT THE DIRECTIONS FOR THIS CRAFT