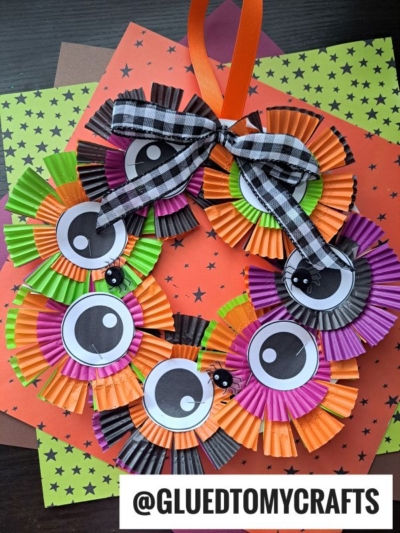
Paper plates and cupcake liners can be easily transformed into a fun Halloween wreath craft for the kids this spook-taular season!

Paper plates and cupcake liners can be easily transformed into a fun Halloween wreath craft for the kids this spook-taular season!

Are you looking for a unique Halloween craft to do with your child AND spook up your home with a handmade decoration at the same time? Look no further! Our latest and greatest creepy paper plate and cupcake liner wreath will be the perfect addition to your décor!
Not only is this an easy project for kids, but it also uses affordable supplies- all of which you may already have lying around at home! Best of all, it’s super fun and looks amazing when completed; sure to draw attention from trick or treaters come October 31st.

Let’s get started on creating our own spooky Halloween paper plate wreath!
Craft Supplies:
- Large Paper Plate – 1 per craft
- White Cardstock Paper
- Eyeball Printable – on our landing page
- LARGE Cupcake Liners {green, purple, orange and black}
- MINI Cupcake Liners {green, purple, orange and black}
- Craft Scissors
- Stapler
- Craft Ribbon
- Small Halloween Stickers
Directions:
- First things first – cut out the center of your paper plate, leaving a simple ring shape for the wreath.
- Discard the center of the paper plate.
- Now for the eyeballs in the craft – go ahead and print out our provided eyeball shape printable on a single sheet of white cardstock paper.
- Trim out each eyeball design from the printable.
- Next up, start laying and planning out how many AND where you want each cutout to be on your paper plate wreath shape.
- Set them aside for now.
- Now grab your large and mini cupcake liners, stapler and scissors.
- For each “Halloween flower” on the wreath, you are going to want TWO large cupcake liners and ONE mini cupcake liner. You will want to change up the colors for each piece on the wreath so be sure to plan those out as well.
- Flatten each set out with your hands and stack them on top of each other.
- Use the stapler to secure them together in the center.
- Go ahead and also staple in ONE eyeball cutout to make it look like a flower.
- Next use the scissors to cut a simple fringe around the edge.
- Use your fingers to “fluff” it up and give it even more of the appearance of a flower.
- Now use your stapler again to staple the flower piece, in place, on the paper plate rim.
- Repeat for each “flower” on the wreath.
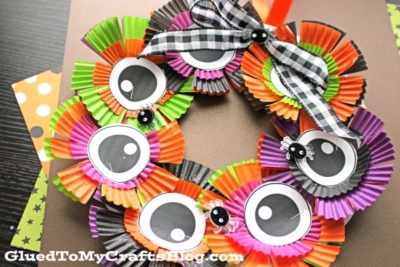
- Once the plate is completely covered and there are no blank spaces on the paper plate, staple on a ribbon “bow” to the bottom or top of the wreath to complete the creepy wreath craft.
- At this point in time you can also add some Halloween stickers all over and a smaller piece of ribbon to the back of it, for easy hanging.
- Then display your beautiful Halloween eyeball wreath in your home or on the front door proudly for ALL to see!
RELATED —> Paper Plate Skull
Why let the crafty fun stop here?! Be sure to also check out our Paper Plate Haunted Pumpkin craft post and pair it with today’s post for double the fun today!
Make sure you FOLLOW US ON FACEBOOK so you never miss a new tutorial from us!

Creepy Cupcake Liner Halloween Wreath Craft For Kids
Paper plates and cupcake liners can be easily transformed into a fun Halloween wreath craft for the kids this spook-taular season!
Here’s your checklist of supplies to bring this craft to life:
Prepare your creative haven by laying down a protective cover before the crafting magic begins!
Directions:
- First things first - cut out the center of your paper plate, leaving a simple ring shape for the wreath.
- Discard the center of the paper plate.
- Now for the eyeballs in the craft - go ahead and print out our provided eyeball shape printable on a single sheet of white cardstock paper.
- Trim out each eyeball design from the printable.
- Next up, start laying and planning out how many AND where you want each cutout to be on your paper plate wreath shape.
- Set them aside for now.
- Now grab your large and mini cupcake liners, stapler and scissors.
- For each "Halloween flower" on the wreath, you are going to want TWO large cupcake liners and ONE mini cupcake liner. You will want to change up the colors for each piece on the wreath so be sure to plan those out as well.
- Flatten each set out with your hands and stack them on top of each other.
- Use the stapler to secure them together in the center.
- Go ahead and also staple in ONE eyeball cutout to make it look like a flower.
- Next use the scissors to cut a simple fringe around the edge.
- Use your fingers to "fluff" it up and give it even more of the appearance of a flower.
- Now use your stapler again to staple the flower piece, in place, on the paper plate rim.
- Repeat for each "flower" on the wreath.
- Once the plate is completely covered and there are no blank spaces on the paper plate, staple on a ribbon "bow" to the bottom or top of the wreath to complete the creepy wreath craft.
- At this point in time you can also add some Halloween stickers all over and a smaller piece of ribbon to the back of it, for easy hanging.
- Then display your beautiful Halloween eyeball wreath in your home or on the front door proudly for ALL to see!


NEED MORE HELP DOWNLOADING OUR FREE PRINTABLES? PLEASE REFER TO OUR FAQ PAGE
If you've enjoyed our content or have any thoughts to share, we'd love to hear from you! Mention @gluedtomycrafts or tag #gluedtomycrafts on Instagram!