
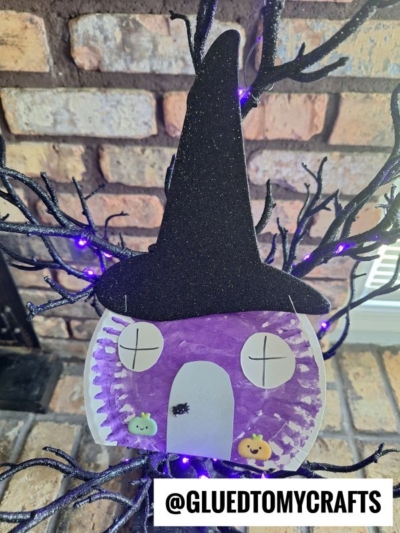
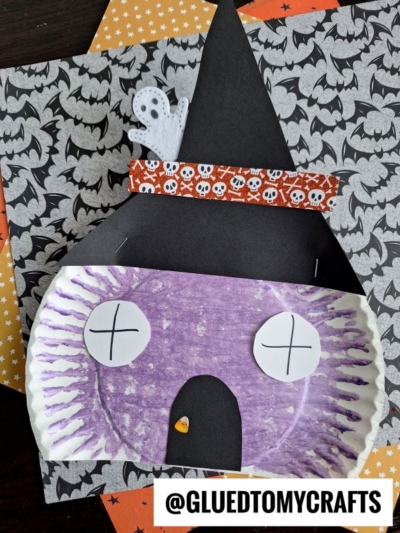
A little hocus-pocus and craftiness will conjure up this adorable Paper Plate Witch House craft idea and it only takes a few minutes!
We have the full how-to for you today and I hope you are inspired to recreate it with your child as well!

Witch House Craft Made From A Paper Plate
Kick off your spook-tacular celebrations with our Halloween kids craft tutorial today! Our latest craft from Glued To My Crafts is WICKEDLY EASY and inexpensive too! All you need is some small paper plates, a few foam witch hat cutouts from Michaels and a little creativity when it comes to the embellishments!
On that note, I always strive to keep it simple and versatile when it comes to our craft tutorials. If by chance you can’t grab the same craft foam witch hats I used, no worries because you can substitute it out and hand-cut your own from cardstock paper. I just hope my design and pictures inspire you to run with the idea & make it work with what you have already on hand!
With complete customization at your fingertips, I don’t want to bore you with any more details from me. You can find the full how-to and a few tips on getting started below. And oh – the ghost stickers were from Dollar Tree!
Happy crafting and please don’t forget to share pictures of your “scary-good” paper plate witch houses you “brew up!” It seriously makes my day to see those pictures {and keeps me going on sharing the creativity with my lovely readers!} You can always find us on Facebook or use our special branded blog hashtag #gluedtomycrafts for us to see!
RELATED —> Paper Plate Witch Legs

Craft Supplies:
- Small Paper Plates – 1 per craft
- Scissors
- Craft Paint
- Paint Brush
- Craft Foam Witch Hats
- Cardstock Paper
- Markers, Crayons or Colored Pencils
- School Glue or Glue Stick
- Stapler
- optional – Halloween stickers
RELATED —> Handprint Witch Keepsake


Directions:
- First things first – cut off a small section of your paper plate to make the bottom of the witch house be flat.
- Discard the small piece you just cut off.
- Now paint the remaining paper plate piece however you want.
- When done painting, go ahead and set it aside a bit to allow it to dry.
- Next grab all your colored cardstock and scissors.
- Cut out a small chimney, door, windows etc. – anything you think your witch might like on her house.
- Decorate those pieces with markers, crayons, stickers etc.
- Now it’s time to start assembling your paper plate witch house.
- Go ahead and glue/staple all your paper embellishments in place on the paper plate. The biggest piece and where I suggest you start is stapling the craft foam hat to the “roof” of the painted paper plate.
- Now add anything else you like for that custom look {like some Halloween themed stickers or glitter!} before displaying proudly!
- And that’s it! Admire your hard work because YOU did a great job! Go ahead and snap a few pictures & share them with us! #gluedtomycrafts
Book Suggestions:
Here are some recommended books that beautifully complement our craft idea. You can conveniently purchase them through our affiliate links on Amazon.
- Room on the Broom by Julia Donaldson
- The Little Witch Who Lost Her Broom! by Elaine Bickell
- The Witch’s Cat and The Broomstick Blunder by Kirstie Watson
- Ten Flying Brooms by Ilanit Oliver
- How to Catch a Witch by Alice Walstead
- There’s a Witch in Your Book by Tom Fletcher
- It’s Raining Bats & Frogs by Rebecca Colby
RELATED —> Paper Plate Witch Cauldron
Come get extra crafty with us this spook season! Come check out the super popular Skeleton Friends, Black Cat On Tree Branch, and Paint Splat Witch Face craft tutorials, right now on the Glued To My Crafts website!
We always LOVE talking crafts with our lovely readers! Come join our private Facebook group where we chit chat, share and laugh together! Everyone is welcomed so come join the fun!!! #gluedtomycrafts

Paper Plate Witch House Craft Idea
Here’s your checklist of supplies to bring this craft to life:
- 1 Small Paper Plate
- Craft Paint
- Cardstock Paper
- 1 Craft Foam Witch Hat
Prepare your creative haven by laying down a protective cover before the crafting magic begins!
Directions:
- First things first - cut off a small section of your paper plate to make the bottom of the witch house be flat.
- Discard the small piece you just cut off.
- Now paint the remaining paper plate piece however you want.
- When done painting, go ahead and set it aside a bit to allow it to dry.
- Next grab all your colored cardstock and scissors.
- Cut out a small chimney, door, windows etc - anything you think your witch might like on her house.
- Decorate those pieces with markers, crayons, stickers etc.
- Now it's time to start assembling your paper plate witch house.
- Go ahead and glue/staple all your paper embellishments in place on the paper plate. The biggest piece and where I suggest you start is stapling the craft foam hat to the "roof" of the painted paper plate.
- Now add anything else you like for that custom look {like some Halloween themed stickers or glitter!} before displaying proudly!


Grab our favorite books via our Amazon affiliate link! In our Amazon storefront you will find books, toys and craft supplies we absolutely love using for our Glued To My Crafts tutorials!