Spice up Halloween with a creative and fun craft idea! Let the kids unleash their inner witch by making this paint splat witch face craft that is sure to be a hit.

Halloween is FAST approaching, so I want YOU to check out our tutorial and create your own Paint Splat Witch Face pieces with your child today! It’s BEWITCHING fun that is super easy to recreate!!! It’s our favorite “paint splatter” technique incorporated into Halloween craft time!!!

Halloween is the perfect time to get creative with crafts, and this Paint Splat Witch Face is a frightfully fun activity that’s simple to make! It’s messy in the best way and results in a unique piece of Halloween art every time.
Whether you’re looking for a DIY decoration or a classroom activity that kids will love, this craft will add a touch of spooky magic to the season.
So on that note, grab your paints and brushes – here’s how to create your own witchy masterpiece!


Get creative this Halloween with a paint splat witch face craft. Fun and easy project for kids using vibrant paint!
Craft Supplies:
- White Cardstock Paper
- Black Cardstock Paper
- Purple Cardstock Paper
- Green Tulip Puffy Paint
- Black Tulip Puffy Paint
- Extra Large Googly Eyes
- School Glue
Directions:
- First things first – lay down some newspaper or a plastic table cover to protect surfaces. This craft can get a little messy!
- Place a white sheet of cardstock paper in front of your little crafter.
- Direct them to fold their white paper in half horizontally. Ask them to open it back up.
- Now help them place a few drops or small blobs of green paint onto one side of the white paper. This will become the witch’s face.
- Instruct them to re-fold the white paper in half horizontally again, sandwiching the paint inside. They will want to gently caress the paper and spread the paint toward the edges. Don’t worry if it looks messy – that’s part of the fun!
- Next up – help them carefully unfold the paper to reveal their abstract splat witch face shape.
- Now for the fun part! While the paint is drying, ask them to take the black cardstock paper and cut out a large triangular piece for the witch’s hat.
- They will use the purple cardstock paper to create a few thin strips for the witch’s hair.
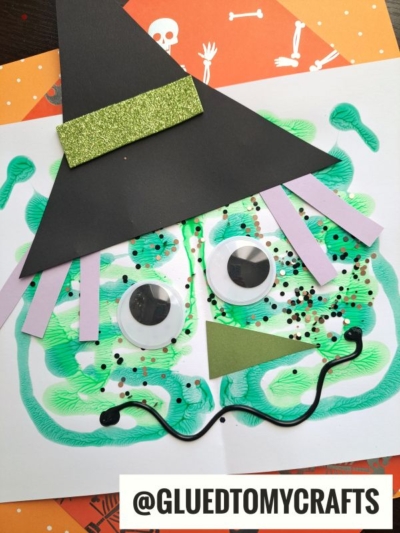
- Once the paint is dry, it’s time to go on the paper pieces and attach a pair of googly eyes to the green paint splat face.
- Use the black paint to draw on a giant smile for the witch.
- At this point in time kids can add any other embellishments they see fit, before displaying it proudly for all to see!
RELATED —> Stained Glass Cauldron

This Paint Splat Witch Face craft is not just fun – it’s an activity full of sensory experiences and creativity. Kids will love getting messy while exploring colors and patterns. Plus, every witch design turns out unique, just like a snowflake but much spookier!
Whether at home, a Halloween party, or in the classroom, these paint splat witches are guaranteed to bring laughs, chills, and lots of Halloween spirit. Happy crafting!

Paint Splat Witch Face Craft Idea For Halloween
Spice up Halloween with a creative and fun craft idea! Let the kids unleash their inner witch by making this paint splat witch face craft that is sure to be a hit.
Here’s your checklist of supplies to bring this craft to life:
- Cardstock Paper white, black, purple and green
- Tulip Puffy Paint green and black
- 2 Wiggle Eyes
- Loose Craft Glitter
Prepare your creative haven by laying down a protective cover before the crafting magic begins!
Directions:
- First things first - lay down some newspaper or a plastic table cover to protect surfaces. This craft can get a little messy!
- Place a white sheet of cardstock paper in front of your little crafter.
- Direct them to fold their white paper in half horizontally. Ask them to open it back up.
- Now help them place a few drops or small blobs of green paint onto one side of the white paper. This will become the witch’s face.
- Instruct them to re-fold the white paper in half horizontally again, sandwiching the paint inside. They will want to gently caress the paper and spread the paint toward the edges. Don't worry if it looks messy - that's part of the fun!
- Next up - help them carefully unfold the paper to reveal their abstract splat witch face shape.
- Now for the fun part! While the paint is drying, ask them to take the black cardstock paper and cut out a large triangular piece for the witch’s hat.
- They will use the purple cardstock paper to create a few thin strips for the witch's hair.
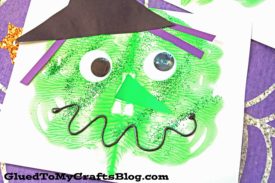
- Once the paint is dry, it's time to go on the paper pieces and attach a pair of googly eyes to the green paint splat face.
- Use the black paint to draw on a giant smile for the witch.
- At this point in time kids can add any other embellishments they see fit, before displaying it proudly for all to see!

Grab our favorite books via our Amazon affiliate link! In our Amazon storefront you will find books, toys and craft supplies we absolutely love using for our Glued To My Crafts tutorials!
If you've enjoyed our content or have any thoughts to share, we'd love to hear from you! Mention @gluedtomycrafts or tag #gluedtomycrafts on Instagram!