Nothing starts off the Halloween season quite like an adorable witch craft!

Nothing starts off the Halloween season quite like an adorable witch! So keep scrolling to see all the easy details on this Popsicle Stick Green Witch craft tutorial and get in the Halloween spirit with us!

Are you looking for a fun and creative craft that requires minimal supplies and can be used to decorate your home? Look no further; this simple popsicle stick witch craft is perfect for adults, children, or the whole family!
Not only is this project easy and affordable — it results in a festive decoration that’ll add some spooky flair to your Halloween season.
Join us as we walk through each step of how to make these adorable little witches with just a few simple household materials so you can have them hunched over cauldrons of candy by October 31st.
Now don’t delay! Find all the details in the step-by-step tutorial below. Happy crafting, my friends! Be sure to share pictures of your finished popsicle stick witch puppets on our Facebook page! #gluedtomycrafts
Get spooky this Halloween with this easy-to-create witch craft idea! No magic necessary – just some creativity and a few supplies!
Craft Supplies:
- Jumbo Wood Craft Sticks – 3 per craft
- Black Craft Paint
- Black Cardstock Paper
- Colored Cardstock Paper
- Scrapbook Paper
- Scissors
- School Glue
- Sharpie Markers
Directions:
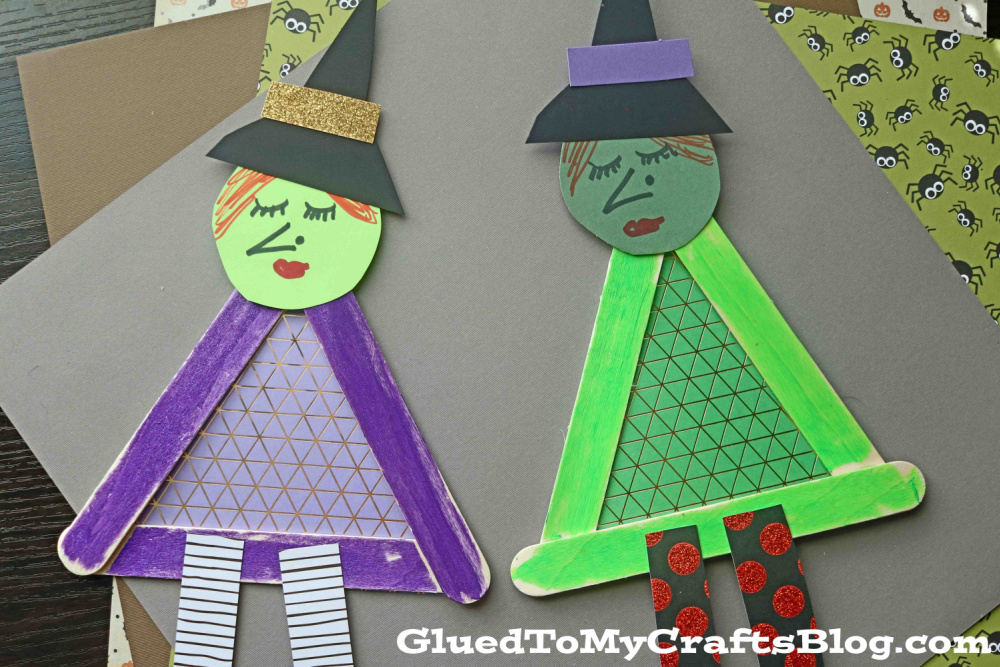
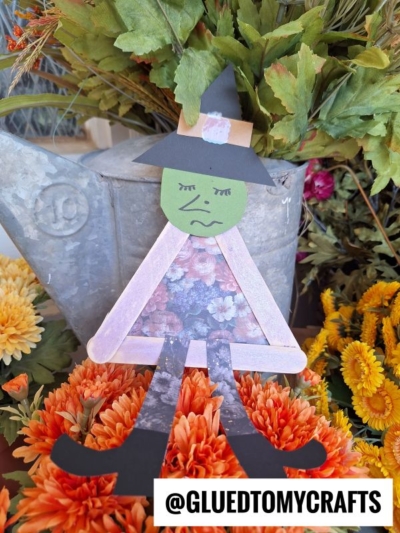
- First grab three craft sticks {three per witch} and glue them together to look like a triangle.
- Set aside to let it dry completely.
- Repeat for each witch craft you want to make.
- Once the popsicle stick shape is dry, go ahead and paint it.
- Set aside.
- While that is drying, grab some cardstock and/or scrapbook paper and cut a triangle that will fit inside the craft stick design. This will complete the witch’s body.
- With another sheet of paper, trim out a witch hat, head, legs, boots etc. to really pull the witch to life.
- To finish off this Popsicle Stick Halloween Witch craft, have children glue their paper pieces in place on the craft stick shape and top off with any other embellishments they see fit {like glitter glue!}
- Be sure to also draw on some eyes as well as drawing on a point nose and smile with a marker to complete the witch’s face.
- Once done, set aside to let it dry completely before displaying your own witch proudly!
- Don’t forget to share pictures with us on your various social media sites! #gluedtomycrafts
RELATED —> Paper Plate Witch House
Looking for more crafty ideas to add to your Halloween activities this year? Then be sure to also check out our popular Paper Plate Witch, Popsicle Stick Pumpkin and Yarn Witch tutorial, for even MORE fun DIYs to make with your child this month!

Popsicle Stick Witch Craft Idea For Halloween
Nothing starts off the Halloween season quite like an adorable witch craft!
Here’s your checklist of supplies to bring this craft to life:
Prepare your creative haven by laying down a protective cover before the crafting magic begins!
Directions:
- First grab three craft sticks {three per witch} and glue them together to look like a triangle.
- Set aside to let it dry completely.
- Repeat for each witch craft you want to make.
- Once the popsicle stick shape is dry, go ahead and paint it.
- Set aside.
- While that is drying, grab some cardstock and/or scrapbook paper and cut a triangle that will fit inside the craft stick design. This will complete the witch's body.
- With another sheet of paper, trim out a head, legs, boots etc. to really pull the witch to life.
- To finish off this Popsicle Stick Halloween Witch craft, have children glue their paper pieces in place on the craft stick shape and top off with any other embellishments they see fit {like glitter glue!}
- Be sure to also draw on some eyes as well as drawing on a point nose and smile with a marker.
- Once done, set aside to let it dry completely before displaying proudly!


Grab our favorite books via our Amazon affiliate link! In our Amazon storefront you will find books, toys and craft supplies we absolutely love using for our Glued To My Crafts tutorials!
If you've enjoyed our content or have any thoughts to share, we'd love to hear from you! Mention @gluedtomycrafts or tag #gluedtomycrafts on Instagram!