These one-of-a-kind orange pumpkins are easy to whip up and are perfect for children of ALL ages. Plus the customization part is pretty much endless!

Create fun Popsicle Stick Pumpkins this fall. This easy kid craft is perfect for children of all ages and endless customization!

If you are looking for some inspiration and a fun kid craft idea to keep the little ones busy this fall, look no further because today’s Popsicle Stick Pumpkin craft tutorial is as EASY as it gets! It’s got low prep time and will work for a wide range of ages!
These one-of-a-kind pumpkins are easy to whip up and are perfect for children to recreate. Plus the customization part is pretty much endless! You could even add some black cutouts to make jack-o-lanterns for Halloween!
So enough chit chat – let’s gather up some craft supplies, check out the full craft tutorial below and let your child’s creative side shine this autumn season!
Happy crafting, my friends! May all your pumpkins be plump! Don’t forget to share pictures of your craft stick pumpkins with us on our Facebook page! #gluedtomycrafts

Get creative this fall and turn some simple popsicle sticks into your own pumpkin masterpiece!
Craft Supplies:
- Jumbo Popsicle Sticks – 9 per craft
- School Glue
- Orange Craft Paint
- Brown Craft Paint
- Paint Brushes
- Paper Scissors
- Brown Cardstock Paper
- Decorative Plastic Leaf
Directions:
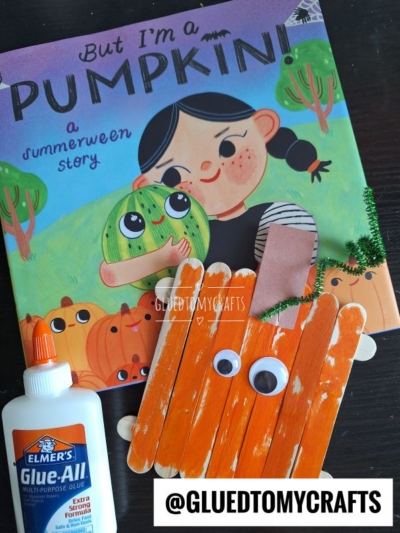
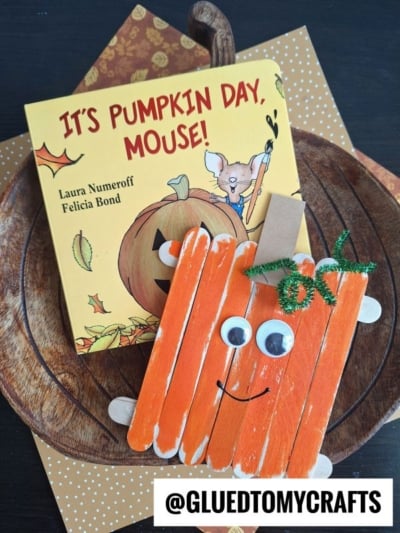
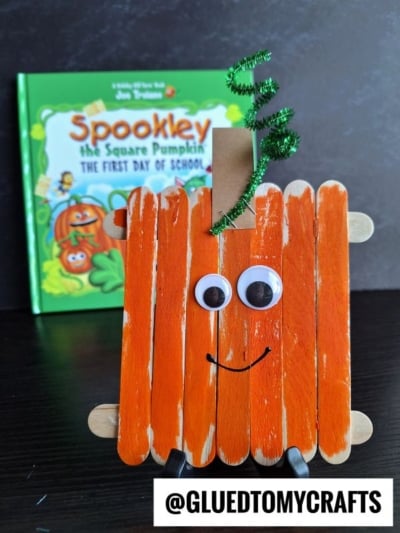
- First you will want to assemble the base of your pumpkins. For each pumpkin, simply glue seven jumbo popsicle sticks together to look like a fence {seven laid next to each other with two across}
- Set aside to let it dry completely.
- Repeat for each pumpkin you want to make.
- Now you are ready for the paint! Squirt the orange and brown craft paint on the paper plate.
- Have children take their orange craft paint and paint the front of the popsicle stick fence completely orange.
- Have them also add a few lines of brown for some dimension.
- To finish off the Popsicle Stick Pumpkins – cut out a pumpkin stem from the brown and glue it to the top.
- Follow that up with a decorate green leaf for the stem.
- Then set it all aside to let it dry completely before displaying proudly.
- Don’t forget to snap a few pictures to share with us on your social media sites! #gluedtomycrafts
Make It Your Own: if desired, you can add some Jack-O-Lantern features to the front or let kids add other embellishments like glitter, rhinestones, feathers etc. to really give it a customized look!
For Displaying: the finished pieces stand pretty nice when leaned against something but you can also add some ribbon to the back to hang it OR add magnets so you can display them on the fridge!
Keep the crafty fun going: Paper Plate Pumpkin

From simple no-prep crafts that only take a few minutes to make, to more engaging craft tutorials – at Glued To My Crafts we have you covered!
Be sure to also check out our Yarn Pumpkin, Black Cat In Pumpkin and Pumpkin Pie Slice kid craft ideas for more fun “fall” themed DIYs to recreate today!
All of which would pair nicely with today’s popsicle stick pumpkin craft idea – hint hint! #gluedtomycrafts

Popsicle Stick Pumpkin Craft Idea
These one-of-a-kind orange pumpkins are easy to whip up and are perfect for children of ALL ages. Plus the customization part is pretty much endless!
Here’s your checklist of supplies to bring this craft to life:
- 9 Jumbo Popsicle Sticks
- Craft Paint orange and brown
- Cardstock Paper brown
- Decorative Plastic Leaves
Prepare your creative haven by laying down a protective cover before the crafting magic begins!
Directions:
- First you will want to assemble the base of your pumpkins. For each pumpkin, simply glue seven jumbo popsicle sticks together to look like a fence {seven laid next to each other with two across}
- Set aside to let it dry completely. Repeat for each pumpkin you want to make.
- Now you are ready for the paint! Have children take their orange craft paint and paint the front of the popsicle stick fence completely orange. Have them also add a few lines of brown for some dimension.
- To finish off the Popsicle Stick Pumpkins - cut out a pumpkin stem from the brown and glue it to the top. Follow that up with a decorate green leaf for the stem.
- Then set it all aside to let it dry completely before displaying proudly.


Grab our favorite books via our Amazon affiliate link! In our Amazon storefront you will find books, toys and craft supplies we absolutely love using for our Glued To My Crafts tutorials!
If you've enjoyed our content or have any thoughts to share, we'd love to hear from you! Mention @gluedtomycrafts or tag #gluedtomycrafts on Instagram!