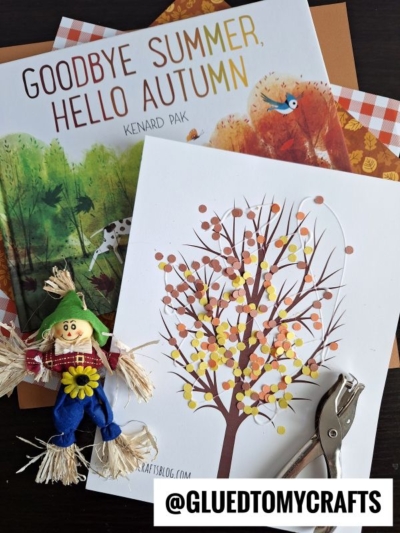
With our Paper Punch Confetti Fall Tree tutorial you are going to make a beautiful fall masterpiece that is pretty enough to frame!

Discover how to make a stunning fall tree craft using paper punch confetti. Perfect for kids and adults alike, this easy DIY project brings autumn colors to life!

Autumn is a season filled with vibrant colors, cooler weather, and a chance for creative projects that celebrate nature’s beauty. Crafting is one of the best ways to engage both children and adults in the spirit of the season.
Today, we’re exploring a fun and easy project that brings the magic of fall right into your home—a Paper Punch Confetti Fall Tree Craft.
In this blog post, we’ll guide you step-by-step through creating a stunning fall tree using paper punch confetti. Whether you’re looking for a fun activity for your kids or a relaxing way to spend an afternoon, this craft is perfect. We tell you the materials needed, how to create the confetti, and of course – how to assemble your masterpiece. Let’s get started!

Get creative and bond with your little one this fall season, with this easy-to-follow craft idea that uses paper punches to create a festive tree!
Craft Supplies:
Before we jump into the crafting process, let’s gather the materials. Here’s what you’ll need:
- Blank Tree Printable – on our landing page
- White Cardstock Paper
- Various Sheets Cardstock Paper
- Single Hole Punch
- Small Bowl or Dish
- Elmer’s School Glue or Glue Stick
Directions:
A clean and organized workspace sets the stage for a successful crafting session. Find a flat surface where you can spread out your materials.
- First things first – grab our free “blank tree branch” printable that is listed above in the supply list.
- Print it out through your home printer on a single sheet of white cardstock paper. You only need one print per craft. Print as many as you like but only use this file for personal use please!
- Now grab your various sheets of colored paper and the single hole punch.
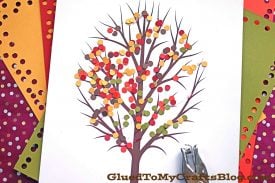
- Go ahead and hole punch a good amount of “circles” that will later be your leaves. You will need a lot of paper punches, so go to town on this step! A good tip is to do the hole punching over a small bowl, to keep the paper circles contained till you need them.
- Next up, grab your school glue and make several squiggles & lines of glue ALL over the tree branches in the printable.
- Now, working pretty fast, you are going to want to sprinkle, dump and rub your paper hole punches ALL over the glue, to make “leaves” in the tree. Keep adding more glue and paper circles until you have the look you like.
- Shake off excess pieces and set aside to let it dry completely.
- Then display proudly your colorful paper confetti fall tree piece for all to see!
- Don’t forget to snap a few pictures to share with us!
RELATED —> Paper Indian Corn Craft
Learn how to easily transform ordinary paper into beautiful masterpieces, with the help of Glued To My Crafts! We strive to make it easy JUST FOR YOU!
So on that note, we also have our Paper Plate Latte Cups, Thankful Tree and Scarecrow Puppet craft posts for you to check out today!
We also LOVE seeing those pictures, so be sure to use our special branded hashtag #gluedtomycrafts on your various social media sites for us to see {and share with our readers!}

Paper Punch Confetti Fall Tree Craft
With our Paper Punch Confetti Fall Tree tutorial you are going to make a beautiful fall masterpiece that is pretty enough to frame!
Here’s your checklist of supplies to bring this craft to life:
- 1 Small Bowl or Dish
Prepare your creative haven by laying down a protective cover before the crafting magic begins!
Directions:
- First grab your various sheets of colored paper and the single hole punch.
- Go ahead and hole punch a good amount of "circles" that will later be your leaves. You will need a lot of paper punches, so go to town on this step! A good tip is to do the hole punching over a small bowl, to keep the paper circles contained till you need them.
- Next up, grab your school glue and make several squiggles & lines of glue ALL over the tree branches in the printed tree branch printable.
- Now, working pretty fast, you are going to want to sprinkle, dump and rub your paper hole punches ALL over the glue, to make "leaves" in the tree. Keep adding more glue and paper circles until you have the look you like.
- Shake off excess pieces and set aside to let it dry completely.
- Then display proudly your colorful paper confetti fall tree piece for all to see!


NEED MORE HELP DOWNLOADING OUR FREE PRINTABLES? PLEASE REFER TO OUR FAQ PAGE
If you've enjoyed our content or have any thoughts to share, we'd love to hear from you! Mention @gluedtomycrafts or tag #gluedtomycrafts on Instagram!