Pumpkins and owls – it seems like a match made in heaven. Especially for Glued To My Crafts!
Keep scrolling to see how I recently made this Paper Plate Pumpkin Owl kid craft idea so you can recreate it with your child this fall!

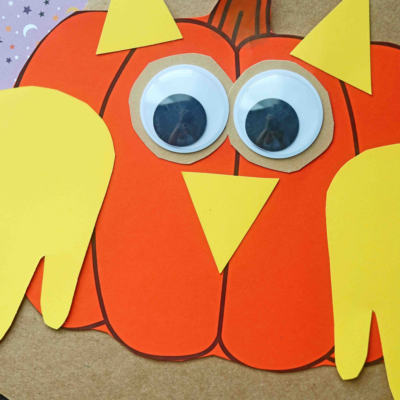
Orange Pumpkin Owl Craft Made From Paper
If you are looking for a clever craft idea for your Fall AND Halloween celebrations, you are going to LOVE today’s Paper Pumpkin Owl craft tutorial!
Not only is this paper pumpkin art project a great way to get crafty this afternoon – but it’s also really fun, completely customizable and great for children of ALL ages! Even adults will think it’s a HOOT to make their own pumpkin owl from cardstock paper!
So stop “hooting” around – let’s grab those supplies and get to work making this “owl-tastic” craft today! Happy crafting my friends! Don’t forget to share pictures of your pumpkin owl made out of paper, on our Facebook page, for us to see! #gluedtomycrafts
RELATED —> Pumpkin Monster and Paper Sleeping Owl

Keep the kids busy and create something magical! Get crafting with this adorable Paper Pumpkin Owl for a fun activity the whole family can enjoy.
Craft Supplies:
- PUMPKIN PRINTABLE – on our landing page
- Cardstock Paper
- Pencil or Pen
- Craft Scissors
- Glue Stick or Stapler
- Extra Large Wiggle Eyes
- optional materials – coloring materials
RELATED —> “J” is Jack-O-Lantern
Directions:
- First things first, grab the free “pumpkin” file {listed above in the supply list} and print it out on your choice of colored cardstock paper.
- If printing the pumpkin design on plain white cardstock paper, you will want to go ahead and color it in with coloring utensils. If you are printing it on orange cardstock paper, you can skip this step.
- Anyways – trim out the pumpkin piece and discard excess paper.
- Now grab your yellow colored cardstock paper and trace both of your child’s hands {one at a time, in separate locations} on the paper.
- When done tracing, trim them both out. This will be the “wings” for the owl.
- Finally – cut out the remaining owl features from the leftover yellow and kraft colored cardstock paper {like triangle ears and a beak!}
- Now it’s time to start assembling! Grab your choice of adhesive and all the paper cutouts.
- To finish off your paper owl pumpkin keepsake, start off by gluing the two handprint cutouts {his wings} on each side of the pumpkin cutout. Follow that up gluing on his facial features, along with the wiggle eyes.
- Now you can stop here or add any other embellishments you see fit, to give it your little owl friend his own personal spin!
- Then display your handprint fall owl paper piece proudly for ALL to see!!
- Don’t forget to snap a few pictures of your finished paper pumpkin owl on your phone and tag us on your social media sites! #gluedtomycrafts
RELATED —> Owl Always Love You Keepsake
Are you looking for more fun and super simple fall kid craft tutorials from us?
Then be sure to check out these past posts, from Glued To My Crafts listed below, for even more inspiration!
Then pair them with today’s paper plate pumpkin owl craft for a fun crafter-noon indoors!
Paper Plate Pumpkin Spice Latte Cups
Pumpkin Jack-O-Lantern Teddy Bear

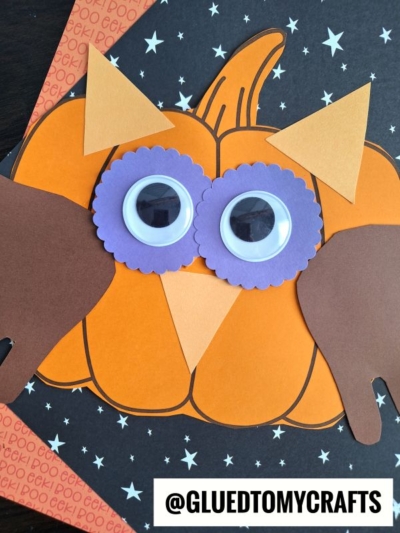
Paper Pumpkin Owl Craft
Here’s your checklist of supplies to bring this craft to life:
Prepare your creative haven by laying down a protective cover before the crafting magic begins!
Directions:
- First print out our provided printable, in color, on a single sheet of cardstock paper. You only need one print per craft.
- If printing the pumpkin design on plain white cardstock paper, you will want to go ahead and color it in with coloring utensils. If you are printing it on orange cardstock paper, you can skip this step.
- Anyways - trim out the pumpkin piece and discard excess paper.
- Now grab your yellow colored cardstock paper and trace both of your child's hands {one at a time, in separate locations} on the paper.
- When done tracing, trim them both out. This will be the "wings" for the owl.
- Finally - cut out the remaining owl features from the leftover yellow and kraft colored cardstock paper {like triangle ears and a beak!}
- Now it's time to start assembling! Grab your choice of adhesive and all the paper cutouts.
- To finish off your paper owl pumpkin keepsake, start off by gluing the two handprint cutouts {his wings} on each side of the pumpkin cutout. Follow that up gluing on his facial features, along with the wiggle eyes.
- Now you can stop here or add any other embellishments you see fit, to give it your little owl friend his own personal spin!
- Then display your handprint fall owl paper piece proudly for ALL to see!!


NEED MORE HELP DOWNLOADING OUR FREE PRINTABLES? PLEASE REFER TO OUR FAQ PAGE