
Our sweet teddy bear friend is wearing an adorable jack-o-lantern costume that is perfect for Halloween night!
Keep scrolling to find out all the details on making this Paper Plate Pumpkin Jack-O-Lantern Teddy Bear kid craft come to life within minutes!

Jack-O-Lantern Teddy Bear Craft
Today’s Pumpkin Teddy Bear is the pick of the patch! We are taking a simple paper plate, some craft paint and a few pieces of colored cardstock paper, to make this adorable friend come to life within minutes. He’s dressed to impress and I hope you like what he’s wearing for his “costume” of the night!
My jack-o-lantern teddy bear kid craft is a great Halloween art project if you are looking for something more on the “cute” side versus the gory side we typically see this time of year. I could easily see this tutorial being brought into the classroom with no fear or tears!
On that note, he’s a festive bear for you to make, love and share! So find all the crafty details below {as well as the FREE bear head printable!} and recreate one with your child today. He might be dressed in a costume for Halloween night but let’s face it… this could easily be a great paper craft activity for any day of the fall season! So don’t feel limited by this idea!
Happy crafting, my friends! Don’t forget to share pictures of your paper pumpkin bear with us! You can find us on Facebook or use our special branded #gluedtomycrafts hashtag for us to find & share from!
RELATED —> Fork Painted Bear

Ready to have some fall fun? Try your hand at this adorable pumpkin jack-o-lantern teddy bear craft! Get crafty and share a picture of your bear creation with us!
Craft Supplies:
- Bear Printable – Landing Page
- Light Brown Cardstock Paper
- Large Paper Plate
- Orange Craft Paint
- Foam Paint Brush
- Black Cardstock Paper
- Brown Cardstock Paper
- Orange Cardstock Paper
- Scissors
- School Glue or Glue Stick
- Stapler
Directions:
- First things first – print out the free bear head printable on brown cardstock paper.
- Set it aside.
- Next up – go ahead and paint your large paper plate, completely orange with the craft paint & a foam paint brush.
- When done painting, set aside the plate to allow it to dry completely.
- Now grab all of your cardstock paper {including the one you printed!} along with your scissors.
- Start off by cutting out the head shape from the printable.
- Discard excess paper.
- Out of the black cardstock paper, cut out some jack-o-lantern facial features.
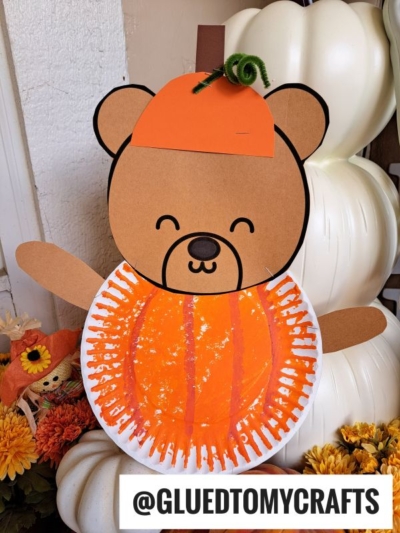
- Out of the remaining cardstock paper, cut out legs, arms and a small “pumpkin” hat for your bear. It might seem overwhelming at first but please use our picture above to get your creative juices flowing.
- When ready – it’s time to assemble! Grab all your paper pieces, the painted paper plate and of course the securing materials.
- Use your stapler and/or glue to secure the paper pieces in place, on the paper plate. I found that it’s easier to staple the arms & legs in place on the paper plate, while everything else is good with some glue on the back. The paper hat should be the last piece to be added.
- Add any other embellishments you see fit to give your Halloween teddy bear a custom fall look. Make him be dressed to impress his friends!
- Allow everything to dry completely before you display it proudly for all to see.
- Snap a few pictures and share your paper plate pumpkin jack-o-lantern teddy bear with us! #gluedtomycrafts
RELATED —> Little Blue Truck’s Halloween Craft
Our Halloween craft section on Glued To My Crafts is BURSTING with new ideas! I really stride EVERYDAY to bring unique and one-of-a-kind tutorials to my readers.
Just check out our Flying Pumpkin Witch, Black Cat At Night, and Cat In Pumpkin craft posts that are unique to us. Click on through and join the hundreds of people have been recreating them thus far this season!
All of three of these ideas will give you instant creativity at your fingerprints and would pair nicely with today’s paper plate teddy bear craft – hint hint!!

Pumpkin Jack-O-Lantern Teddy Bear Craft
Here’s your checklist of supplies to bring this craft to life:
Prepare your creative haven by laying down a protective cover before the crafting magic begins!
Directions:
- First things first - print out the free bear head printable on brown cardstock paper. Set it aside.
- Next up - go ahead and paint your large paper plate, completely orange with the craft paint & a foam paint brush.
- When done painting, set aside the plate to allow it to dry completely.
- Now grab all of your cardstock paper {including the one you printed!} along with your scissors.
- Start off by cutting out the head shape from the printable. Discard excess paper.
- Out of the black cardstock paper, cut out some jack-o-lantern facial features.
- Out of the remaining cardstock paper, cut out legs, arms and a small "pumpkin" hat for your bear. It might seem overwhelming at first but please use our picture above to get your creative juices flowing.
- When ready - it's time to assemble! Grab all your paper pieces, the painted paper plate and of course the securing materials.
- Use your stapler and/or glue to secure the paper pieces in place, on the paper plate. I found that it's easier to staple the arms & legs in place on the paper plate, while everything else is good with some glue on the back. The paper hat should be the last piece to be added.
- Add any other embellishments you see fit to give your Halloween teddy bear a custom fall look. Make him be dressed to impress his friends!
- Allow everything to dry completely before you display it proudly for all to see.


NEED MORE HELP DOWNLOADING OUR FREE PRINTABLES? PLEASE REFER TO OUR FAQ PAGE