
Spooky and sweet, these cupcake liner witch hats make for a fun and creative craft for the little ones! Get your craft supplies ready and create some magic today!
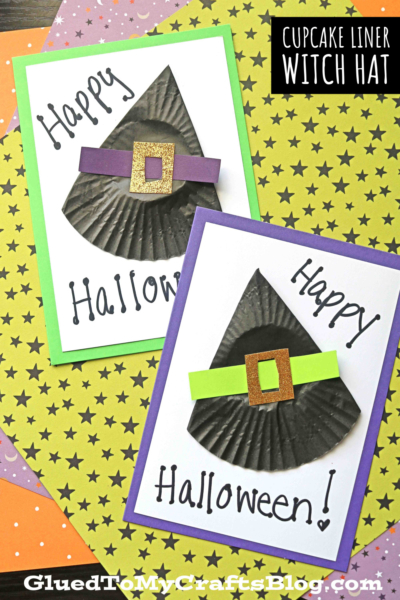
Muffin Cup Liner Witch Hat Halloween Cards For Kids To Make
When it comes to ALL the holidays, handmade cards and gifts are a simple but terrific way to say “I’m thinking of it.” At Glued To My Crafts, we TRULY believe that handmade is better! Even during the month of Halloween.
So on that note… don’t delay anymore! I highly encourage YOU and your child, to send friends and family far away some spook-tacular happy mail with today’s Cupcake Liner Witch Hat Cards kid craft idea! All you need is a few black muffin cups, a glue stick and cardstock paper to make it happen! That’s it!
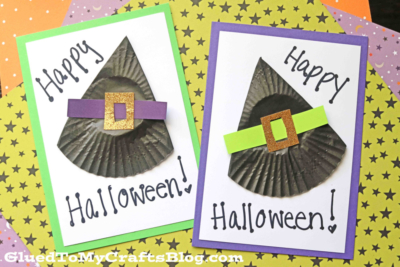
You won’t believe how simple it is to create these “witch hat cards” within minutes! It’s just a matter of folding a black cupcake liner into a triangle shape and gluing it on a cardstock card front. Then add your own special touch for the witch hat design and you will have yourself a unique, one-of-a-kind Halloween card piece that any lucky receiver will absolutely love to receive this time of year!
I got you hooked now, right?! If this is something that interests you, you can find the complete witch hat tutorial below!
Happy crafting, my friends!!! Don’t forget to share pictures of your paper witch hat cards with us, on our Facebook page wall so we can admire your bewitching good creations! I can’t wait to see how you customize your Halloween cards! #gluedtomycrafts
RELATED —> Paper Plate Witch Hat

Get your craft on! There’s no spookier way to celebrate Halloween than making your own cupcake liner witch hat cards. It’s a fun activity for all ages, so let’s get crafting!
Craft Supplies:
- Large Black Cupcake Liners
- Cardstock Paper
- Cardstock Card Fronts
- Scissors
- Adhesive
- Embellishments
Directions:
- First take ONE black cupcake liner and flatten it out with your hands. Repeat for each card you want to make.
- Next have children fold the flattened cupcake liner into thirds/a triangle to create the witch hat.
- Glue it in the center of a single sheet of cardstock. This step may take some extra effort but it’s super easy for kids to do.
- Now trim down that particular cardstock piece to placed on a cardstock card front. Attach the two to create the card.
- To finish off the Cupcake Liner Witch Hat Card – add a simple “strip” of cardstock to create the rim of the hat, as well as the little embellishments to give it personality.
- Then add other embellishments you see fit and display/gift away proudly!
Book Suggestions:
Here are some recommended books that beautifully complement our craft idea. You can conveniently purchase them through our affiliate links on Amazon.
- Room on the Broom by Julia Donaldson
- The Little Witch Who Lost Her Broom! by Elaine Bickell
- The Witch’s Cat and The Broomstick Blunder by Kirstie Watson
- Ten Flying Brooms by Ilanit Oliver
- How to Catch a Witch by Alice Walstead
- There’s a Witch in Your Book by Tom Fletcher
- It’s Raining Bats & Frogs by Rebecca Colby
RELATED —> Halloween Witch Keepsake
A TWIST ON TODAY’S TUTORIAL!
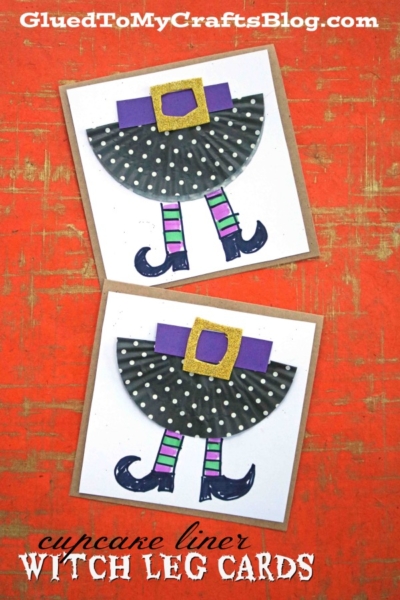
Before you leave, I wanted to inspire you with just ONE MORE card idea. It’s just a slight twist on today’s cupcake liner witch hat tutorial!
Above you will see, that you can ALSO use the same black cupcake liners to make a dress with witch legs coming out of it instead. Just follow the same steps above but fold your cupcake liner in HALF {instead of a triangle} and then glue it down on the card front, to build from there. Easy peasy!
It’s just another crafty way to make a card this Halloween season! Hopefully our added picture to this already awesome craft idea, inspires you to recreate it as well!
BTW – there is ALWAYS more time for another craft idea! Be sure to check out our most popular Popsicle Stick Witch Hat and Styrofoam Cone Witch Hat kid craft ideas & pair them with today’s Halloween tutorial!

Cupcake Liner Witch Hat Cards
Here’s your checklist of supplies to bring this craft to life:
- Cardstock Paper
- Cupcake Liners black
- Embellishments
Prepare your creative haven by laying down a protective cover before the crafting magic begins!
Directions:
- First take ONE black cupcake liner and flatten it out with your hands. Repeat for each card you want to make.Cupcake Liners
- Next have children fold the flattened cupcake liner into thirds/a triangle to create the witch hat.
- Glue it in the center of a single sheet of cardstock. This step may take some extra effort but it’s super easy for kids to do.Cardstock Paper
- Now trim down that particular cardstock piece to placed on a cardstock card front. Attach the two to create the card.
- To finish off the Cupcake Liner Witch Hat Card - add a simple "strip" of cardstock to create the rim of the hat, as well as the little embellishments to give it personality.Embellishments
- Then add other embellishments you see fit and display/gift away proudly!

CLICK HERE TO PRINT THE DIRECTIONS FOR THIS CRAFT