Ready to make some spooky memories with your little ones? Get creative with this fun paper handprint witch keepsake! Even better, you get to keep it forever.

Witch Handprint Craft For Halloween
Today’s Paper Handprint Witch kid craft tutorial is a BEWITCHING keepsake idea that doubles as awesome Halloween decor as well!!! You could even turn it into a card if you like {wouldn’t that be a treat for grandparents far away?!}
With this simple DIY Halloween activity, you and your child can conjure up a wicked good time that is sure to be remembered for years to come!! It’s super easy, really inexpensive and fun for ALL ages! Just cast a spell with some cardstock paper, a black marker and school glue – that’s it!
So no more waiting. it’s time to make your witch that is perfect to sit on top of her broomstick on Halloween night! Happy Halloween and happy crafting this upcoming SPOOK-TACULAR holiday, my friends!!! If you don’t mind, I would love to see pictures of your child’s paper handprint witch creation on our Facebook page! I just LOVE seeing those pictures come across social media – hint hint! #gluedtomycrafts
RELATED —> Paper Plate Witch

Celebrate Halloween in a unique way this year! Create a special paper handprint witch keepsake with your little one and keep your special memories alive!
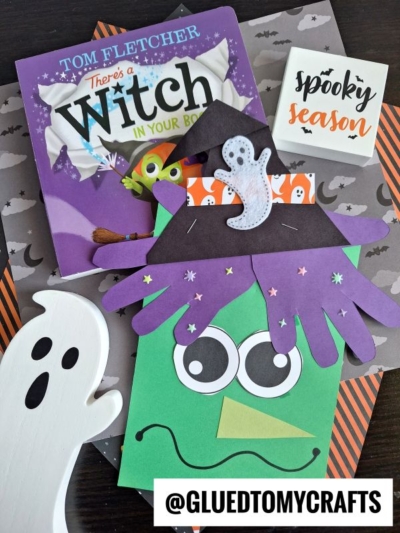
Craft Supplies:
- Green Cardstock Paper
- Black Cardstock Paper
- White Cardstock Paper
- Purple Cardstock Paper
- Basic Craft Scissors
- Pencil or Pen
- Glue Stick or School Glue
- Hand-Held Office Stapler
- Markers/Crayons
- optional – our FREE monster eyeball printable
Directions:
- First have your child trace their hands {both of them} on some PURPLE cardstock paper.
- Trim out both pieces with scissors. This is now the witch’s hair. Set aside.
- Now trim out a large witch hat shape from the black cardstock. Set aside.
- Next up – trim out TWO circles from the white cardstock, for her eyes. Draw in some black with a crayon/marker, to make the pupils.
- Ready to finish it off? To complete the Paper Handprint Witch Keepsake, simple staple the two handprint “hair pieces” to the top of the green cardstock, along with gluing the other cardstock embellishments in the remaining spots {see our picture for an example.}
- Now draw on a smile and add a quick small triangle nose to complete her look.
- Then display your green paper witch craft proudly!!
Book Suggestions:
Here are some recommended books that beautifully complement our craft idea. You can conveniently purchase them through our affiliate links on Amazon.
- Room on the Broom by Julia Donaldson
- The Little Witch Who Lost Her Broom! by Elaine Bickell
- The Witch’s Cat and The Broomstick Blunder by Kirstie Watson
- Ten Flying Brooms by Ilanit Oliver
- How to Catch a Witch by Alice Walstead
- There’s a Witch in Your Book by Tom Fletcher
- It’s Raining Bats & Frogs by Rebecca Colby
Are you by chance looking for even more fun Halloween kids craft ideas from us?
Then be sure to check out these past posts, listed below, for even MORE spooky craft inspiration from Glued To My Crafts! All of which would pair nicely with today’s unique paper handprint witch kid craft idea! So much fun to be had today!
- Paper Plate Jack O’ Lantern
- Terra Cotta Pot Pumpkin
- Paper Plate Black Cat
- Paper Plate Witch
- Popsicle Stick Witch Hats
- Popsicle Stick Beaker
- Terra Cotta Pot Pumpkin
- Popsicle Stick Jack-o-Lanterns
- Handprint Pumpkin
- Popsicle Stick Jack-O-Lantern
- Paper Plate Pumpkin
