Who says Halloween has to be all about candy? We are going with the unexpected today and turning inexpensive pencils from Dollar Tree into classy witch broom party favors!
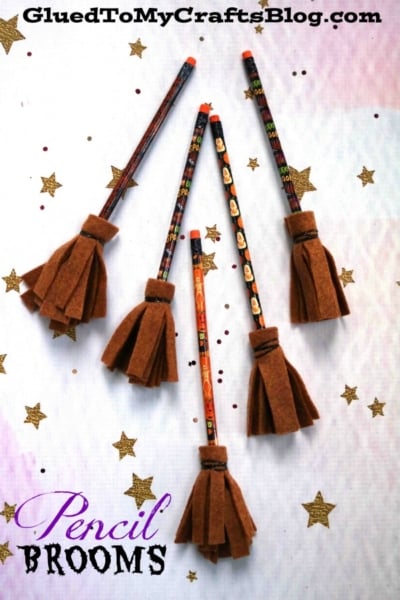
Today’s Witch Broom Pencil Party Favors are playful Halloween-themed gifts that resemble tiny witch brooms but actually function as pencils.
They’re ideal for both kids and adults since they’re cute, practical, and eliminate the over-reliance on candy for trick-or-treating. Bonus—they’re entirely DIY-friendly, which means you can add your own creative flair to suit your Halloween aesthetic.
Whether you’re catering to a classroom, partygoers, or coworkers, these pencil brooms are bound to be a hit.

What better way to show off your witchy side than with these broom pencil party favors? So spooky and fun!
Craft Supplies:
Here’s a comprehensive list of supplies you’ll need to create these spooky brooms. Most of these items are easy to find and budget-friendly!
- New, Unsharpened Pencils
- Brown Craft Felt
- Craft or Fabric Scissors
- Small Black Rubber Hands
RELATED —> Witch Gnome Puppet


Directions:
Follow this step-by-step guide to make your own witch broom party favors.
- First things first – take your brown craft felt and cut it into small rectangles, approximately 5 x 4 inches. You’ll need one rectangle per pencil.
- Next, make thin, vertical cuts along one side of the rectangle to create your broom’s bristles. Leave about an inch of uncut paper along the top of the rectangle to keep it sturdy enough to wrap.
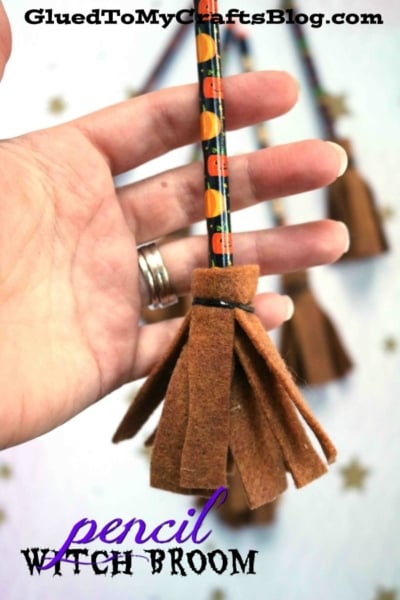
- Wrap the uncut edge of the paper bristle rectangle around the base of the pencil. Use tape or glue to secure the paper to the pencil. Ensure it’s wrapped tightly enough to stay in place but loose enough at the bottom to give that broom-like effect. Once it’s rolled, it will start to flair out a bit.
- To finish it off and secure everything in place, I then took a small black rubber band and slid it onto/around the rolled felt. On this step I added a couple of rubber bands to really secure my felt. My suggestion is that the more bands you add, the tighter it will become around the pencil.
- You could of course add some adhesive to the felt but remember, you want the receiver to be able to slide off the “broom” part and be able to use the pencil afterwards.
- When done crafting, your spooky yet functional witch broom favors are ready to go! Place them in jars, pumpkins, or cauldrons for stylish presentation at your Halloween party.
Pro Tips for Craft Success:
- Batch-Crafting: If you’re making favors for a large group, prepare all your materials in advance to streamline the process. Enlist some helpers to make it a fun group activity.
- Alternative Bristles: Not a fan of brown craft felt? You can also try using tissue paper, raffia, or even burlap for the broom bristles to achieve different textures and looks.
- Stick to the Theme: If your Halloween gathering has a specific theme—like “Hocus Pocus”—you can adapt the colors and decorations of your brooms to match!
RELATED —> Paper Plate Cauldron
Crafting these “Witch Broom Pencil Party Favors” is a rewarding way to get spooky while showing off your creative side. These charming and functional favors will leave a lasting impression on all your guests, from kids to adults. Plus, the best part? You don’t need excessive time or money to bring a bit of Halloween magic to life.
This Halloween, ditch the candy and create something truly memorable. Try these DIY party favors for yourself – you’ll be sweeping your guests off their feet! Happy crafting, wicked witches!
