Glued To My Crafts

Join thousands of others who have gotten GLUED to our craft tutorials!

  • Home
  • Privacy Policy
  • Craft Safety Guidelines
  • Seasonal Themes
    • New Years
    • Valentine’s Day
    • St. Patrick’s Day
    • Spring
    • Easter
    • Mother’s Day
    • Summer
    • Father’s Day
    • Patriotic
    • Halloween
    • Thanksgiving
    • Fall
    • Winter
    • Christmas
    • Snowmen
    • Story Time
  • About Us
  • Our Amazon Storefront
  • Monthly Themes
    • January Craft Ideas
    • February Craft Ideas
    • March Craft Ideas
    • April Craft Ideas
    • May Craft Ideas
    • June Craft Ideas
    • July Craft Ideas
    • August Craft Ideas
    • September Crafts
    • October Crafts
    • November Crafts
    • December Crafts

Paper Plate Broom Craft Idea For Halloween

When engaging in craft activities, it is important for young children to have adult supervision at ALL times. It is also recommended to use supplies that are suitable for your child's age. Feel free to modify materials or steps to meet your specific requirements. Please refer to our safety guidelines for more information.

As an Amazon Associate I earn from qualifying purchases. This post may contain affiliate links. For more information, please see our disclosure policy.

UPDATE FOR 2026 - To reduce storage costs and download fees, we recently made some changes to our website. The password for all our files this year is GLUEDTOMYCRAFTS2026. No sign-up is required to download our free printables! You can enjoy our printables without creating an account or paying for Box.com. Simply follow the download instructions on our FAQ PAGE.

Craft a paper plate witch broom with just a few materials. Follow the easy instructions to make a fun and colorful broomstick for Halloween
SKIP THE FLUFF AND PRINT THE DIRECTIONS
Paper Plate Broom Craft Idea For Halloween

Paper Plate Broom Craft Idea For Halloween

Craft a Spooky Halloween Broom with Paper Plates

Halloween is just around the corner, and what better way to get into the festive spirit than with a fun and creative craft project?

If you’re looking for a unique yet simple craft for kids to recreate this spooky season, today’s “paper plate broom” is the perfect choice. This broom paper plate craft is not only easy to make but also budget-friendly, making it ideal for families, teachers, and anyone who loves DIY projects.

Paper Plate Broom Craft Idea For Halloween

In this blog post, we’ll guide you through the steps to create your very own paper plate broom for Halloween. Whether you’re a seasoned crafter or a beginner, our tutorial is sure to bring some bewitching fun your way!
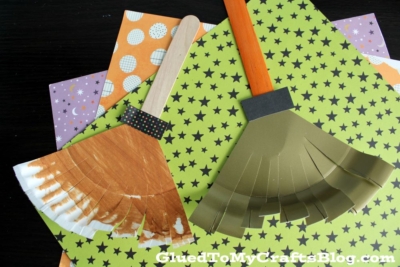
Craft Supplies:

Before you get started, gather all the materials you’ll need for this project. Having everything on hand will make the crafting process smoother and more enjoyable.

  • Large Paper Plate
  • Craft Scissors
  • Brown Craft Paint
  • Paint Brush
  • Jumbo Popsicle Sticks
  • School Glue
  • Scrapbook Paper

Directions:

Now that you have all your materials ready, it’s time to start crafting. Follow these steps to create your very own paper plate broom.

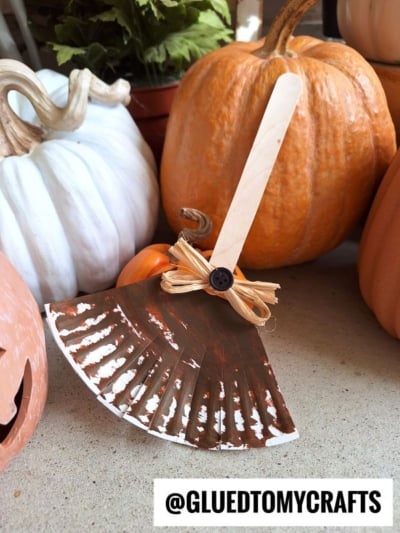
  • First things first – take your paper plate and cut it into fourths. Straight up the center to make TWO equal pieces and then cutting one of those halves again to make TWO triangle pieces. You only need one fourth per broom stick craft. Either repeat the craft or save the other pieces for a rainy day.
  • Now that you have your paper plate piece, squirt some BROWN craft paint on it.
  • Use the foam paint brush to paint the small paper plate piece completely.
  • Set it aside to allow it to dry completely.
  • Once dry, cut a fringe along the bigger edge to create the bristles.
  • Use your hands to curl each strand.
  • To finish off the Paper Plate Witch Broom craft, glue your decorated triangle piece to one end of your jumbo popsicle stick.
  • Polish it off with a small rectangle scrapbook piece to “seal” it all together.
  • Then display it proudly for ALL to see!
  • Don’t forget to share pictures of your paper broom with us on your various social media sites! #gluedtomycrafts

Book Suggestions:

Here are some recommended books that beautifully complement our craft idea. You can conveniently purchase them through our affiliate links on Amazon.

  • Room on the Broom by Julia Donaldson
  • The Little Witch Who Lost Her Broom! by Elaine Bickell
  • The Witch’s Cat and The Broomstick Blunder by Kirstie Watson
  • Ten Flying Brooms by Ilanit Oliver
  • How to Catch a Witch by Alice Walstead
  • There’s a Witch in Your Book by Tom Fletcher
  • It’s Raining Bats & Frogs by Rebecca Colby

RELATED —> Popsicle Stick Broom

A children's book titled The Little Witch Who Lost Her Broom! is surrounded by cut-out ghosts, candy corn, a paper plate witch broom, and purple star-patterned paper. The cover shows a witch and her black cat under a nighttime sky.

AFFILIATE LINK – PAIR OUR CRAFT IDEA WITH THIS BOOK RECOMMENDATION

Get creative with your kids this weekend and make some fun crafts together! It’s an enchanting way to add a little magic to your day! Be sure to also check out our Fox Pumpkin and Scarecrow Gnome tutorials for even more crafty fun for Halloween!

stacey-signature-2023

Paper Plate Broom Craft Idea For Halloween
PRINT

Paper Plate Broom Craft Idea

Craft a paper plate witch broom with just a few materials. Follow the easy instructions to make a fun and colorful broomstick for Halloween

Here’s your checklist of supplies to bring this craft to life:

  • 1 Jumbo Popsicle Stick
  • 1 Large Paper Plate
  • Craft Paint
  • Scrapbook Paper
  • School Glue
  • 1 Foam Paint Brush
  • 1 Scissors
  • Halloween Book Recommendations - link to our Amazon shop

Prepare your creative haven by laying down a protective cover before the crafting magic begins!

Directions:

  • First things first - take your paper plate and cut it into fourths. Straight up the center to make TWO equal pieces and then cutting one of those halves again to make TWO triangle pieces. You only need one fourth per broom stick craft. Either repeat the craft or save the other pieces for a rainy day.
  • Now that you have your paper plate piece, squirt some BROWN craft paint on it.
  • Use the foam paint brush to paint the small paper plate piece completely.
  • Set it aside to allow it to dry completely.
  • Once dry, cut a fringe along the bigger edge to create the bristles.
  • Use your hands to curl each strand.
  • To finish off the Paper Plate Witch Broom craft, glue your decorated triangle piece to one end of your jumbo popsicle stick.
  • Polish it off with a small rectangle scrapbook piece to "seal" it all together.
  • Then display it proudly for ALL to see!
    Paper Plate Broom Craft Idea For Halloween
MINI-HEARTS-page-separator-logo-gluedtomycrafts


CLICK HERE TO PRINT THE DIRECTIONS FOR THIS CRAFT

If you've enjoyed our content or have any thoughts to share, we'd love to hear from you! Mention @gluedtomycrafts or tag #gluedtomycrafts on Instagram!

Craft Activity Safety Guidelines:

Always Ensure Adult Supervision - Young children should be supervised at all times when engaging in craft activities. This is essential to keep them safe and ensure materials are used correctly. Use Age-Appropriate Supplies - Choose craft supplies that are suitable for your child’s age. Check labels for recommendations and avoid items with small parts or sharp edges for younger children. Modify as Needed - Feel free to adapt materials or steps to meet your child's abilities and safety needs. For example, substitute scissors with safety scissors if necessary. Keep an Eye on Allergies - Be mindful of potential allergens in craft materials like glue, paint, or certain fabrics. Opt for non-toxic and hypoallergenic options whenever possible. Organize and Secure Supplies - Keep all craft tools and materials organized. Store sharp objects, small parts, and potentially hazardous items out of reach when not in use. Following these guidelines will ensure that crafts remain fun, creative, and, most importantly, safe for everyone involved!


OUR PRIVACY POLICY

OUR COPYRIGHT POLICY

  • Email
  • Facebook
  • Instagram
  • Pinterest
  • Twitter
  • YouTube

LOOKING FOR SOMETHING?

EXPLORE OUR SITE:

TRENDING TODAY:

  • A pink hand-shaped bookmark with red heart stickers and star confetti surrounds a round note that reads a heartfelt message about love and reading. The image is from GluedToMyCraftsBlog.com. Handprint Bookmark Keepsake: A Gift That Holds Your Spot
  • A handmade Valentine’s Day craft featuring a red rose made of torn paper, two green handprint leaves, a glue bottle, heart decorations, and a message: “LOOK WHAT I MADE - A ROSE THAT WON’T FADE! WISHING YOU LOVE THIS VALENTINE’S DAY!”. Torn Paper Rose Card Craft Tutorial for Valentine’s Day
  • A colorful craft project featuring a yellow felt moon, sparkly stars, and heart shapes, with glue and a heartfelt message. Torn Paper Love You To The Moon and Back Card Craft Idea For Kids
  • A handmade card with a rocket drawing, hearts, and messages of love. Felt hearts and an envelope are around it. Handprint Rocket Keepsake - I Love You Because
  • A colorful paper craft featuring a red and pink painted paper plate with yellow circles in the center, green handprint cutouts as leaves, surrounded by craft supplies, heart decorations, and paint bottles. Paint Splat Valentine's Day Flower Craft Idea
  • A vibrant Valentine's Day craft showcasing a torn-paper bumblebee with googly eyes on a white sheet, accompanied by the text "MY VALENTINE!" The scene is decorated with felt hearts, heart-shaped gems, and patterned papers, with a glue bottle and crafting supplies adding to the creative atmosphere. Torn Paper Bee My Valentine Card Craft Idea For Valentine's Day
  • A flat lay of handmade Valentine’s Day cards and decorations, including paper flowers, felt hearts, an envelope, and printed cards with romantic poems, arranged on a gray and pink background. Capture Memories With These 6 Handprint Flower Poems
  • Flat lay of a torn paper dandelion craft featuring a white sheet with a black dandelion outline. Torn yellow, pink, and purple paper pieces are glued to the dandelion head, simulating seeds. Surrounding the craft are Elmer's glue, felt hearts, paper flowers, and patterned scrapbook paper. The text 'MAKING WISHES, ONE PIECE OF PAPER AT A TIME.' and 'GluedToMyCraftsBlog.com' are printed on the white sheet. Torn Paper Dandelion Craft: Making Wishes, One Piece at a Time
  • A playful torn paper cactus craft with hearts and flowers. Includes glue and felt hearts. Torn Paper Cactus Card: A Sweet Mother's Day Craft
  • A colorful handprint craft made from purple paper with glitter edges sits on a multicolored polka dot background. A round tag with a poem is attached below, tied with red and white string. Flowers are visible in the corner. Easy Handprint Flower Craft with Poem – Perfect Spring DIY for Kids

© 2012–2026 Glued To My Crafts
All activities should be supervised by an adult at all times. Please refer to our safety guidelines for more information.


Please note that all the content of the website, including printables, are for classroom and personal use only. This means that any digital item you download from our site can be used for non-commercial use only. We kindly request that you do not reproduce or sell our creations. We appreciate your understanding and cooperation in respecting our content and intellectual property rights.

Accessibility Adjustments

Powered by OneTap

How long do you want to hide the toolbar?
Hide Toolbar Duration
Select your accessibility profile
Vision Impaired Mode
Enhances website's visuals
Seizure Safe Profile
Clear flashes & reduces color
ADHD Friendly Mode
Focused browsing, distraction-free
Blindness Mode
Reduces distractions, improves focus
Epilepsy Safe Mode
Dims colors and stops blinking
Content Modules
Font Size

Default

Line Height

Default

Color Modules
Orientation Modules