
Get your little ones crafting with this fun and simple paper bowl witch craft! It’s perfect for encouraging their imaginations to run wild and keep them busy.
Witch Kids Craft Idea Made From A Paper Bowl
From our Halloween craft table to yours! Today we are sharing how to make WITCHES out of inexpensive paper bowls and I want YOU to be inspired to join in on the fun as well!
Our latest and greatest EASY Halloween craft idea is super fun to recreate all through the month of October {it would make for a great Halloween classroom party craft!} but mostly importantly, it would be perfect to make on All Hallows Eve before you head out to trick-o-treat.
So what are you waiting for? It’s time to learn how we brought our witch’s face to life on a simple paper bowl from the grocery store! Keep on scrolling to learn more AND grab the free witch hat printable from us as well {you’re welcome!}
Happy crafting my friends!! Don’t forget to share pictures with us of your child’s finished paper witch pieces on our Facebook page! I seriously can’t wait to see everyone’s BEWITCHING crafts! #gluedtomycrafts
RELATED —> Popsicle Stick Witch House

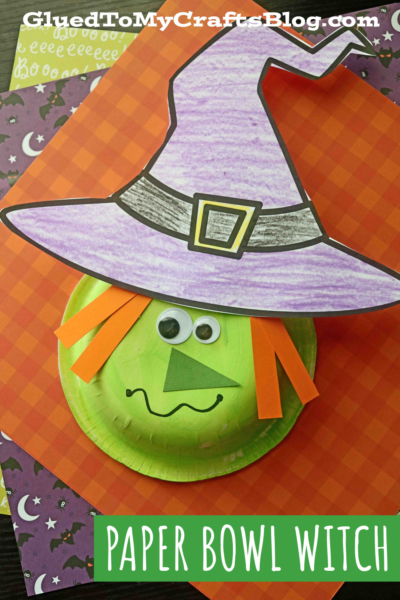
Get ready for a spooky good time with this paper bowl witch craft! Make your own wicked witch with just a few everyday items!
Craft Supplies:
- White Paper Bowl
- Green Craft Paint
- Paint Brush
- Crayons, Markers or Coloring Pencils
- Hat Printable – on our landing page
- White Cardstock Paper
- Orange Cardstock Paper
- Green Cardstock Paper
- Craft Scissors
- Black Sharpie Marker
- School Glue
- Small Googly Eyes
Directions:
- First things first – grab your craft paint, a paper bowl and the paint brush.
- Flip over the paper bowl so the inside of it is facing your work table and the bottom side is facing you.
- Now squirt some green paint in the center of the paper bowl and use the paint brush to paint it completely green.
- When done painting, set it aside to let it dry completely.
- Next grab your printed witch hat printable and your choice of coloring utensil.
- Color in the hat design however you like.
- When done coloring, cut it out and discard excess paper.
- Out of your remaining sheets of colored cardstock paper, go ahead and cut out a green triangle nose & a few strips of orange for the witch’s hair.
- Now we are heading towards the last few steps! To finish off the green witch craft, simply start off by gluing on the hat cutout to the bowl.
- Follow that up by gluing on the strips of orange hair under her hat, wiggle eyes right below that and then of course the triangle nose in the center.
- Finally , use the black marker to draw on a squiggle mouth.
- And that’s it! At this point in time you can add other embellishments you see fit {like some Halloween stickers or glitter} before you display her proudly for ALL to see this Halloween season!
Book Suggestions:
Here are some recommended books that beautifully complement our craft idea. You can conveniently purchase them through our affiliate links on Amazon.
- Room on the Broom by Julia Donaldson
- The Little Witch Who Lost Her Broom! by Elaine Bickell
- The Witch’s Cat and The Broomstick Blunder by Kirstie Watson
- Ten Flying Brooms by Ilanit Oliver
- How to Catch a Witch by Alice Walstead
- There’s a Witch in Your Book by Tom Fletcher
- It’s Raining Bats & Frogs by Rebecca Colby
RELATED —> Paper Plate Owl Witch

Craft time is HAPPY TIME {especially during the holidays} so let’s make it happen today!
Get ready to be wowed with our popular Paper Plate Witch House and Paint Splat Cauldron craft posts!
We also have a great FREE community YOU can join for even more crafty ideas to recreate this time of year! Join our private Facebook group and enjoy some old fashioned craft time with us!
RELATED —> Paper Plate Witch

Paper Bowl Witch Craft For Kids
Here’s your checklist of supplies to bring this craft to life:
- School Glue
Prepare your creative haven by laying down a protective cover before the crafting magic begins!
Directions:
- First things first - grab your craft paint, a paper bowl and the paint brush.
- Flip over the paper bowl so the inside of it is facing your work table and the bottom side is facing you.
- Now squirt some green paint in the center of the paper bowl and use the paint brush to paint it completely green.
- When done painting, set it aside to let it dry completely.
- Next grab your printed witch hat printable and your choice of coloring utensil.
- Color in the hat design however you like.
- When done coloring, cut it out and discard excess paper.
- Out of your remaining sheets of colored cardstock paper, go ahead and cut out a green triangle nose & a few strips of orange for the witch's hair.
- Now we are heading towards the last few steps! To finish off the green witch craft, simply start off by gluing on the hat cutout to the bowl.
- Follow that up by gluing on the strips of orange hair under her hat, wiggle eyes right below that and then of course the triangle nose in the center.
- Finally, use the black marker to draw on a squiggle mouth.
- And that's it! At this point in time you can add other embellishments you see fit {like some Halloween stickers or glitter} before you display her proudly for ALL to see this Halloween season!


NEED MORE HELP DOWNLOADING OUR FREE PRINTABLES? PLEASE REFER TO OUR FAQ PAGE