
Today’s craft idea from Glued To My Crafts is spooky fun for ALL! Keep scrolling to see how we made this Paper Plate Pumpkin Patch At Night come to life with simple supplies and steps!
After checking out our post, I hope you are encouraged to recreate it with your preschool aged child, this Halloween season!

Haunted Pumpkin Patch Craft With A Paper Plate
Although I’ve titled it “haunted” there’s nothing spooky about our paper plate pumpkin patch at night kid craft idea!
Just like you’ve learned from our past tutorials on our site, we like to keep it simple, not only for the children BUT for adults, as well. It’s really what I strive for with every new idea I hit publish on.
To complete this pumpkin patch at night art project idea, all you need is a simple paper plate, black craft paint, some Halloween stickers and some cardstock. That’s it! It’s simply a CINCH to make – from the supply list to the directions.
Now friends – I’ll end the chit chat here. I’ll let you get to the full BOO-TIFUL tutorial below. You can either follow our directions to a “T” or mix and match to include your favorite craft supplies, to give your paper pumpkin patch a creative look that is perfect for this time of year!
Happy crafting, my dear friends! Please don’t forget to share pictures of your Handprint Ghost and Paper Plate Pumpkin Patch At Night creations! I can’t wait to see those images pop up on our Facebook page! #gluedtomycrafts
RELATED —> Chalk Art Bat In The Night

Get your kids into the spooky spirit this Fall with this easy and fun-to-make Halloween craft!
Craft Supplies:
- Large Paper Plate – 1 per craft
- Black Craft Paint
- Foam Paint Brush
- Small Loose Star Glitter
- White Cardstock Paper
- Yellow Cardstock Paper
- Brown Cardstock Paper
- Black Sharpie Marker
- Scissors
- School Glue
- Stapler
- Stickers
Directions:
- First have children paint their paper plate completely black with the craft paint & a foam brush. Just squirt a little in the center and hand it over!
- When they are done and while the black paint is still wet, go ahead and sprinkle some star glitter on top for added sparkle in the night.
- Set it aside to allow it to dry a bit.
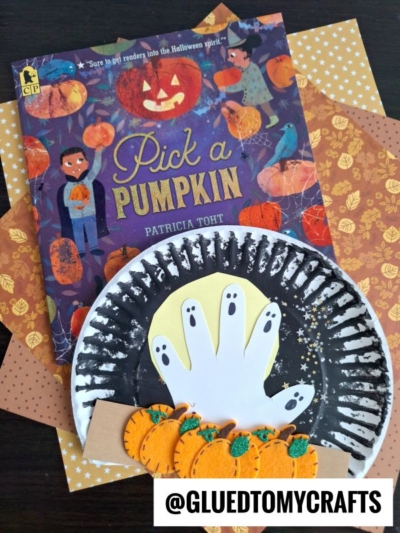
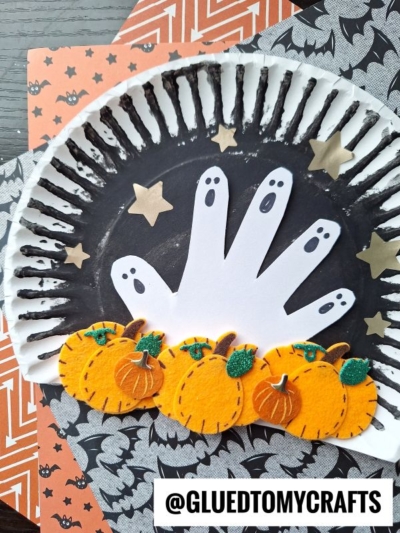
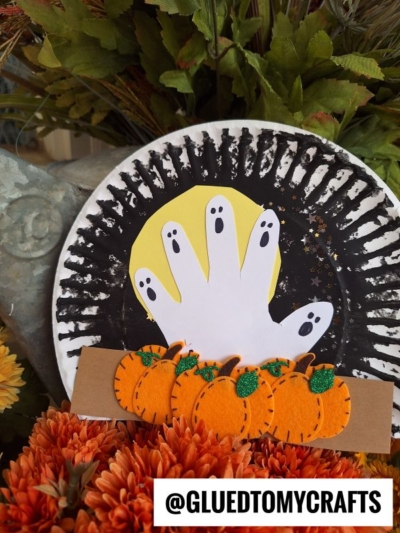
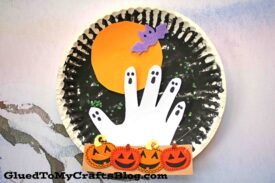
- Next up – the ghost handprint made from paper. Grab your white cardstock, a marker and paper craft scissors.
- Pick one of your child’s hands and place in the center of the white cardstock.
- Use the marker to trace around it, on the paper.
- Lift up their hand and trim out the handprint design you just made, with the scissors.
- Discard excess paper.
- Now take the Sharpie marker again and draw on “ghost faces” on each finger of the cutout.
- Set aside the ghost handprint till later.
- Next up – grab the yellow and brown colored cardstock.
- Out of the yellow paper, cut out a large, circular moon shape.
- Out of the brown paper, cut out a small rectangle that will be the dirt that holds the pumpkins.
- Go ahead and add line of pumpkin stickers on the brown paper piece, you just made.
- Now we are ready to assemble our craft! Grab your painted paper plate, all the paper pieces, school glue and stapler.
- Start off my gluing down the moon, towards the top, of the black painted paper plate.
- Follow that up with the handprint ghost cutout in the center.
- Finally – to finish off the Pumpkin Patch At Night – Halloween Kid Craft, staple the “line of dirt and pumpkins” on the bottom of the decorated paper plate. This will tie everything together.
- Add any other embellishments you see fit {like more Halloween stickers and paper cutouts} before you display it proudly for ALL to see!
- Don’t forget to share some pictures with us on your social media sites! #gluedtomycrafts
RELATED —> Pom Pom Painted Pumpkin Patch
Are you looking for even more fun and awesome Halloween art project tutorials from Glued To My Crafts? Check out these past posts listed below, for even more spooky, craft inspiration to recreate with your child today!
Then pair your choice from the below list with today’s paper plate haunted pumpkin patch craft idea, for a fun CRAFTER-NOON together!
Paper Plate Jack O’ Lantern
Pumpkin Patch Picture Frame
Thumbprint Pumpkin Patch
Eyeball Frame Craft
Terra Cotta Pot Pumpkin
Halloween Black Cat Craft
Welcome To My Pumpkin Patch
Haunted Paper Plate Pumpkin Patch At Night Craft
Here’s your checklist of supplies to bring this craft to life:
- School Glue
Prepare your creative haven by laying down a protective cover before the crafting magic begins!
Directions:
- First have children paint their paper plate completely black with the craft paint & a foam brush. Just squirt a little in the center and hand it over!
- When they are done and while the black paint is still wet, go ahead and sprinkle some star glitter on top for added sparkle in the night.
- Set it aside to allow it to dry a bit.
- Next up - the ghost handprint made from paper. Grab your white cardstock, a marker and paper craft scissors.
- Pick one of your child's hands and place in the center of the white cardstock.
- Use the marker to trace around it, on the paper.
- Lift up their hand and trim out the handprint design you just made, with the scissors.
- Discard excess paper.
- Now take the Sharpie marker again and draw on "ghost faces" on each finger of the cutout.
- Set aside the ghost handprint till later.
- Next up - grab the yellow and brown colored cardstock.
- Out of the yellow paper, cut out a large, circular moon shape.
- Out of the brown paper, cut out a small rectangle that will be the dirt that holds the pumpkins.
- Go ahead and add line of pumpkin stickers on the brown paper piece, you just made.
- Now we are ready to assemble our craft! Grab your painted paper plate, all the paper pieces, school glue and stapler.
- Start off my gluing down the moon, towards the top, of the black painted paper plate.
- Follow that up with the handprint ghost cutout in the center.
- Finally - to finish off the Pumpkin Patch At Night - Halloween Kid Craft, staple the "line of dirt and pumpkins" on the bottom of the decorated paper plate. This will tie everything together.
- Add any other embellishments you see fit {like more Halloween stickers and paper cutouts} before you display it proudly for ALL to see!

Grab our favorite books via our Amazon affiliate link! In our Amazon storefront you will find books, toys and craft supplies we absolutely love using for our Glued To My Crafts tutorials!
