As spring brings with it the blossoming of new life and the promise of warmer days ahead, there is no better time than now to recreate some flower craft ideas with your little kiddos this season!

It’s officially spring! The flowers are blooming and it is time to celebrate with some fun flower-themed crafts.
Flower crafts are an excellent way for children to not only express their creativity but also learn about nature. From constructing handmade flower cards to making their own flower decorations, there are lots of fun activities available that will surely put a smile on everyone’s face.
Here in this blog post, we have collected some super easy flower craft ideas that require minimal materials and skill so that you can make something special with your little ones this season! Whether you’re a mom, teacher, or crafter looking for a new project – there’s sure to be something here everyone will love.
Not only are they great activities on your own, but these flower craft ideas from Glued To My Crafts are also perfect ways to create memories that last long after the blossom petals have faded away. So roll up your sleeves and get ready craft – it’s time make all of those beautiful flowery visions come true!
BTW – find us on Pinterest so you never miss a new tutorial from us! Happy crafting, my friends!
RELATED —> Plastic Fork Spring Flowers

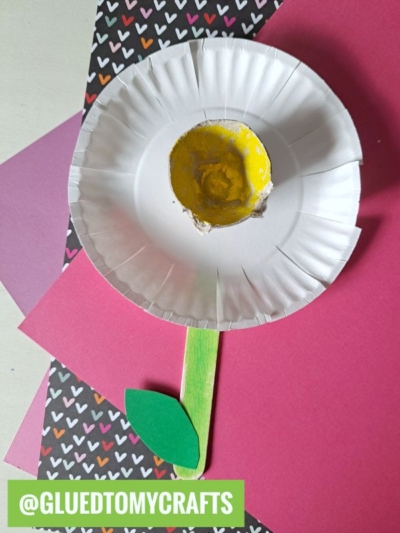
PAPER PLATE & YARN FLOWER
-
Supplies: small paper plate, craft yarn, school glue, cardstock paper and wood popsicle sticks
-
Directions: use school glue to add the craft yarn to the center of the paper plate. Finish off with a popsicle stick stem.
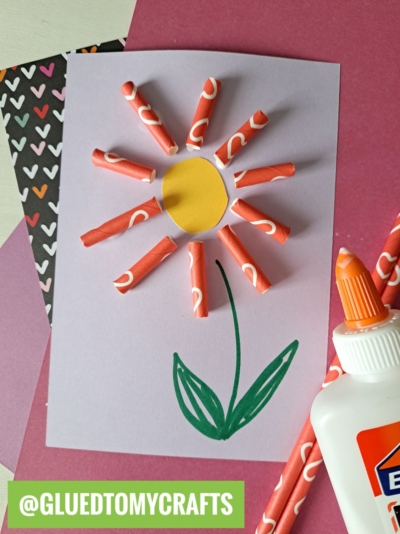
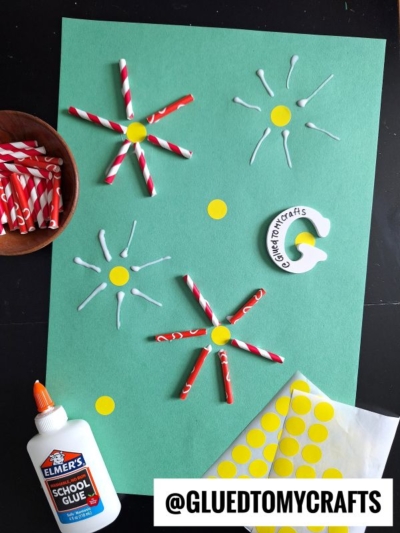
PAPER STRAW FLOWER CARD
-
Supplies: paper straws, school glue, markers and cardstock paper
-
Directions: cut paper straws into smaller pieces and glue them in a flower formation on cardstock paper
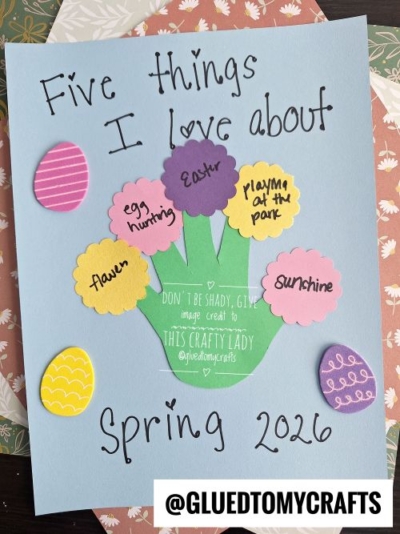
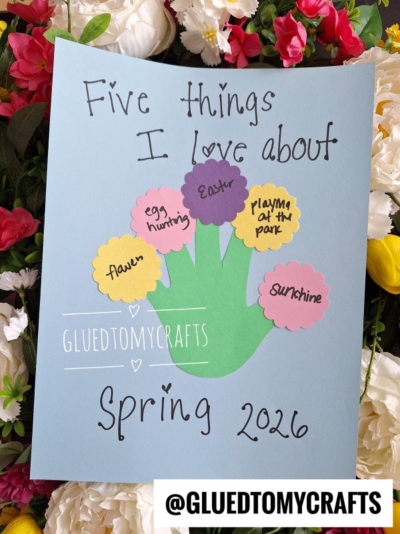
FIVE REASONS WHY I LOVE SPRING KEEPSAKE IDEA
-
Supplies: cardstock paper, school glue and paper punches
-
Directions: create a handprint cutout out of green paper and add colorful paper punches for the “flowers”

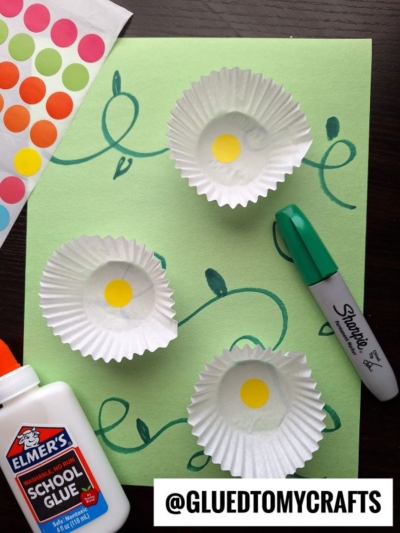
COFFEE FILTER DAISY
-
Supplies: coffee filters, school glue, cupcake liners, staplers and craft stick for the stem
-
Directions: flatten out your coffee filters and cupcake liner for your flower. Add a craft stick for the stem

PAPER PLATE & CONFETTI FLOWER
-
Supplies: hole punch, colorful paper, school glue, small paper plate and craft stick
-
Directions: use your school glue to “glue” the confetti pieces to the center of the paper plate

CUPCAKE LINER FLOWER WREATH
-
Supplies: large paper plate, scissors, mini cupcake liners and cardstock paper
-
Directions: cut the center out of your large paper and secure flattened cupcake liner “flowers” around the rim

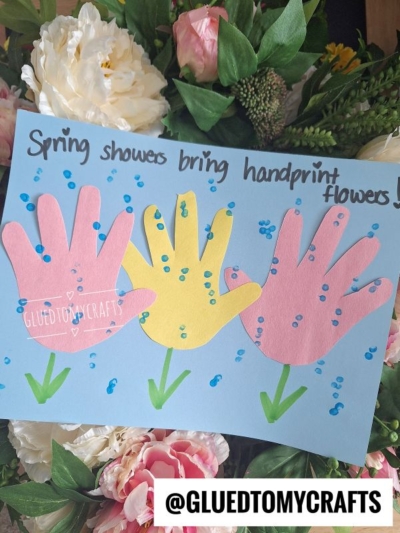
HANDPRINT FLOWER CARD
-
Supplies: washable craft paint, paint brush and cardstock paper
-
Directions: paint your child’s hand completely and press it down on the center of the paper. Decorate the design

PAPER PLATE CHERRY BLOSSOM TREE
-
Supplies: paper plate, cardstock paper, pom pom stamp and craft paint
-
Directions: use a pom pom stamp to “paint” the cherry blossoms on the paper plate. Add a handprint tree trunk cutout

CUPCAKE LINER AND POPSICLE STICK FLOWER
-
Supplies: cupcake liners, glue and craft sticks
-
Directions: make your flower out of a stack of cupcake liners. Add a craft stick for the stem

POTATO MASHER STAMPED FLOWER
-
Supplies: potato masher, craft paint and cardstock paper
-
Directions: use the potato masher to “stamp” the center of a flower, on paper

THUMBPRINT DANDELION KEEPSAKE CANVAS – I COULDN’T HAVE WISHED FOR A BETTER MOM
-
Supplies: blank canvas, markers and fingerpaint
-
Directions: draw your dandelion design on the canvas and add fingerprints for the “points”
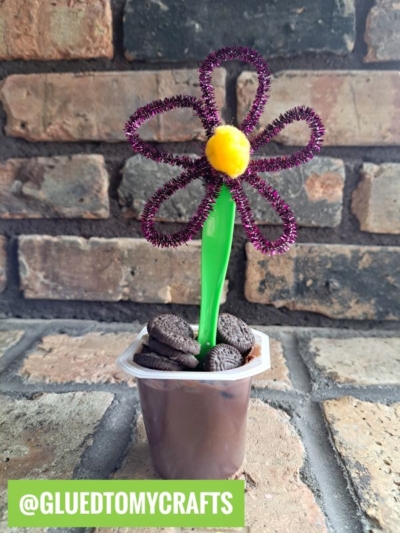
FLOWER POT PUDDING CUPS – PIPE CLEANER FLOWER SPOON
-
Supplies: pudding cups, crushed cookies, plastic spoons, pipe cleaners and a hot glue gun
-
Directions: follow our tutorial to make flower “spoons” for your pudding cups
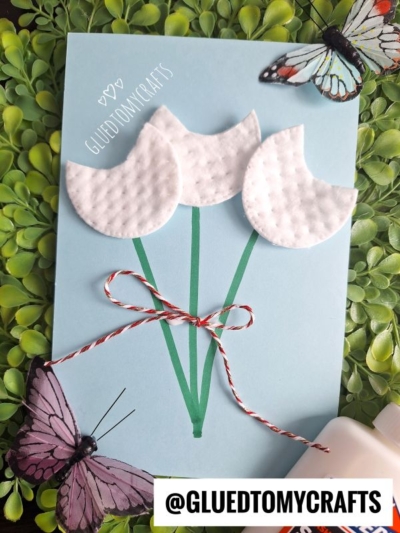
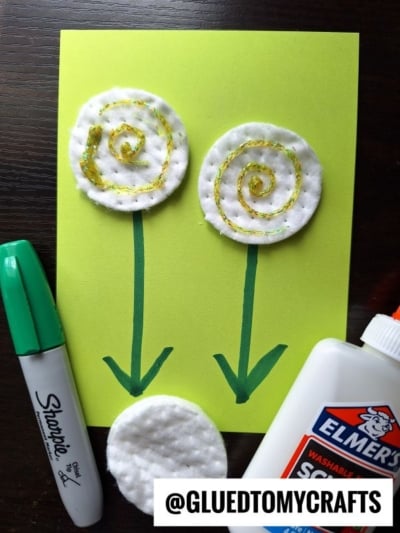
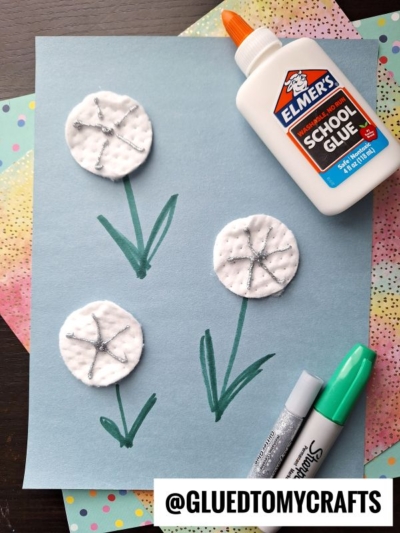
COTTON ROUND TULIPS
-
Supplies: cotton rounds, scissors, paper, school glue and a marker
-
Directions: trim down your cotton rounds {to make the tulip designs} glue them to your paper along with some hand-drawn stems

FLOWER PETAL BOOKMARK
-
Supplies: use clear packing tape and dry flower petals
-
Directions: take two pieces of clear packing tape and add flower petals between the two to make your bookmark
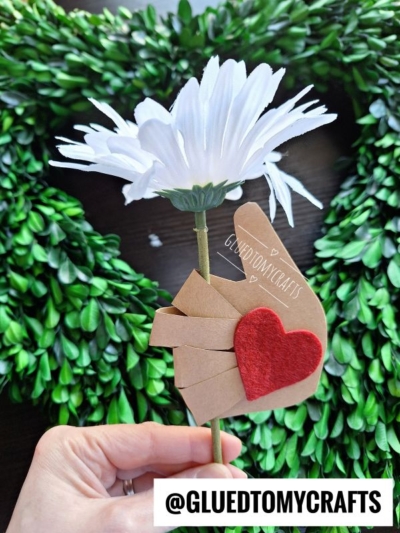
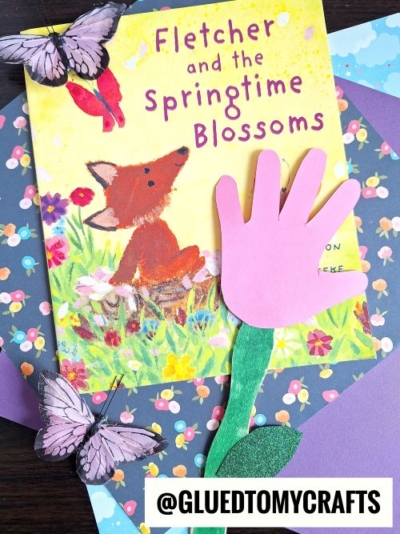
3-D Handprint Flower Keepsake
-
Supplies: cardstock paper, plastic flower and heart sticker
-
Directions: bend your handprint cutout so the fingers wrap around the flower stem. Secure with a large heart sticker

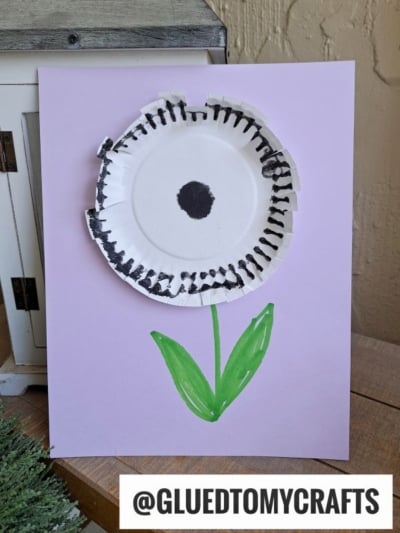
TOILET ROLL STAMPED FLOWERS
-
Supplies: toilet paper roll, scissors, craft paint and cardstock paper
-
Directions: cut slits in a toilet paper roll and use it to “stamp” flower designs on paper

THUMBPRINT HEART TULIPS FOR SPRING – MY TINY HANDS MADE SOME FLOWERS GROW
-
Supplies: washable craft paint, markers and paper
-
Directions: use your index finger to add the heart shaped fingerprint “tulip” designs on paper

FORK PAINTED FLOWER CARD
-
Supplies: plastic fork, craft paint, cardstock paper and markers
-
Directions: use a plastic fork to “stamp” your tulip flower designs on paper

WASHI TAPE FLOWER CARD
-
Supplies: washi tape, markers and cardstock paper
-
Directions: tear several pieces of washi tape and place them on your paper in a flower formation

COTTON BALL DAISY FLOWER
-
Supplies: cotton balls, school glue and cardstock paper
-
Directions: glue your cotton balls into a circular design on paper to create the flower design

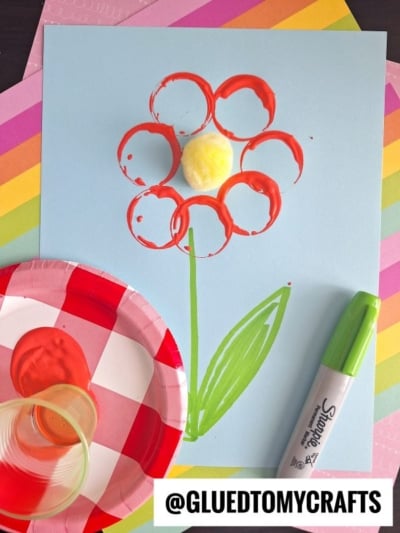
POM POM STAMPED FLOWER
-
Supplies: pom pom, clothespin, craft paint and cardstock paper
-
Directions: pinch your pom pom in between a clothespin to make a “stamper.” Use it to stamp the petals on paper

POPSICLE STICK FLOWER
-
Supplies: wood craft sticks, craft paint, school glue and cardstock paper
-
Directions: paint your craft sticks and glue them together in a flower formation. Decorate

PAPER BOWL FLOWER W/HANDPRINT PETALS
-
Supplies: paper bowl, craft paint, scissors and cardstock paper
-
Directions: start off by painting your paper roll yellow. Finish off with handprint cutouts around the bowl to create the flowers

PAPER PLATE FLOWER GARDEN – USE WASHABLE INK PADS AND YOUR INDEX FINGER TO ADD THE FLOWERS
-
Supplies: washable ink pads, cardstock paper and a large paper plate
-
Directions: use your index finger to add the flower designs on paper
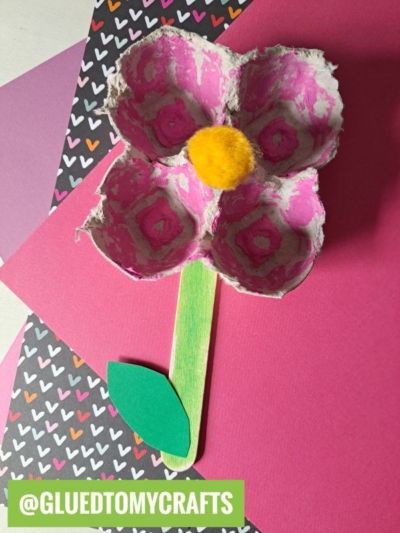
PAPER PLATE FLOWER – USE A SMALL PIECE OF AN EGG CARTON FOR THE CENTER
-
Supplies: cardboard egg carton, craft paint, cardstock paper and craft stick for the stem
-
Directions: paint the egg carton and add the stem made out of a craft stick & cardstock paper

PAPER PLATE CHERRY BLOSSOM WREATH
-
Supplies: large paper plate, scissors, cupcake liners and cardstock paper
-
Directions: cut the center out of a large paper plate and decorate with flattened out cupcake liners

FORK PAINTED FLOWER BOUQUET
-
Supplies: plastic fork, craft paint, cardstock paper and marker
-
Directions: draw off by drawing several lines for the “stems” in your bouquet. Then use the plastic fork to “stamp” the flowers on

THUMBPRINT HEART TULIPS – THIS LITTLE PRINT SAYS I LOVE YOU!
-
Supplies: washable craft paint, markers and paper
-
Directions: use your index finger to add the heart shaped fingerprint “tulip” designs on paper
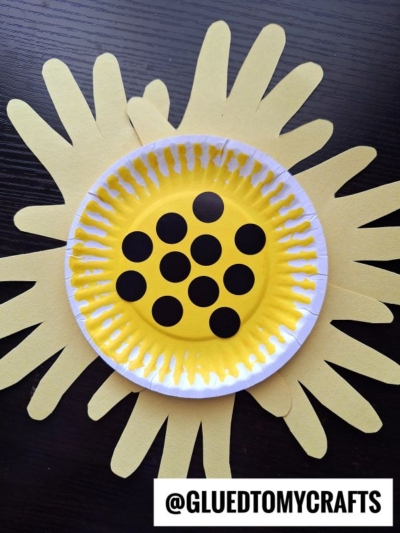
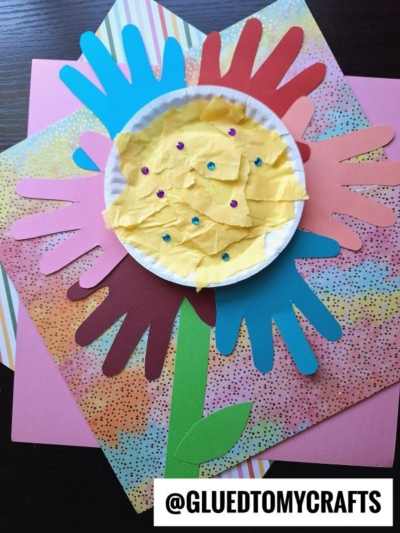
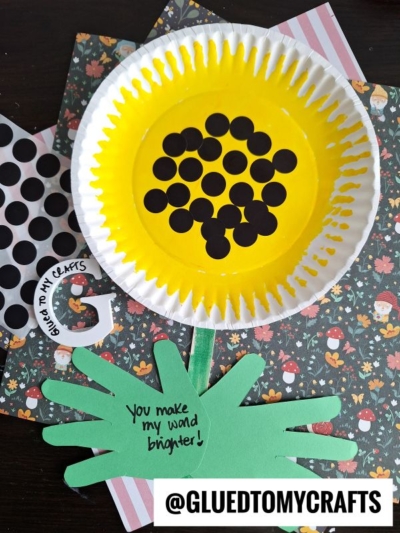
PAPER PLATE & HANDPRINT CUTOUT SUNFLOWER CRAFT IDEA – USE DOT STICKERS FOR THE CENTER
-
Supplies: paper plate, dot stickers, paint, scissors, school glue and cardstock paper
-
Directions: decorate the paper plate and add handprint cutouts

HANDPRINT FLOWER CRAFT
-
Supplies: cardstock paper, craft stick and an extra large flower sticker
-
Directions: make your flower out of the craft stick and wrap the handprint cutout around it to make it look like it’s “holding” the flwoer


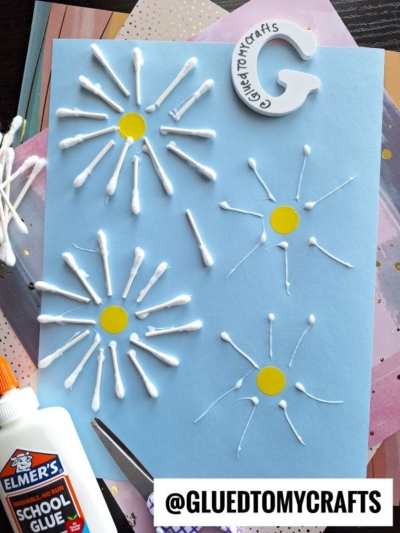
Q-TIP DAISY FLOWERS
-
Supplies: q-tips, scissors, school glue and paper
-
Directions: cut your q-tips in half and glue them in a flower formation on paper

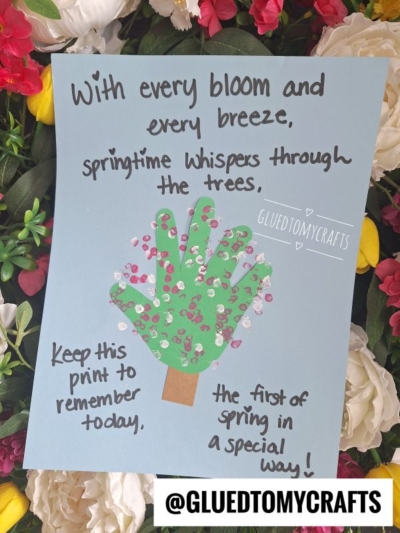
HANDPRINT DAFFODIL FLOWER
-
Supplies: craft paper, craft stick, school glue and cupcake liners
-
Directions: use your handprint cutouts and cupcake liners to make a beautiful flower design

MARSHMALLOW STAMPED FLOWERS
-
Supplies: marshmallows, craft paint, paper and markers
-
Directions: start off by drawing your stems first. Then use the marshmallow to “stamp” the petals on

POPSICLE STICK FLOWER BOX ON PAPER
-
Supplies: jumbo craft sticks, school glue, paper and flower embellishments
-
Directions: glue your craft sticks into a window design and then decorate

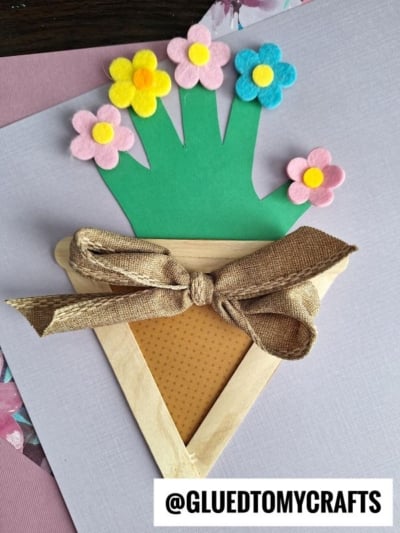
HAND PICKED FOR YOU KEEPSAKE IDEA
-
Supplies: cardstock paper, scissors, glue and markers
-
Directions: cut out a pot for the bottom portion and use a handprint cutout for the flower
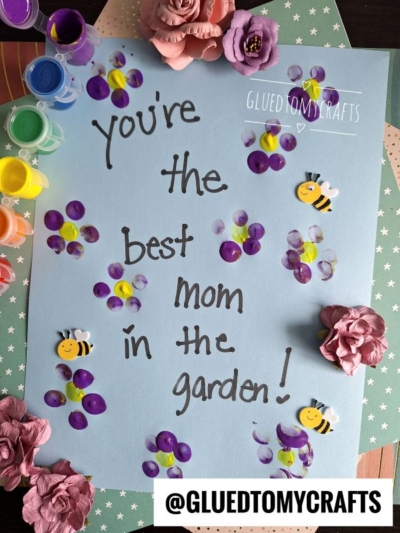
THUMBPRINT FLOWERS – YOU ARE THE BEST MOM IN THE GARDEN
-
Supplies: fingerpaint, cardstock paper and markers
-
Directions: start off by writing your phrase first and then add the fingerprint flower designs around it

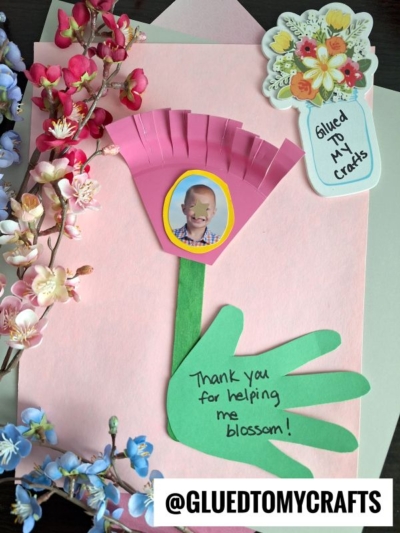
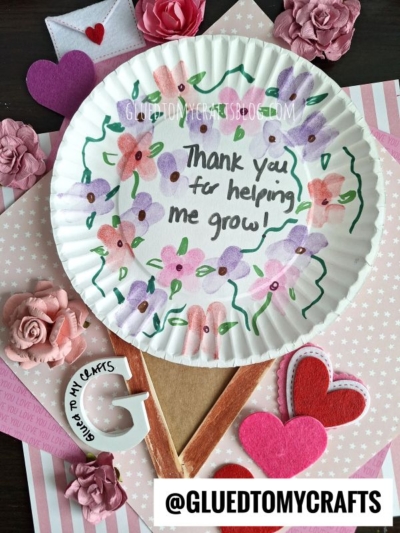
HEART DOILY FLOWER CRAFT IDEA – THANK YOU FOR HELPING ME BLOSSOM
-
Supplies: paper heart doilies, cardstock paper, school glue and a craft stick for the stem
-
Directions:
Q-TIP PAINTED CHERRY BLOSSOM TREE CRAFT IDEA
-
Supplies: craft paint, qtips, cardstock paper

USE A POTATO MASHER TO STAMP THIS CRAFT IDEA ON PAPER
-
Supplies: potato masher, craft paint and cardstock paper
-
Directions: use your potato masher as your “stamp” to make the flower petals
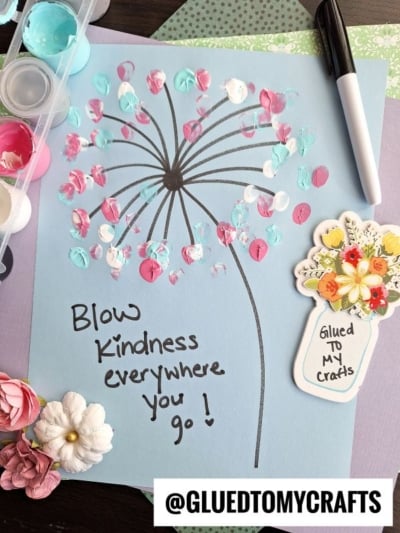
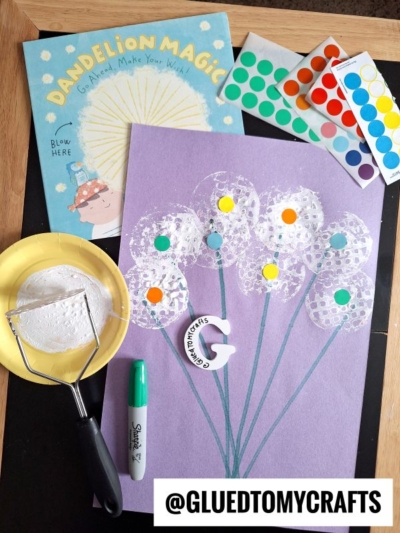
FINGERPRINT DANDELION – BLOW BLOW KINDNESS EVERYWHERE YOU GO!
-
Supplies: washable fingerpaint, markers and cardstock paper
-
Directions: draw your dandelion design first and then decorate with your index finger

USE A PLASTIC FORK TO PAINT TULIPS ON PAPER
-
Supplies: plastic fork, craft paint and cardstock paper
-
Directions: dip the plastic fork in craft paint and use it to “paint” the flowers on paper
PAPER PLATE FLOWER W/HANDPRINT PETALS
-
Supplies: paper plate, tissue paper, school glue, scissors and cardstock paper
-
Directions: decorate the paper plate with tissue paper to make the center and then handprint cutouts for the petals

3-D GIFT BOW & HANDPRINT FLOWER CARD – THANK YOU FOR HELPING ME GROW
-
Supplies: gift bows, cardstock paper, scissors and glue stick
-
Directions: use a gift bow as a “flower” center. Use handprint cutouts for the leaves

PAPER PLATE & CONFETTI FLOWER
-
Supplies: hole punch, colorful paper, school glue, small paper plate and craft stick
-
Directions: use your school glue to “glue” the confetti pieces to the center of the paper plate

MY LOVE GROWS FOR YOU KEEPING FLOWER – HANDPRINT FLOWER
-
Supplies: cardstock paper, scissors and glue

HANDPRINT BEST BUD FLOWER KEEPSAKE
-
Supplies: cardstock paper, scissors and glue

TOILET ROLL STAMPED LOVE BOUQUET
-
Supplies: toilet paper roll, craft paint and cardstock paper
-
Directions: flatten/fold your toilet paper roll into a slight heart shape and use it to stamp “flowers” on paper
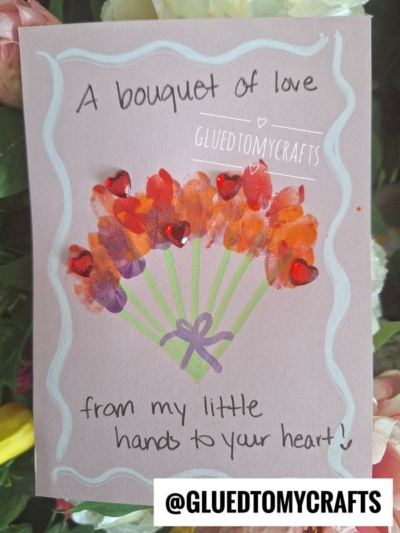
THUMBPRINT FLOWER BOUQUET – A BOUQUET OF LOVE
-
Supplies: fingerpaint, cardstock paper and markers

EGG CARTON FLOWER – USE A JUMBO POPSICLE STICK FOR THE STEM
-
Supplies: empty cardboard egg carton, craft paint, paint brush, school glue and craft stick
-
Directions: paint your egg carton and decorate it to look like a flower

CUPCAKE LINER LOVE FLOWER CRAFT IDEA
-
Supplies: cupcake liners, cardstock paper, scissors, craft sticks and glue

WASHI TAPE FLOWER CRAFT IDEA
-
Supplies: washi tape, markers and cardstock paper

Bottle Stamped Flowers
-
Supplies: empty water bottle, craft paint, cardstock paper and markers
-
Directions: use the bottom of a plastic bottle to stamp flowers on paper

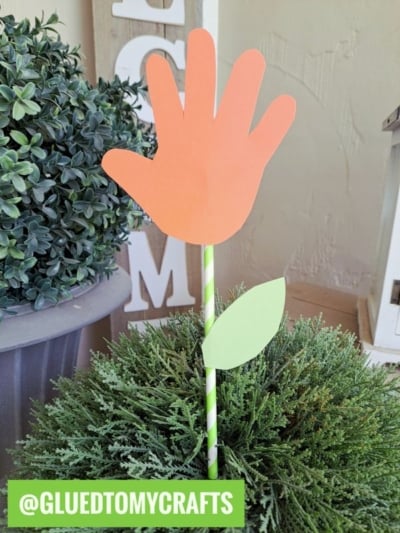
PAPER STRAW AND HANDPRINT FLOWER CRAFT IDEA
-
Supplies: cardstock paper, hot glue gun, paper straws and scissors

PAPER PLATE FLOWER PICTURE FRAME
-
Supplies: small paper plate, craft sticks, scissors and craft embellishments
-
Directions: cut the center out of a small paper plate to create your picture frame. Decorate to look like a flower

FINGERPRINT FLOWER THANK YOU FOR HELPING ME BLOSSOM KEEPSAKE
-
Supplies: craft paint, cardstock paper and jewels

APPLE SLICE STAMPED FLOWER ON PAPER
-
Supplies: apple slice, craft paint, cardstock paper
-
Directions: use your apple to “stamp” the flower design on paper

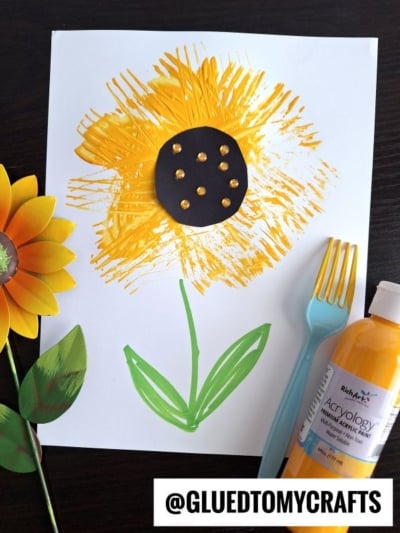
FORK PAINTED SUNFLOWER CRAFT
-
Supplies: plastic fork, yellow craft paint and cardstock paper
Q-TIP PAINTED CHERRY BLOSSOM TREE CRAFT IDEA
-
Supplies: craft paint, qtips, cardstock paper

TOILET PAPER ROLL STAMPED FLOWERS
-
Supplies: toilet paper roll, craft paint and paper
-
Directions: cut slits in your toilet paper roll and use it as a stamp
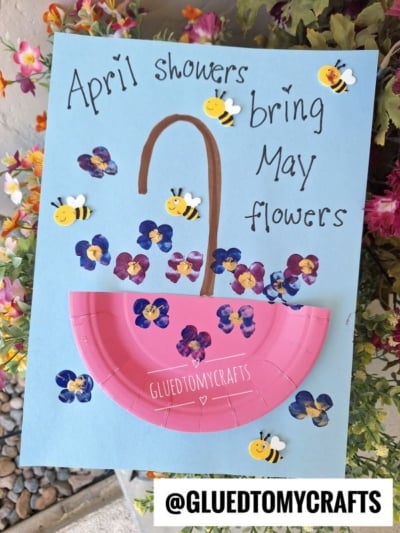
PAPER PLATE UMBRELLA FILLED WITH FINGERPRINT FLOWERS
-
Supplies: small paper plate, school glue, fingerpaint
-
Directions: a small paper plate in half to make the umbrella and use your index finger to make the flowers
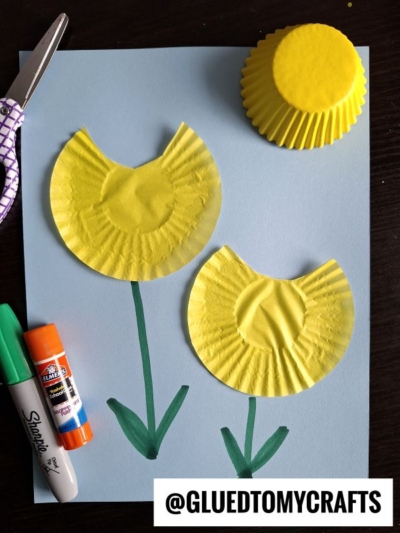
CUPCAKE LINER TULIPS FOR SPRING
-
Supplies: glue stick, cupcake liner, cardstock paper and marker
-
Directions: cut a small section out of a flattened out cupcake liner to create your flower design
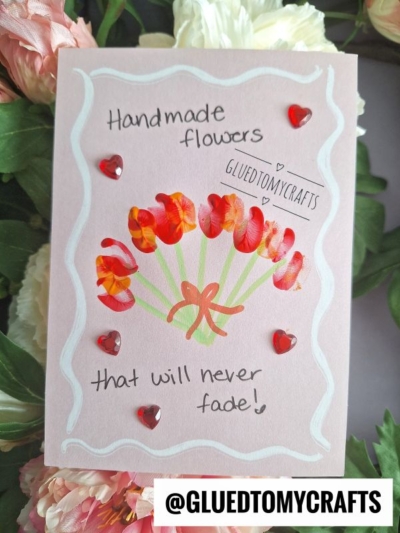
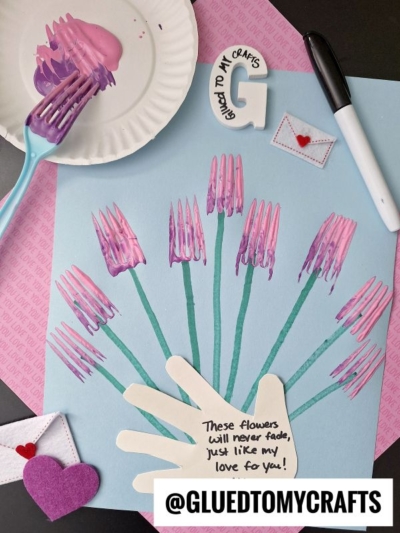
THUMBPRINT FLOWER BOUQUET – FLOWERS THAT WILL NEVER FADE
-
Supplies: fingerpaint, cardstock paper and markers

TOOTH BRUSH PAINTED FLOWERS
-
Supplies: clean, unused toothbrush, white craft paint, markers, dot stickers and cardstock paper
-
Directions: dip your paint brush in white craft paint and use it to “paint” flowers on paper. Add dot stickers for the centers

HEART SHAPED FLOWER CRAFT IDEA
-
Supplies: construction paper, school glue, scissors and craft sticks
-
Directions: for the flower petals, simply cut your construction paper into heart shapes. Glue them to a craft stick
POTATO MASHER STAMPED DANDELION FLOWERS – USE DOT STICKERS FOR THE CENTERS
-
Supplies: potato masher, craft paint, construction paper and dot stickers
-
Directions: use the masher to “stamp” the flowers on paper. Add dot stickers for the centers

PLASTIC CUP STAMPED FLOWERS
-
Supplies: plastic cup, craft paint and cardstock paper
-
Directions: use the bottom of a plastic cup to stamp flower petals on paper

PAPER PLATE FLOWER PICTURE FRAME
-
Supplies: small paper plate, craft sticks, scissors and craft embellishments
-
Directions: cut the center out of a small paper plate to create your picture frame. Decorate to look like a flower

PAPER PLATE & YARN FLOWER
-
Supplies: small paper plate, craft yarn, school glue, cardstock paper and wood popsicle sticks
-
Directions: use school glue to add the craft yarn to the center of the paper plate. Finish off with a popsicle stick stem.

TORN PAPER AND GLITTER GLUE FLOWER
-
Supplies: white computer paper, glitter glue, school glue and cardstock paper

PAINT DABBER FLOWER CRAFT IDEA
-
Supplies: bingo dabbers, paper plate and embellishments
-
Directions: use paint dabbers to make the center design of a paper plate flower

SPONGE PAINTED FLOWERS
-
Supplies: kitchen sponge cut into a circle, craft paint and paper

BUBBLE WRAP STAMPED FLOWERS
-
Supplies: bubble wrap piece, craft paint, markers and craft paint
PAPER PLATE DANDELION CRAFT IDEA
-
Supplies: paper plate, craft paint, school glue, marker and cardstock paper

HANDPRINT FLOWER BOUQUET CRAFT IDEA
-
Supplies: flower stickers, scissors, glue and cardstock paper
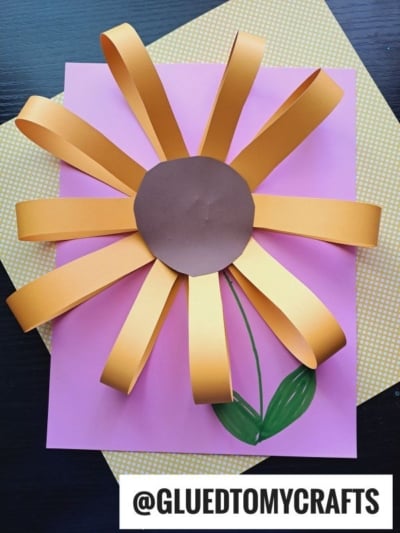
3-D PAPER LOOP SUNFLOWER
-
Supplies: cardstock paper, scissors and glue
-
Directions: use paper loops to make a sunflower shape on paper
POPSICLE STICK AND HANDPRINT FLOWER BOUQUET
-
Supplies: craft sticks, glue and cardstock paper

USE POPSICLE STICKS TO MAKE THIS FLOWER SCENE ON PAPER
- Supplies: craft sticks, glue, paint crayons and cardstock paper
Q-TIP DAISY FLOWERS
-
Supplies: q-tips, scissors, school glue and paper
-
Directions: cut your q-tips in half and glue them in a flower formation on paper

USE A POM POM TO STAMP THE CENTER OF THIS FLOWER
-
Supplies: pom pom, clothespin, craft paint and paper plate

FINGERPRINT PAINTED FLOWERS ON A PAPER PLATE
-
Supplies: paper plates, markers and fingerpaint

PAPER PLATE TULIP FLOWERS
-
Supplies: large paper plates, scissors, school glue and craft sticks
-
Directions: cut your paper plates into fourths and add a fringe. Add a craft stick for the stem

PAPER PLATE FLOWER CRAFT IDEA
-
Supplies: paper plate, craft stick, glue and cardstock paper
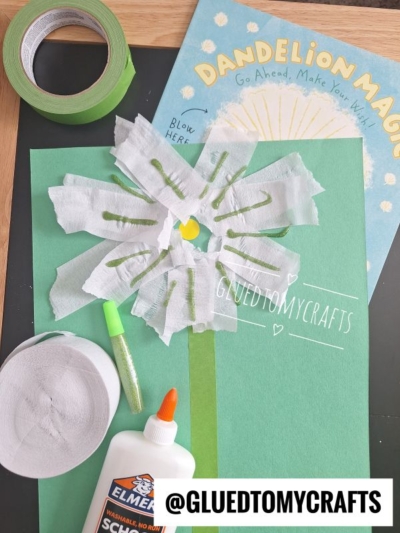
CREPE PAPER DANDELION CRAFT IDEA FOR SPRING
-
Supplies: white crepe paper, painter’s tape, construction paper and school glue
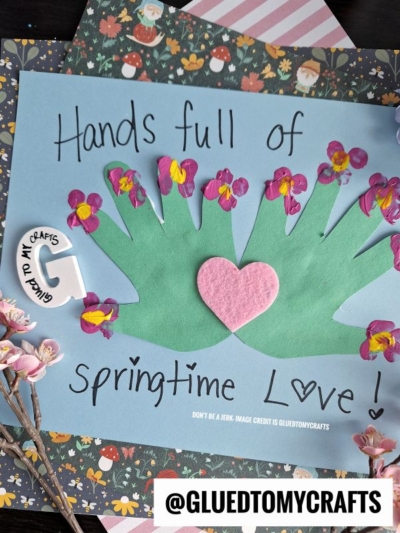
HANDS FULL OF SPRING TIME LOVE KEEPSAKE
-
Supplies: washable paint, cardstock paper and embellishments
-
Directions: use finger paint and use your index finger to recreate this craft idea

HANDPRINT FLOWER CARD – USE GIFT BOWS
-
Supplies: gift bows, school glue and cardstock paper

SPATULA STAMPED FLOWER
-
Supplies: flat spatula, craft paint and paper
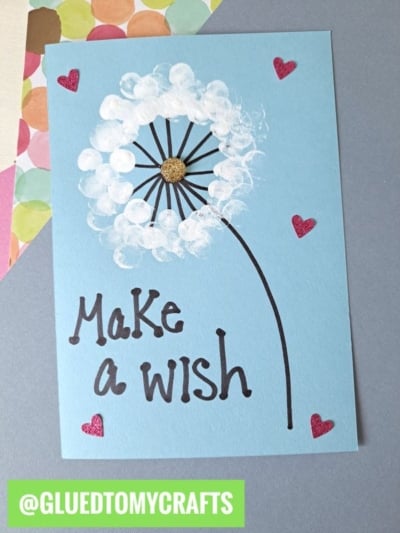
FINGERPRINT DANDELION – MAKE A WISH
-
Supplies: cardstock paper, washable craft paint and markers

Q-TIP PAINTED FLOWER
-
Supplies: q-tips, paper plate and craft paint
-
Directions: use your q-tips dipped in black craft paint to “paint” the sunflower design on paper

COFFEE FILTER CHERRY BLOSSOM TREE
-
Supplies: coffee filters, sponge, craft paint and cardstock paper
-
Directions: use a small piece of sponge to “paint” the coffee filters and turn them into a cherry blossom design

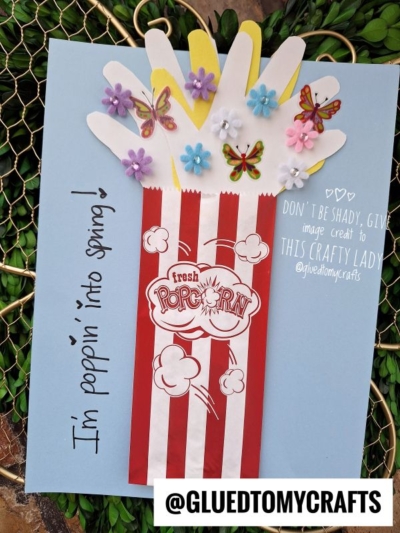
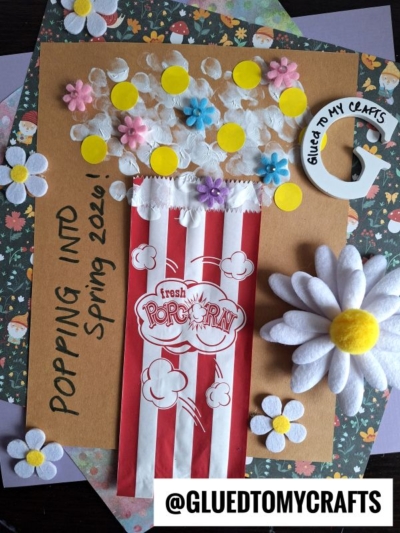
POPPIN’ INTO SPRING CRAFT IDEA USING POPCORN BAGS
-
Supplies: paper popcorn bags, cardstock paper, flower stickers, scissors and glue
-
Directions: use the flower stickers to make “popcorn” coming out the bag. Write a punny phrase like “popping into spring” around it

HANDPRINT FLOWERS IN MASON JAR
-
Supplies: mason jar, construction paper, glue, scissors and craft sticks
-
Directions: make handprint flowers out of construction paper and sticks & place them in the mason jar

SPONGE PAINTED FLOWERS
-
Supplies: kitchen sponges, craft paint and paper
-
Directions: cut your kitchen sponge into long rectangle shapes to use as a stamp

CREPE PAPER CHERRY BLOSSOM TREE CRAFT
-
Supplies: crepe or tissue paper, cardstock paper and school glue
-
Directions: cut out a handprint “trunk” and a heart shape for the tree. Decorate with crumbled up tissue paper for the blossoms

HANDPRINT SPRING IS IN THE AIR FLOWER KEEPSAKE
-
Supplies: cardstock paper, scissors and glue

BALLOON STAMPED FLOWER WREATH
-
Supplies: balloon, craft paint, paper and paper plate
-
Directions: use a slightly blown up balloon to stamp “flowers” on paper, trim them out and add them to a paper plate wreath

TORN PAPER FLOWERS
-
Supplies: construction paper, glue and jewels

PAPER PLATE FLOWER CRAFT IDEA
-
Supplies: paper plate, craft stick, glue, scissors and paint dabber
-
Directions: use the paint dabber to “paint” the center of the paper plate flower

FINGERPRINT FLOWER CRAFT IDEA
-
Supplies: paper, marker and craft paint
-
Directions: write two M’s on your paper but make sure you leave a large space between them. Add a fingerprint flower design to the center

HANDPRINT & PIPE CLEANER FLOWER CRAFT IDEA
-
Supplies: cardstock paper, ink pads and pipe cleaners

SPRING 2025 FLOWER KEEPSAKE
-
Supplies: cardstock paper, markers and glitter glue

WELCOME SPRING – HANDPRINT FLOWER KEEPSAKE
- Supplies: cardstock paper, markers and glitter glue
EGG CARTON FLOWER – USE A JUMBO POPSICLE STICK FOR THE STEM
-
Supplies: empty cardboard egg carton, craft paint, paint brush, school glue and craft stick
-
Directions: paint your egg carton and decorate it to look like a flower

FORK PAINTED TULIPS WITH HANDPRINT
-
Supplies: cardstock paper, craft paint and a plastic fork
COTTON ROUND DANDELION CRAFT IDEA
-
Supplies: cotton rounds, glue, marker and cardstock paper
-
Directions: use glitter glue and cotton rounds to recreate this dandelion craft

THUMBPRINT FLOWER PICTURE FRAME
-
Supplies: craft sticks, glue, paper and ink pads
-
Directions: use the craft sticks and cardstock paper to make a “frame” shape. Add your thumbprint design

CUPCAKE LINER & FORK PAINTED FLOWER CRAFT
-
Supplies: plastic fork, cupcake liners, craft paint and paper

APPLE STAMPED FLOWER CRAFT IDEA
-
Supplies: apple slice, cardstock paper, marker and craft paint

PAPER PLATE SUNFLOWER CRAFT IDEA
-
Supplies: paper plate, paint crayon, dot stickers, craft stick
-
Directions: use coding dots for the center of the flower

COTTON BALL DAISY FLOWER – USE A DOT MARKER FOR THE CENTER
-
Supplies: cotton balls, school glue and markers

USE CODING LABELS TO MAKE FLOWER DESIGNS ON PAPER PLATES
-
Supplies: paper plates, dot stickers and craft sticks

USE CODING DOTS TO MAKE DAISY DESIGNS ON PAPER PLATES
-
Supplies: paper plate, dot stickers and markers

HANDPRINT FLOWER BOUQUET
-
Supplies: large paper plate, craft sticks, cardstock paper and glue
-
Directions: cut your paper plate in half and add the handprint flowers

Q-TIP PAINTED HYACINTHS
-
Supplies: washi tape, q-tips, craft paint and paper
-
Directions: create your washi tape “stems” and then use the q-tip to paint on purple flowers

USE CODING DOTS TO MAKE A FLOWER BOUQUET
-
Supplies: dot stickers, paper heart doily and paper

HANDPRINT FLOWER BOUQUET – FOLD THE PAPER PLATE INTO A TRIANGLE SHAPE
-
Supplies: paper plate, craft sticks and cardstock paper

FINGERPRINT FLOWERS ON A TERRA COTTA POT
-
Supplies: terra cotta pot and craft paint

HAND PICKED FOR YOU HANDPRINT KEEPSAKE
-
Supplies: cardstock paper, scissors, glue and markers

MINI CUPCAKE LINER FLOWERS ON A PAPER PLATE
-
Supplies: mini cupcake liners, paper plate, glue and markers
USE THE BOTTOM OF A PLASTIC CUP TO STAMP A FLOWER ON PAPER
-
Supplies: plastic cup, craft paint, marker and paper

HANDPRINT FLOWER KEEPSAKE IDEA FOR MOTHER’S DAY
-
Supplies: cardstock paper and markers

BUBBLE WRAP STAMPED DANDELIONS
-
Supplies: toilet paper roll, bubble wrap, rubber paint, craft paint and paper
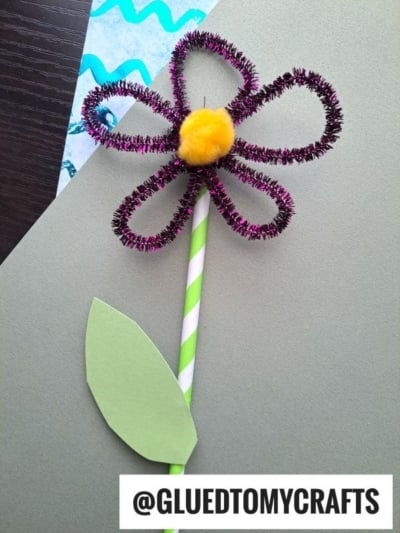
PAPER STRAW & PIPE CLEANER FLOWER CRAFT IDEA
-
Supplies: paper straws, pipe cleaners, hot glue gun and cardstock paper

CUPCAKE LINER FLOWER GARDEN – START OFF BY DRAWING SWIRLS ON THE PAPER FIRST
-
Supplies: cupcake liners, glue stick, marker and construction paper
PAPER STRAW AND HANDPRINT FLOWER CRAFT IDEA
-
Supplies: paper straw, cardstock paper, hot glue gun and scissors

CUPCAKE LINER & CLOTHESPIN FLOWER CRAFT IDEA
-
Supplies: cupcake liners, clothespins, glue and small picture for the center
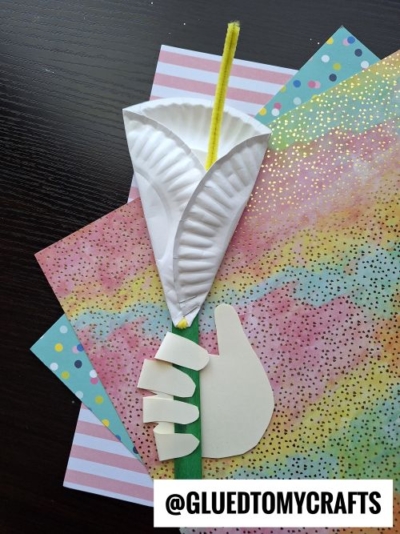
FOLD A LARGE PAPER PLATE INTO A TRIANGLE TO MAKE A LILY
-
Supplies: small paper plate, pipe cleaner, cardstock paper and a craft stick
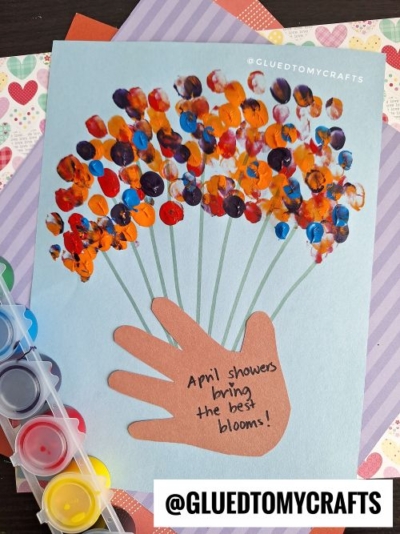
USE FINGER PAINT AND YOUR INDEX FINGER TO RECREATE THIS “APRIL SHOWERS BRING THE BEST BLOOMS” CRAFT IDEA
-
Supplies: washable fingerpaint and cardstock paper
USE A PLASTIC FORK TO PAINT TULIPS ON PAPER
-
Supplies: plastic fork, cardstock paper and craft paint
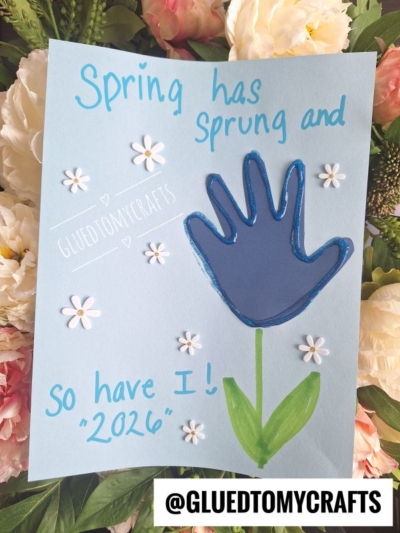
SPRING HAS SPRUNG – HANDPRINT FLOWER KEEPSAKE
- Supplies: cardstock paper, markers and glitter glue
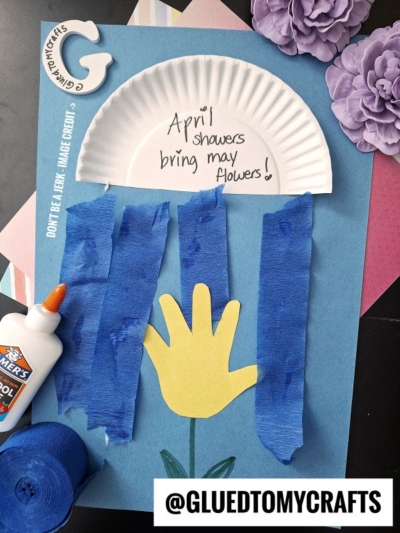
USE TORN PIECES OF BLUE CREPE PAPER FOR THIS APRIL SHOWERS CRAFT IDEA
-
Supplies: paper plate, crepe paper, construction paper and school glue
-
Directions: use the paper plate half piece for the cloud and the crepe paper for the “rain”
HANDPRINT “I’M POPPIN’ INTO SPRING” POPCORN CRAFT IDEA
-
Supplies: paper popcorn bag, cardstock paper and embellishments
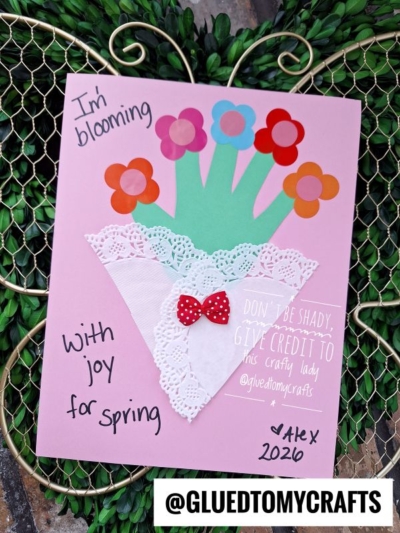
USE DOT STICKERS FOR THIS “I’M BLOOMING WITH JOY FOR SPRING” KEEPSAKE
-
Supplies: dot stickers, paper doilies and cardstock paper
USE A SLIGHTLY BLOWN UP BALLOON TO STAMPED A FLOWER BOUQUET ON PAPER TODAY!
-
Supplies: balloon, craft paint and cardstock paper
-
Directions: use a slightly blown up balloon to “stamp” flowers on paper
PAPER PLATE TULIP CRAFT IDEA FOR KIDS
-
Supplies: paper plate, cardstock paper, school glue and craft stick
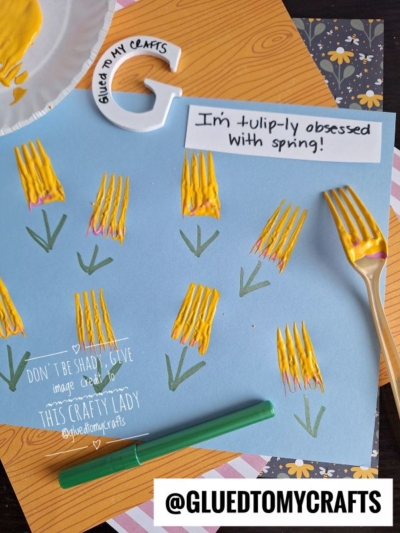
USE A PLASTIC FORK TO PAINT TULIPS ON PAPER – card reads “I’m tulip-ly obsessed with spring!”
-
Supplies: cardstock paper, plastic fork and craft paint
USE DOT STICKERS ON YELLOW PAINTED PAPER PLATES TO MAKE SUNFLOWERS
-
Supplies: paper plate, dot stickers, paint crayon, craft stick and paper
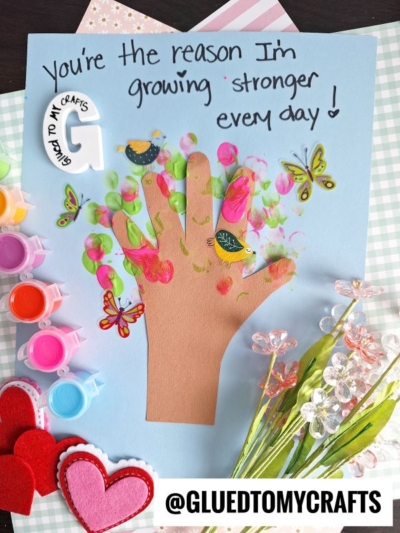
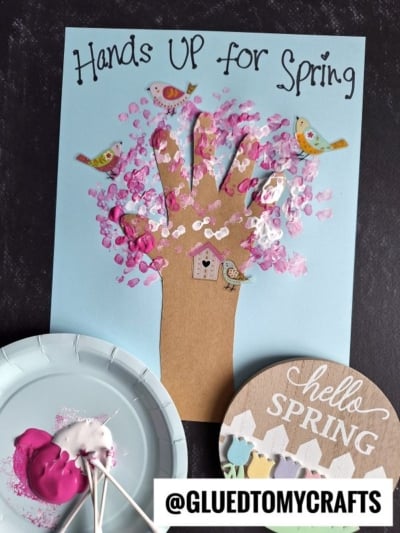
HANDPRINT CHERRY BLOSSOM TREE KEEPSAKE – THE CARD READS “YOU’RE THE SEASON I’M GROWING STRONGER EVERYDAY!”
-
Supplies: cardstock paper, glue and fingerpaint
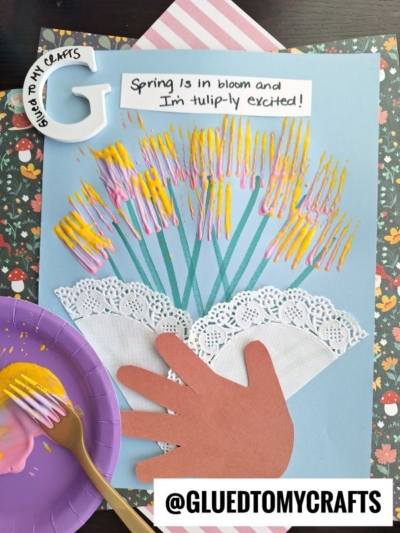
FORK PAINTED FLOWER BOUQUET – the card reads “spring is in bloom and I’m tulip-ly excited!”
-
Supplies: plastic fork, craft paint and paper
Paper Plate, Popsicle Stick AND Thumbprint Flower Bouquet Craft Idea
-
Supplies: large paper plate, ink pad, markers, school glue and popsicle sticks
-
Directions: cover the paper plate with thumbprint flowers and use craft sticks to make a “bouquet” shape for the bottom
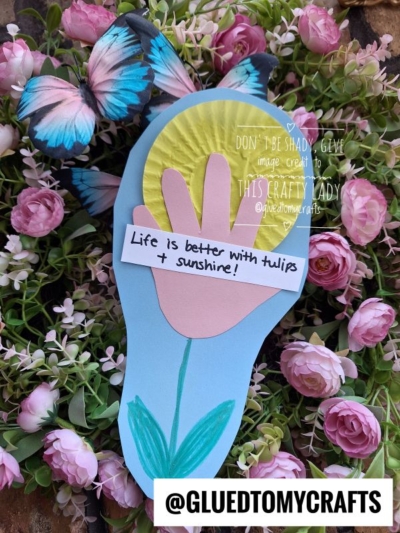
Cupcake Liner and Handprint Tulip Flower Craft Idea – Life is better with tulips and sunshine!
-
Supplies: cupcake liners, cardstock paper, school glue and markers
-
Directions: use the cupcake liner to make the “sunshine” in the craft
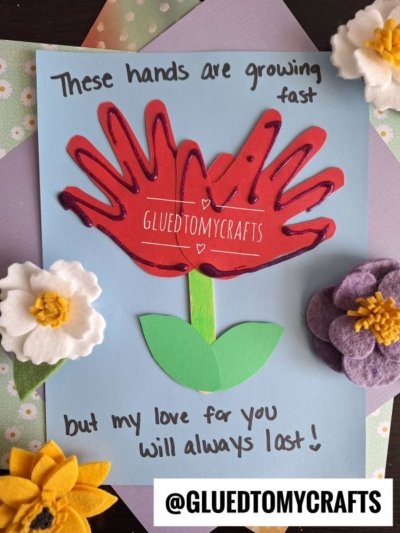
HANDS ARE GROWING FAST – HANDPRINT FLOWER KEEPSAKE
- Supplies: cardstock paper, markers, craft stick and glitter glue
FINGERPRINT PAINTED “I’M POPPIN’ INTO SPRING” POPCORN CRAFT IDEA
-
Supplies: paper popcorn bag, fingerpaint, cardstock paper and markers
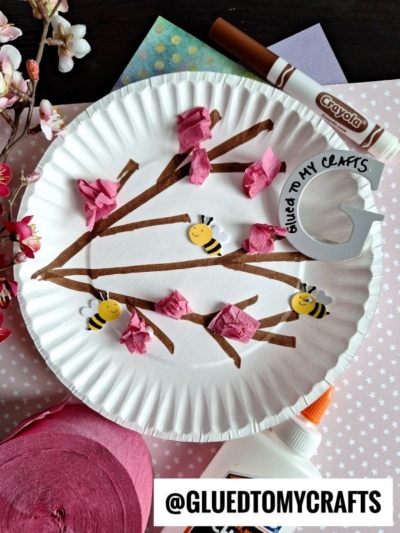
PAPER PLATE & TORN CREPE PAPER CHERRY BLOSSOM TREE BRANCH
-
Supplies: paper plate, markers, school glue and pink crepe paper
-
Directions: draw your branches on the paper and add crumbled up crepe paper for the “blossoms”

POOL NOODLE STAMPED FLOWERS – USE DOT STICKERS FOR THE CENTERS
-
Supplies: pool noodle, craft paint, marker, cardstock paper and dot stickers
-
Directions: use a pool noodle to “stamp” flowers on paper and then use dot stickers for the center
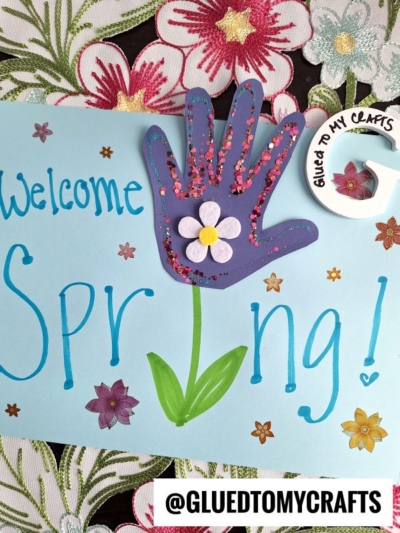
HANDPRINT “WELCOME SPRING” FLOWER KEEPSAKE CRAFT IDEA
-
Supplies: cardstock paper, markers and glitter glue
CUPCAKE LINER AND DOT STICKER DAISY FLOWER GARDEN CRAFT IDEA
-
Supplies: cupcake liners, school glue, markers and paper
COTTON ROUND DANDELION CRAFT IDEA
-
Supplies: cotton rounds, glue, marker and cardstock paper
-
Directions: use glitter glue and cotton rounds to recreate this dandelion craft
FORK PAINTED SUNFLOWER CRAFT IDEA
-
Supplies: plastic fork, craft paint and cardstock paper
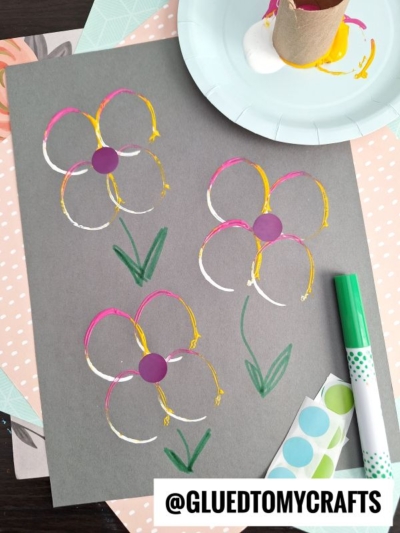
USE A TOILET PAPER ROLL AS A STAMP, TO RECREATE THIS FLOWER CRAFT IDEA
-
Supplies: toilet paper roll, craft paint, cardstock paper, marker and dot stickers
FIVE REASONS WHY I LOVE SPRING KEEPSAKE IDEA
-
Supplies: cardstock paper, school glue and paper punches
-
Directions: create a handprint cutout out of green paper and add colorful paper punches for the “flowers”
SPRING SHOWERS – HANDPRINT FLOWER KEEPSAKE
-
- Supplies: cardstock paper, markers, paint and Q-tips for painting on raindrops
PAPER STRAW FLOWER CARD
-
Supplies: paper straws, school glue, markers and cardstock paper
-
Directions: cut paper straws into smaller pieces and glue them in a flower formation on cardstock paper