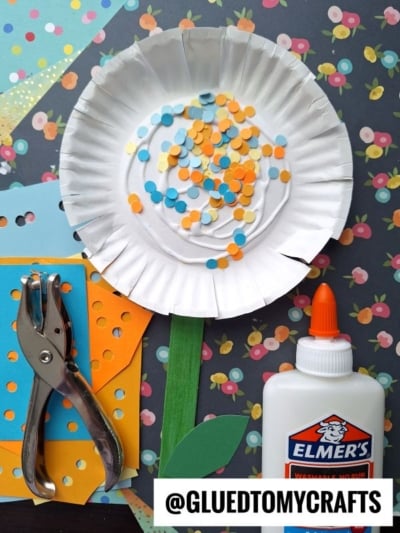
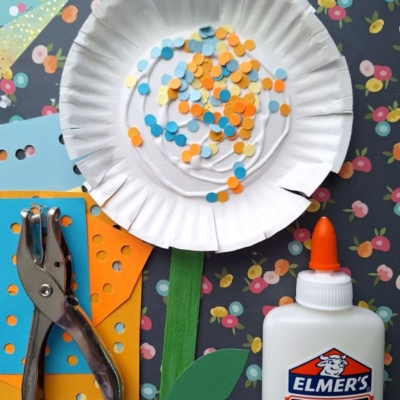
Bring a burst of vibrant color to your day with a cheerful Paper Plate Flower craft. This project turns simple, everyday supplies into a beautiful, textured masterpiece.
Creating the custom paper punch confetti center adds a highly tactile and enjoyable element that crafters of all ages will love. We designed this activity to be completely stress-free, making it perfect for a cozy afternoon with the kids or a relaxing solo creative session.
Let us gather our supplies and start crafting some bright, joyful blooms!
Craft Supplies:
You likely have most of these supplies hiding in your craft drawer right now:
- Small paper plates {one per craft}
- A single-hole punch
- Assorted scrap paper or cardstock in bright colors
- School glue
- Green craft sticks (or plain popsicle sticks painted green)
- Green paper or cardstock for the leaves
- Scissors
Directions:
- Punch the Confetti – Grab your hole punch and your brightly colored scrap paper. Punch away at the paper to create a small mountain of colorful paper circles. This is a fantastic step for kids to help develop their fine motor skills. Mix all the different colored dots together in a small bowl.
- Prep the Flower Center – Take your paper plate and lay it flat on your workspace. Squeeze a generous swirl of school glue directly into the center of the plate. You want enough glue to firmly hold the confetti, but not so much that it soaks through the paper plate.
- Sprinkle the Magic – Take a handful of your freshly punched paper confetti and sprinkle it right over the glue puddle. Pat the confetti down gently with your fingers to ensure the pieces stick securely. Shake off any loose, unglued dots back into your bowl for the next flower.
- Create the Stem and Leaf – Use your scissors to cut a simple leaf shape out of your green paper. Take your green craft stick and apply a small dot of glue near the middle. Press the base of your green leaf onto the glue spot.
- Assemble Your Flower – Add a generous dab of glue to the top portion of your green craft stick. Press the back of your confetti-filled paper plate firmly onto the stick. Hold it in place for just a few seconds to let the glue grab hold.
- Let It Dry – Set your beautiful new flower aside on a flat surface to dry completely. Liquid glue takes a little time to set, so patience is key before putting your craft on display.
RELATED —> Paper Confetti Field of Flowers Craft Idea For Kids


We’d love to see your finished paper plate flowers! Share your creations by tagging us on Facebook, so we can celebrate your creativity together. Stay inspired and keep exploring on our website – there’s always another project just waiting for your personal touch!

Paper Plate Flower with Confetti Center
Ready for a fun craft? Learn how to make a beautiful paper plate flower with a colorful paper punch confetti center. Get our simple, step-by-step tutorial!
Here’s your checklist of supplies to bring this craft to life:
- School Glue
Prepare your creative haven by laying down a protective cover before the crafting magic begins!
Directions:
- Punch the Confetti - Grab your hole punch and your brightly colored scrap paper. Punch away at the paper to create a small mountain of colorful paper circles. This is a fantastic step for kids to help develop their fine motor skills. Mix all the different colored dots together in a small bowl.
- Prep the Flower Center - Take your paper plate and lay it flat on your workspace. Squeeze a generous swirl of school glue directly into the center of the plate. You want enough glue to firmly hold the confetti, but not so much that it soaks through the paper plate.
- Sprinkle the Magic - Take a handful of your freshly punched paper confetti and sprinkle it right over the glue puddle. Pat the confetti down gently with your fingers to ensure the pieces stick securely. Shake off any loose, unglued dots back into your bowl for the next flower.
- Create the Stem and Leaf - Use your scissors to cut a simple leaf shape out of your green paper. Take your green craft stick and apply a small dot of glue near the middle. Press the base of your green leaf onto the glue spot.
- Assemble Your Flower - Add a generous dab of glue to the top portion of your green craft stick. Press the back of your confetti-filled paper plate firmly onto the stick. Hold it in place for just a few seconds to let the glue grab hold.
- Let It Dry - Set your beautiful new flower aside on a flat surface to dry completely. Liquid glue takes a little time to set, so patience is key before putting your craft on display.
CLICK HERE TO PRINT THE DIRECTIONS FOR THIS CRAFT
If you've enjoyed our content or have any thoughts to share, we'd love to hear from you! Mention @gluedtomycrafts or tag #gluedtomycrafts on Instagram!