We are bringing the beautiful scenic view to you, in a crafty form instead!

Do you have a creative kid bursting with energy? Looking for something fun, easy and mess-free to keep them entertained? Look no further!
With just some paper confetti, you can help your kids create a stunning field of flowers that will leave them inspired and feeling like an artist!
The sweet scent of spring fills the air, and vibrant colors emerge as nature awakens from its winter slumber. It’s a time for new beginnings, and what better way to celebrate than with a fun and creative craft project?
In this blog post, we will be sharing an exciting and colorful paper confetti field of flowers craft idea that is perfect for kids.
This simple yet charming activity will not only keep little ones entertained but also allow them to explore their creativity while bringing some joy into your home. So gather your art supplies and let’s dive in!

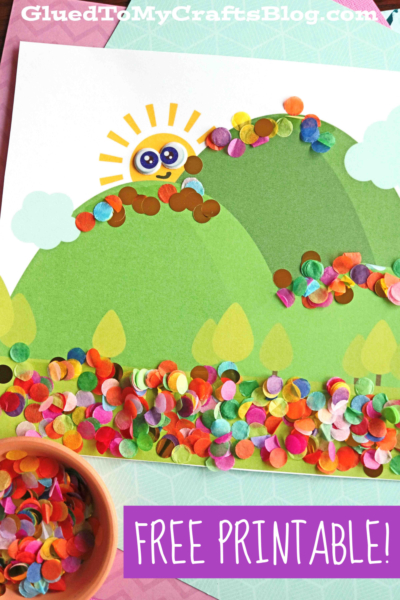
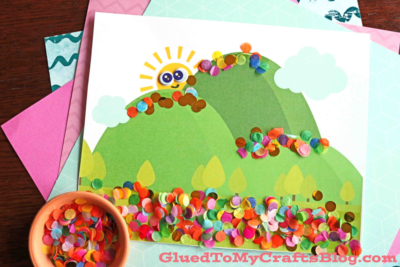
Bring the beauty of springtime flowers inside your home, with this easy paper confetti craft idea for kids!
Craft Supplies:
- Free Printable {on our landing page}
- White Computer Paper
- Scissors or Paper Trimmer
- Paper Scraps
- Single Hole Punch
- Small Bowl or Dish
- Glue Stick
Directions:
- First things first – grab our free “field of flowers” printable listed above.
- Print it in color through your home printer on a single sheet of white computer paper. You only need one print per craft.
- Depending on your printer settings, before you move forward with the craft, you might need to trim off some excess white around the printable. Use paper scissors or a trimmer to do that. Once done with that step, the printable will be slightly smaller.
- Go ahead and now glue that piece to another sheet of paper. This will frame the design nicely and make it a bit sturdier 🙂 Set it aside.
- Now grab your various sheets of colored paper and the single hole punch.
- Go ahead and hole punch a good amount of “circles” that will later be your flowers. You will need a lot of paper punches, so go to town on this step! A good tip is to do the hole punching over a small bowl, to keep the paper circles contained till you need them.
- Next up, grab your purple glue stick and make thick lines of glue on the grassy area in the printable. I like the purple glue stick for this step because you can see where you are placing down the adhesive but it later dries clear.
- Now, working pretty fast, you are going to want to sprinkle, dump and rub your paper hole punches ALL over the glue, to make “flowers” in the field. Keep adding more glue and paper circles until you have the look you like.
- Shake off excess pieces and set aside to let it dry completely.
- Then display proudly your colorful paper field of flower piece for all to see!
RELATED —> Clothespin Tulips

Learn how to easily transform ordinary paper into beautiful masterpieces, with the help of Glued To My Crafts! We strive to make it easy JUST FOR YOU!
So on that note, we also have our Sunrise and Cross, Rainbow Cloud Unicorn and Paper Plate Fish craft posts for you to check out today!
All of which would pair nicely with today’s flower art project idea – hint hint!

Paper Confetti Field of Flowers Craft
We are bringing the beautiful scenic view to you, in a crafty form instead!
Here’s your checklist of supplies to bring this craft to life:
- 1 Small Bowl or Dish
Prepare your creative haven by laying down a protective cover before the crafting magic begins!
Directions:
- First print out our provided printable, in color, on a single sheet of white cardstock paper. You only need one print per craft.
- Now grab your various sheets of colored paper and the single hole punch.
- Go ahead and hole punch a good amount of "circles" that will later be your flowers. You will need a lot of paper punches, so go to town on this step! A good tip is to do the hole punching over a small bowl, to keep the paper circles contained till you need them.
- Next up, grab your purple glue stick and make thick lines of glue on the grassy area in the printable. I like the purple glue stick for this step because you can see where you are placing down the adhesive but it later dries clear.
- Now, working pretty fast, you are going to want to sprinkle, dump and rub your paper hole punches ALL over the glue, to make "flowers" in the field. Keep adding more glue and paper circles until you have the look you like.
- Shake off excess pieces and set aside to let it dry completely.
- Then display proudly your colorful paper field of flower piece for all to see!


NEED MORE HELP DOWNLOADING OUR FREE PRINTABLES? PLEASE REFER TO OUR FAQ PAGE
If you've enjoyed our content or have any thoughts to share, we'd love to hear from you! Mention @gluedtomycrafts or tag #gluedtomycrafts on Instagram!