
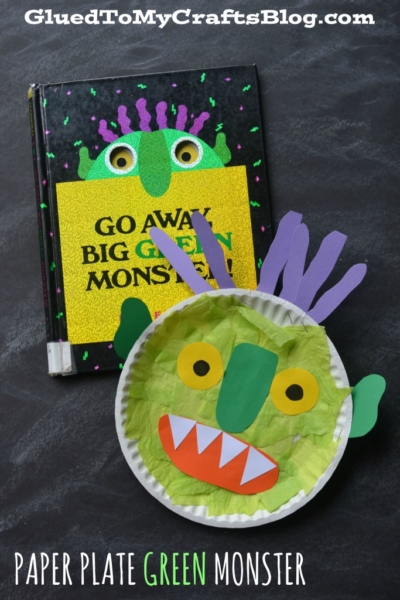
Get creative with your little ones this weekend! Try making this easy and fun paper plate green monster craft for some extra spooky Halloween vibes.
Green Monster Made From A Paper Plate
There is NO reason to be scared of today’s kid friendly Paper Plate Green Monster craft. Yes… it’s monster after all. But this green colored monster is NOT scary to recreate. I can pinky promise on that!
Not only is this monster themed idea super NOT scary but he’s also very easy, inexpensive and fun for kids to make. PLUS he goes along perfectly with the children’s book “Go Away, Big Green Monster” by Ed Emberley, making it the BEST excuse to have story time and craft time this afternoon!
Caldecott Award-winning author-artist Ed Emberley has created an ingenious way for children to chase away their nighttime fears. Kids can turn the pages of this book and watch the Big Green Monster grow. Then, when they’re ready to show him who’s in charge, they’ll turn the remaining pages and watch him disappear! This lavish reissue features dramatic eyes and sparkling foil on the cover.
So what are you waiting for? Haven’t I convinced you yet? Let’s scare those bedtime monsters away with this customizable and fun kid craft today!
Happy crafting {and crushing those nightmares} my friends! Don’t forget to read the book I mentioned above, along with the craft!
RELATED —>Heart Valentine Monsters

Ready to craft with the kiddos? Join us in making this cute green monster out of a paper plate! It’s sure to get those creative juices flowing!
Craft Supplies:
- Large Paper Plate
- Green Tissue Paper
- Cardstock Paper
- School Glue
- Scissors
- Stapler
Directions:
- First cut your lime green tissue paper into small squares.
- Take your paper plate and put a good amount of glue all over it.
- Have children place the tissue paper on top of the glue, until the paper plate is completely covered.
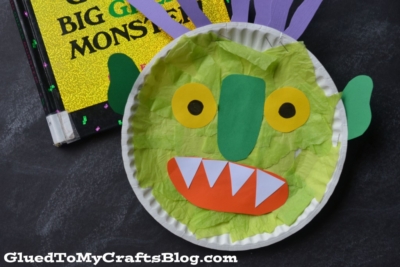
- While they are working on that, cut out the facial features for the monster from the cardstock. Think eyes, mouth, teeth, ears, hair etc. {be sure to reference the book if you need help}
- To finish off the monster kid craft – staple/glue the cardstock pieces in their designated spots on the paper plate.
- Then display proudly! {or add other embellishments to really make it your own!}
RELATED —> Stained Glass Monster

The kids craft tutorials on Glued To My Crafts aren’t scary at all!
If you are looking for even MORE easy kid craft ideas to make today, check out these fun posts from us:
- Footprint Monster Truck
- Cute Mouse and Cheese
- Paper Plate Monster
- Popsicle Stick Picket Fence
- Reindeer Envelope Puppet
- Craft Stick Monsters
- Craft Stick Love Monster
- Paper Plate Love Monster

Paper Plate Green Monster Craft
Here’s your checklist of supplies to bring this craft to life:
Prepare your creative haven by laying down a protective cover before the crafting magic begins!
Directions:
- First cut your lime green tissue paper into small squares.Tissue Paper
- Take your paper plate and put a good amount of glue all over it.1 Large Paper Plate
- Have children place the tissue paper on top of the glue, until the paper plate is completely covered.
- While they are working on that, cut out the facial features for the monster from the cardstock paper. Think eyes, mouth, teeth, ears, hair etc.Cardstock Paper
- To finish off the monster kid craft – staple/glue the cardstock pieces in their designated spots on the paper plate.
- Then display proudly!

CLICK HERE TO PRINT THE DIRECTIONS FOR THIS CRAFT