There's NO NEED to be scared! We are going to show you how easy it is to make this adorable craft stick love monster craft idea today!


Valentine’s Day crafting creates precious memories and heartfelt gifts that children love to make and give. This adorable popsicle stick love monster craft transforms ordinary wooden sticks into a whimsical creature that’s perfect for expressing affection and creativity during the season of love.
This charming project combines the simplicity of popsicle stick crafts with the fun of creating friendly monsters. Unlike scary creatures, these love monsters are designed to be cute, colorful, and completely lovable. They make excellent Valentine’s Day cards, classroom treats, or decorations for your home.
Whether you’re planning a craft session with kids, need unique Valentine’s gifts, or want to create handmade decorations, this step-by-step guide will help you build an endearing love monster using materials you likely have at home!

These love monsters also serve as excellent conversation starters about emotions, friendship, and kindness. Children learn that monsters don’t have to be scary – they can be loving, friendly, and full of personality.
Craft Supplies:
Gather these supplies before starting your popsicle stick love monster craft:
- Jumbo Wood Craft Sticks – 9 per craft
- School Glue
- Craft Paint
- Small Paper Plate
- Paint Brush
- Cardstock Paper
- Buttons, Wiggles Eyes, Glitter, Valentine Stickers
Directions:
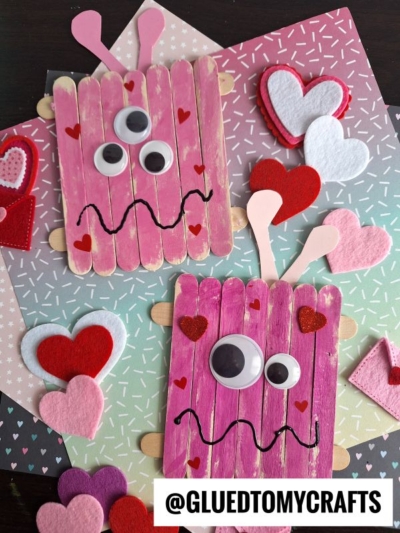
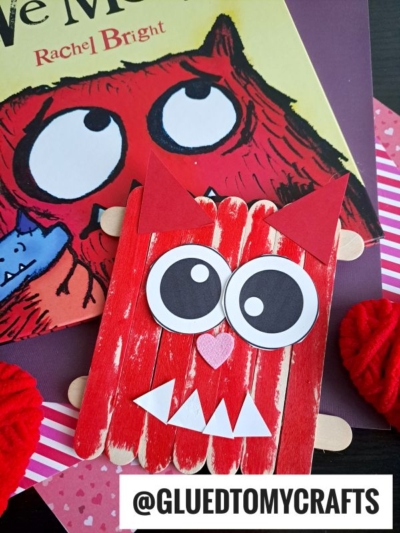
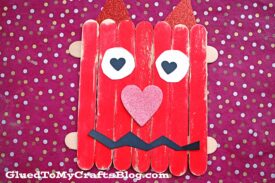
- First things first – gluing the popsicle sticks together. Grab NINE jumbo popsicle sticks and your school glue.
- Glue them together to look like a fence. Seven next to each other and two across.
- Repeat the above steps for each love monster you want to make today.
- Set aside the popsicle stick shape to allow it to dry a bit.
- When ready – decide what color {or colors} you want your love monster craft to be.
- Squirt that shade of craft paint on your paper plate.
- Use the foam paint brush to paint one side of your popsicle stick square shape completely.
- Again, set it aside to allow it to dry a bit.
- Now you are ready for the embellishments. Grab all your cardstock paper sheets and scissors.
- Cut out eyes, ears, wacky hair, antennas and other facial features from the cardstock. (The funnier the monster, the better!)
- To finish off your DIY love monster craft, glue your paper pieces in place on the front of the painted craft stick base, as well as any of the buttons, glitter or any other embellishments you see fit.
- Then let it all dry completely before displaying and/or playing with proudly!!!
RELATED —> Paper Plate Love Monster
AFFILIATE LINK – PAIR OUR CRAFT IDEA WITH THE “LOVE MONSTER” BOOK
We aim to live up to our name and get you GLUED to YOUR crafts as well!
So on that note, come get extra crafty with us this Valentine’s Day season by checking out our Paper Plate Lion, Popsicle Stick Fairy House and Bubble Wrap Bee Hive Card craft posts! All three of them are super easy and sure to inspire!

Popsicle Stick Love Monster Craft Idea For Valentine's Day
There's NO NEED to be scared! We are going to show you how easy it is to make this adorable craft stick love monster craft idea today!
Here’s your checklist of supplies to bring this craft to life:
- 9 Jumbo Popsicle Sticks
- Craft Paint
- Cardstock Paper
- Embellishments
- School Glue
Prepare your creative haven by laying down a protective cover before the crafting magic begins!
Directions:
- First things first - gluing the popsicle sticks together. Grab NINE jumbo popsicle sticks and your school glue.9 Jumbo Popsicle Sticks
- Glue them together to look like a fence. Seven next to each other and two across.
- Repeat the above steps for each love monster you want to make today.
- Set aside the popsicle stick shape to allow it to dry a bit.
- When ready - decide what color {or colors} you want your love monster craft to be.
- Squirt that shade of craft paint on your paper plate.Craft Paint
- Use the foam paint brush to paint one side of your popsicle stick square shape completely.
- Again, set it aside to allow it to dry a bit.
- Now you are ready for the embellishments. Grab all your cardstock paper sheets and scissors.
- Cut out eyes, ears, wacky hair, antennas and other facial features from the cardstock. (The funnier the monster, the better!)Cardstock Paper
- To finish off your DIY love monster craft, glue your paper pieces in place on the front of the painted craft stick base, as well as any of the buttons, glitter or any other embellishments you see fit.Embellishments
- Then let it all dry completely before displaying and/or playing with proudly!!!

CLICK HERE TO PRINT THE DIRECTIONS FOR THIS CRAFT
If you've enjoyed our content or have any thoughts to share, we'd love to hear from you! Mention @gluedtomycrafts or tag #gluedtomycrafts on Instagram!