Kids will love turning a few simple supplies into a creative masterpiece!
Ready to get creative? Make some adorable bubble wrap stamped bee hive cards with just a few supplies!

Are you looking for a fun and creative activity to do with your kids? Look no further because we have the perfect craft idea for you!
Our bubble wrap stamped bee hive cards are not only easy to make, but also allow children to showcase their artistic skills while learning a bit about nature.
This unique craft project combines two things that kids love – stamping and creating something by themselves. In this blog post, we will guide you through the simple steps of making these adorable bee hive cards that can be used for various occasions such as birthdays, thank-you notes or just as a thoughtful gesture for someone special.

Don’t delay! Send some sweet sentiments this Valentine’s Day, with today’s DIY Bubble Wrap Bee Hive Cards craft tutorial! Gather up some supplies and get ready to enjoy a buzzing good time with your little ones!
Craft Supplies:
- Cardstock Paper Cards
- Black Sharpie Marker
- Bubble Wrap
- Yellow Craft Paint
- Craft Scissors
- Small Paper Plate
- Bee Stickers
- Small Red Heart Stickers
Directions:
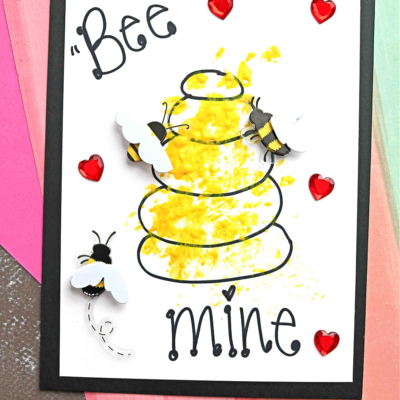
- First things first – grab your cardstock card and draw a BEEHIVE design in the center of the card front.
- Next up – we are going to make our “stamp.” Grab a small piece of bubble wrap and cut it into a circle.
- Now squirt a SMALL amount of yellow paint on your small paper plate.
- Have children smear their bubble wrap {with the bumpy side facing the plate} in the paint a few times, making sure there is a thin layer of paint on the bubble wrap.
- Next have children “stamp” a few times their bubble wrap on the front of their card, right inside the bee hive design. Not to many times because you want to see the detail in the bubble wrap/bee hive.
- To finish off the Bubble Wrap Bee Hive Cards – use the marker {or stickers} to write out “BEE” mine, just “BEE” cause or whatever other punny BEE sentiment you like!
- Then set aside to let it dry completely before gifting away in an envelope!
RELATED —> BEE Mine Keepsake

AFFILIATE LINK – PAIR OUR CRAFT IDEA WITH THIS BOOK RECOMMENDATION
If you are looking for even MORE Valentine’s Day themed kid craft ideas to accomplish this month, be sure to check out these fun posts listed below:
- Paper Plate Donut
- The Day It Rained Hearts
- Paper Plate Valentine Bear
- Paper Plate Valentine Fox
- Popsicle Stick Valentine Bear
- Clothespin Handprint Flowers
- Wooden Spoon Bee Puppets

Stamped Bee Hive Card Craft Idea For Kids
Kids will love turning a few simple supplies into a creative masterpiece!
Here’s your checklist of supplies to bring this craft to life:
- Cardstock Cards
- Bubble Wrap
- Craft Paint yellow
- Embellishments
- 1 Scissors
Prepare your creative haven by laying down a protective cover before the crafting magic begins!
Directions:
- First things first - grab your cardstock card and draw a BEEHIVE design in the center of the card front.Cardstock Cards
- Next up - we are going to make our "stamp." Grab a small piece of bubble wrap and cut it into a circle.
- Now squirt a SMALL amount of yellow paint on your small paper plate.Craft Paint
- Have children smear their bubble wrap {with the bumpy side facing the plate} in the paint a few times, making sure there is a thin layer of paint on the bubble wrap.
- Next have children "stamp" a few times their bubble wrap on the front of their card, right inside the bee hive design. Not to many times because you want to see the detail in the bubble wrap/bee hive.
- To finish off the Bubble Wrap Bee Hive Cards - use the marker {or stickers} to write out "BEE" mine, just "BEE" cause or whatever other punny BEE sentiment you like!Embellishments
- Then set aside to let it dry completely before gifting away in an envelope!


CLICK HERE TO PRINT THE DIRECTIONS FOR THIS CRAFT
If you've enjoyed our content or have any thoughts to share, we'd love to hear from you! Mention @gluedtomycrafts or tag #gluedtomycrafts on Instagram!