
Not only is this turtle art project a fun way to get the whole family involved in crafting together, but it is also an excellent opportunity to teach children about sea turtles while they work on their beautiful creations.

Green Turtle Craft Idea For Kids
In the spirit of summer and water fun activities – today I’m sharing a super fun turtle craft that is fun for all ages! It’s titled Paper Plate Turtle and I hope you like it!!!
This sea turtle craft tutorial from us is super easy and can be pulled together with simply supplies like a paper plate, glue and tons of tissue paper. It honestly doesn’t get any easier or cheaper than that!
Now if your child is “BEGGING” {or more like bugging} you to do something fun w/them today – why not give this ocean theme turtle craft idea a try? I bet you have the stuff right now in your home. So don’t wait any longer – find ALL the details you need to know, in our full paper plate turtle craft tutorial below!
As always – I hope this post from us inspires you and gets that creativity going in your home today!
Happy crafting, my friends! Don’t forget to share pictures of your tissue paper turtle creations on our Facebook page wall, so we can admire your hard work from a far! I can’t wait to see those paper plate sea turtles in action! #gluedtomycrafts
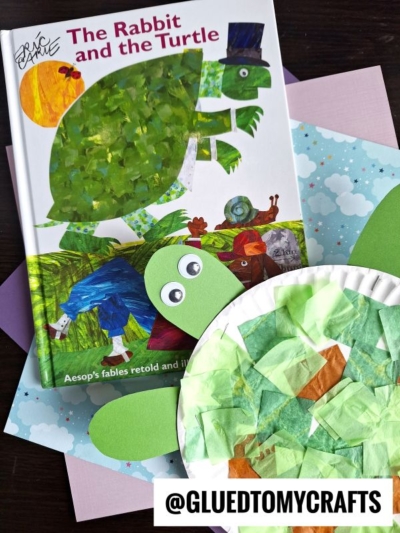
RELATED —> Popsicle Stick Turtle

Are you looking for a fun and easy craft idea for kids? This paper plate turtle craft is perfect for toddlers and preschoolers!
Craft Supplies:
- Large Paper Plate
- Tissue Paper
- Green Construction Paper
- White School Glue
- Craft Scissors
- Paint Brush
- Stapler
- Large Googly Eyes
- Black Marker
Directions:
- First things first – cut your tissue paper into squares.
- Set aside till later.
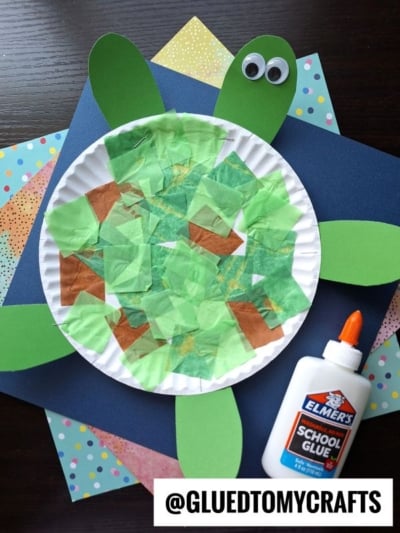
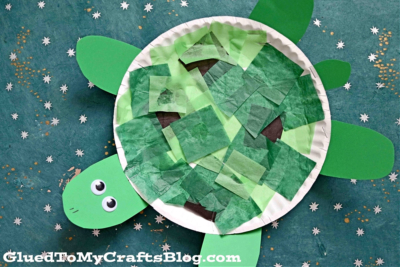
- Out of your construction paper, cut out 4 legs, the turtle’s head and it’s tail.
- Next slather a good amount of glue on your paper plate.
- Use a foam paint brush to really cover the paper plate in glue.
- Next have your child child place the various colors of brown and green squares on the paper plate, until it’s completely covered. This is now the turtle shell.
- Now it’s time for the final steps! To finish off the paper plate turtle craft – staple the construction paper pieces in the designated spots to give the turtle life.
- Add any other embellishments you see fit.
- And that’s it! Allow your turtle piece to dry completely and then display it proudly for ALL to see!
RELATED —> Torn Paper Turtle Craft Idea For Kids
If you enjoyed this turtle paper plate tutorial from us, you may also enjoy these fun craft posts on Glued To My Crafts website right now:
- Paper Plate Seahorse
- Paper Bag Ninja Turtles
- Popsicle Stick Robots
- Footprint Airplane Canvas
- Popsicle Stick Fish
- Paint Splat Turtle Friends
- Cupcake Liner Ninja Turtle
- Handprint Ninja Turtle

Paper Plate Turtle Craft
Here’s your checklist of supplies to bring this craft to life:
- 1 Large Paper Plate
- Tissue Paper green and brown
- Cardstock Paper green
- 2 Wiggle Eyes
Prepare your creative haven by laying down a protective cover before the crafting magic begins!
Directions:
- First things first - cut your tissue paper into squares. Set aside till later.
- Out of your construction paper, cut out 4 legs, 1 head and 1 tail for the turtle.
- Next slather a good amount of glue on your paper plate. Use a foam paint brush to really cover the paper plate in glue.
- Now ask your child to place the tissue paper squares on the paper plate, until it's completely covered.
- When they are done with the tissue paper, it's time for the final steps! To finish off the paper plate turtle craft - staple the construction paper pieces in the designated spots to give the turtle life.
- Add any other embellishments you see fit.
- And that's it! Allow your turtle piece to dry completely and then display it proudly for ALL to see!

CLICK HERE TO PRINT THE DIRECTIONS FOR THIS CRAFT