This fun kids craft is inspired by one of our favorite children’s book authors, Eric Carle. It’s a great way to get the kids excited about reading and also learn some new colors. Let your imagination run wild with this creative seahorse craft idea!

Paper Plate & Tissue Paper Seahorse Craft
By looking at today’s “paper plate seahorse” blog title, you would think today’s kid friendly craft tutorial would be inspired by the ocean or perhaps even summer – but NOPE. It was actually inspired by one of our favorite children’s book authors – Eric Carle.
It should come as no surprise, that we absolutely LOVE Eric Carle around here.
I’ve shared quite a few paper plate kid crafts centered around his books already on the Glued To My Crafts blog {you can see them all in our Eric Carle Kid Craft Roundup!} and I’m already planning some more as I type this very blog post… {yay!}
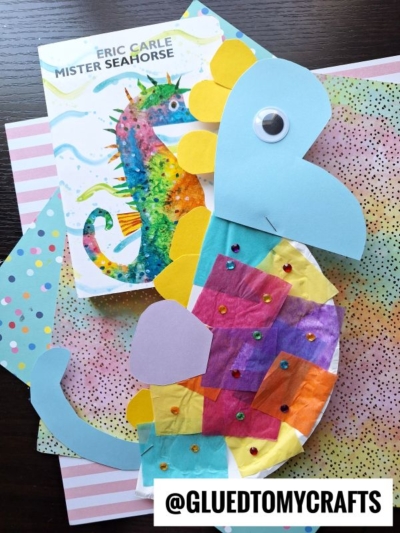
But before I get too ahead of myself, let’s talk about this blog post – shall we? Today’s post is centered around the beautiful and sentimental story Mister Seahorse.
“When Mrs. Seahorse lays her eggs, she does it on Mr. Seahorse’s belly! She knows he will take good care of them. While he swims waiting for the eggs to hatch, he meets other underwater fathers caring for their babies.
Now Eric Carle’s heart-warming New York Times bestseller is finally available in a board book edition, complete with the clear “peek-a-boo” pages that made the original such a hit. Brimming with bright, colorful sea life, this new board book will be irresistible to young children everywhere.”
So what are you waiting for? Let’s grab those craft supplies and get to work on this simple rainbow colored seahorse kid craft ASAP. Happy crafting {and reading} with your little ones, my friends!
RELATED —> Cupcake Liner Seahorse

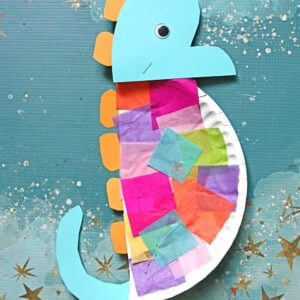
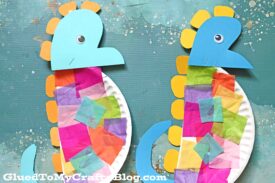
All you need is some tissue paper, a paper plate, and a few simple supplies to bring these rainbow seahorses to life!
Craft Supplies:
- Large Paper Plate – 1 per craft
- Tissue Paper
- Turquoise Cardstock Paper
- Yellow Cardstock Paper
- White Cardstock Paper
- School Glue
- Craft Scissors
- Stapler
- Wiggle Eyes
Directions:
- First cut your paper plate in half. Straight up the center to make TWO equal pieces.
- Reserve one half for today’s craft and save the other for a rainy day.
- Next is your tissue paper. Cut it all into small squares.
- Take your paper plate half and put a good amount of glue all over it.
- Have children place the tissue paper on top of the glue, until the paper plate is completely rainbow covered.
- When they are done with that, set it aside to let it dry completely while you trim out the other seahorse features from your cardstock paper {use the book cover as a good guide on what to cut out & how.}
- To finish off the Paper Plate Seahorse kid craft – simply staple the finished cardstock pieces in their designated spots.
- Add a wiggle eye so your seahorse can see.
- Then display proudly for everyone to see!
RELATED —> Cupcake Liner Seahorse
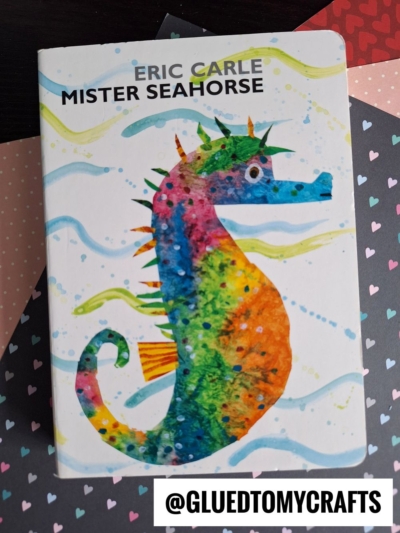
AFFILIATE LINK – PAIR OUR CRAFT IDEA WITH “MISTER SEAHORSE” BOOK BY ERIC CARLE
If you are looking for even MORE easy kid craft ideas that go along with our favorite children’s books, be sure to check out these fun posts listed below, from the Glued To Crafts archives!
- Paper Plate Cookie
- Paper Plate Leopard
- Paper Plate Caterpillar
- Dr Seuss Inspired Fish
- Paper Plate Pigeon
- Paper Plate Cat In The Hat
- Paper Plate Baker
- Paper Plate Spider
- Cupcake Liner Caterpillar
- Paper Plate Gruffalo
- Cupcake Liner Fish

Paper Plate Seahorse Craft Idea
Here’s your checklist of supplies to bring this craft to life:
Prepare your creative haven by laying down a protective cover before the crafting magic begins!
Directions:
- First cut your paper plate in half. Straight up the center to make TWO equal pieces.1 Large Paper Plate
- Reserve one half for today's craft and save the other for a rainy day.
- Next is your tissue paper. Cut it all into small squares.Tissue Paper
- Take your paper plate half and put a good amount of glue all over it.
- Have children place the tissue paper on top of the glue, until the paper plate is completely rainbow covered.
- When they are done with that, set it aside to let it dry completely while you trim out the other seahorse features from your cardstock {use the book cover as a good guide on what to cut out & how}Cardstock Paper
- To finish off the Paper Plate Seahorse kid craft – simply staple the finished cardstock pieces in their designated spots.
- Add a wiggle eye so your seahorse can see.Wiggle Eyes
- Then display proudly for everyone to see!

Grab our favorite books via our Amazon affiliate link! In our Amazon storefront you will find books, toys and craft supplies we absolutely love using for our Glued To My Crafts tutorials!