It's super fun, really inexpensive & great for those who absolutely LOVE the Teenage Mutant Ninja Turtles

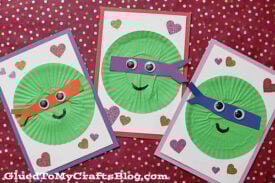
Looking to create something special with your kids this weekend? Check out our easy and fun cupcake liner ninja turtle card craft idea!

This fun and easy ninja turtle card was made from an inexpensive materials you probably already have in your home. Anyone can make it, even the younger kids! Let’s learn how!
Craft Supplies:
- Green Cupcake Liners
- Cardstock Cards
- Cardstock Paper
- Glue Stick
- Scissors
- Medium Sized Wiggle Eyes
- Sharpie Markers
Directions:
- First grab your green cupcake liner and flatten it out with your fingers.
- Put some glue on the back of your flattened cupcake liner piece and glue it onto your card front.
- If the edges are sticking up, add more glue so it really sticks down on the paper.
- Next up – the mask embellishments. Grab your choice in color cardstock paper, along with the scissors.
- Cut out a a mask shape for your turtle friend.
- Go ahead and glue it in place, on the cupcake liner piece.
- Now take your black marker and draw on a simple mouth shape.
- Finally, take the wiggle eyes and secure those in place as well.
- Add other embellishments if desired {maybe some hearts if you are giving it away as a Valentine card}
- Write some “punny” NINJA TURTLE sayings on the outside and inside with your Sharpie marker.
- COWABUNGA! You just completed the craft! Now set aside your cupcake liner and cardstock ninja turtle paper card masterpiece to let it dry completely before gifting them away!
RELATED —> Paper Bag Ninja Turtles

If you are looking for even MORE easy kid craft ideas that use cupcake liners, be sure to check out these fun posts listed below.
And “if” you decide to make this ninja turtle card craft idea, please share a picture on our Facebook page or tag us on Instagram with #gluedtomycrafts for us to see. We love seeing our inspiration come to life!
- Cupcake Liner Ladybugs
- Cupcake Liner Bunnies
- Cupcake Liner Rainbow Fish
- Cupcake Liner Shamrock
- Cupcake Liner Bees
- Cupcake Liner Cat Cards
- Cupcake Liner Caterpillar

Cupcake Liner Ninja Turtle Card
It's super fun, really inexpensive & great for those who absolutely LOVE the Teenage Mutant Ninja Turtles
Here’s your checklist of supplies to bring this craft to life:
Prepare your creative haven by laying down a protective cover before the crafting magic begins!
Directions:
- First grab your green cupcake liner and flatten it out with your fingers.1 Cupcake Liner
- Put some glue on the back of your flattened cupcake liner piece and glue it onto your card front.Cardstock Cards
- If the edges are sticking up, add more glue so it really sticks down on the paper.
- Next up - the mask embellishments. Grab your choice in color cardstock paper, along with the scissors.Cardstock Paper
- Cut out a a mask shape for your turtle friend.
- Go ahead and glue it in place, on the cupcake liner piece.
- Now take your black marker and draw on a simple mouth shape.
- Finally, take the wiggle eyes and secure those in place as well.2 Wiggle Eyes
- Add other embellishments if desired.
- Write some "punny" NINJA TURTLE sayings on the outside and inside with your Sharpie marker.

CLICK HERE TO PRINT THE DIRECTIONS FOR THIS CRAFT
If you've enjoyed our content or have any thoughts to share, we'd love to hear from you! Mention @gluedtomycrafts or tag #gluedtomycrafts on Instagram!