Using inexpensive paper materials, you too can create some "paw-some" cards within minutes.


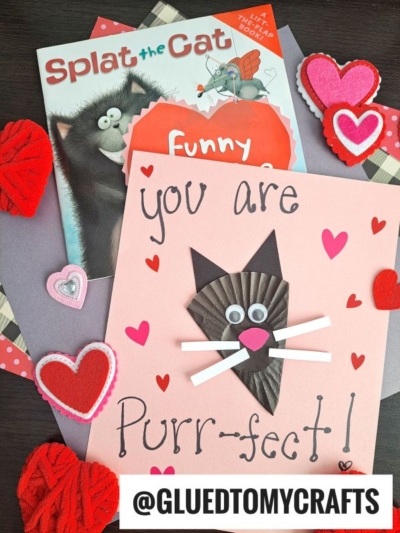
Calling all cat lovers and crafty kids! The Cupcake Liner Cat Card Craft is a purr-fectly adorable project that’s as fun to make as it is to share. With just a few simple materials like cupcake liners, cardstock paper, and a dash of creativity, kids can create their very own feline-inspired cards within minutes!
Whether it’s for a birthday, a thank-you note, or just a fun afternoon activity, this craft is sure to delight little ones and bring out their inner artist. Let’s dive into this meow-tastic craft and get those creative claws out! 🐾✨

This easy cupcake liner cat card craft for kids is perfect for so many occasions! Your little ones will love crafting and sending these adorable feline cards to their friends. With a dash of whimsy and a sprinkle of imagination, these cards embody the playful spirit of cats!
Craft Supplies:
- Large Cupcake Liners
- Cardstock Paper
- Glue Stick
- Scissors
- Small Wiggle Eyes
- Black Marker
- Embellishments
Directions:
- First things first – take ONE large cupcake liner and flatten it out with your hands.
- Next take that flattened cupcake liner and fold it into thirds/a triangle shape, to create the head of the cat.
- Glue it down, in the center of a single sheet of cardstock paper.
- Now grab your remaining cardstock paper and scissors.
- Cut out a small nose, two ears and of course, some whiskers.
- Secure those pieces to the center of the cupcake liner design.
- Now grab the wiggle eyes.
- Secure those in place, right above the eyes, to start bringing the cat to life.
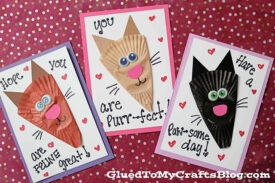
- To finish off the Cupcake Liner Cat Card – write a cheesy saying around the finished design.
- Add other embellishments you see fit {maybe some heart stickers} and display/gift away proudly!
Cat Sayings:
- Have a PURR-FECT Day! You are PURR-FECT!
- You are simply PAW-SOME! Have a PAW-SOME day!
- You make my heart PURR!
- You are PURR-RETTY!
- I think you are MEOW-TASTIC! MEOW, how is it going?
- You rock – FUR-REALS!
- Hope you are FELINE great! I have a FELINE, you are amazing!
- No KITTEN – you are awesome!
- I’d spend ALL NINE LIVES with you!
- Happy PURR-thday!
RELATED —> Paper Bag Black Cat

AFFILIATE LINK – PAIR OUR CRAFT IDEA WITH THIS BOOK RECOMMENDATION
If you are looking for even MORE easy handmade card craft ideas that use cupcake liners, be sure to check out these fun posts listed below. Several of which would pair nicely with today’s crafty tutorial – hint hint!
- Orange Cutie Cards
- Watermelon Cards
- Green Olive Card
- Egg Friend Card
- Cheesy Valentine Card
- Valentine Camper Card
- Sloth Cards
- Car Cards

Cupcake Liner Cat Card Craft Idea For Kids
Using inexpensive paper materials, you too can create some "paw-some" cards within minutes.
Here’s your checklist of supplies to bring this craft to life:
Prepare your creative haven by laying down a protective cover before the crafting magic begins!
Directions:
- First take ONE large cupcake liner and flatten it out with your hands.1 Cupcake Liners
- Next take that flattened cupcake liner and fold it into thirds/a triangle shape, to create the head of the cat.
- Glue it down, in the center of a single sheet of white cardstock.Cardstock Paper
- Now trim down that particular cardstock piece to be placed on another colored cardstock card front.Cardstock Cards
- Use the glue stick to attach the two paper pieces together.
- Now grab your pink cardstock and scissors.
- Cut out a small nose shape for the cat.
- Secure that piece to the center of the cupcake liner design.
- Now grab the wiggle eyes.2 Small Wiggle Eyes
- Secure those in place, right above the eyes, to start bringing the cat to life.
- Take the black Sharpie marker and draw on a whiskers.
- Follow that up cutting out TWO triangle ears from your remaining cardstock paper {it should be a color that matches your cupcake liner.}
- Glue those in place as well.
- To finish off the Cupcake Liner Cat Card - write a cheesy saying on the outside, as well as in the inside.
- Add other embellishments you see fit {maybe some heart stickers} and display/gift away proudly!

CLICK HERE TO PRINT THE DIRECTIONS FOR THIS CRAFT
If you've enjoyed our content or have any thoughts to share, we'd love to hear from you! Mention @gluedtomycrafts or tag #gluedtomycrafts on Instagram!