This craft idea is perfect for my little one! It's cute, simple and EGG-xactly what you need to gift away this Easter season!


Easter is around the corner, and it’s the perfect time for families to engage in fun activities that celebrate the season.
Crafts provide an ideal way for children to flex their creative muscles, engage in the festive spirit, and bond with their families. In this blog post, we’ll explore a delightful craft project using cupcake liners to create whimsical egg yolk cards.
Whether you’re an educator looking for a classroom activity or a parent seeking an interactive project, this craft is sure to bring joy and color to your Easter celebrations.

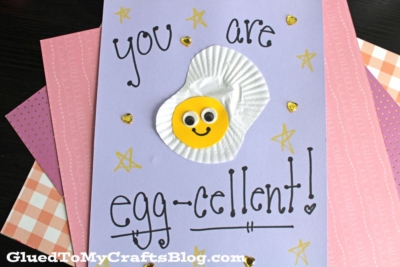
Unlock the fun and educational potential of art with a Cupcake Liner Egg Yolk Card Craft that’s perfect for all occasions, especially for Easter celebrations!
Card Supplies:
- Large WHITE Cupcake Liners
- Cardstock Paper
- Paper Trimmer
- Scissors
- Glue Stick
- Black Marker
- Wiggle Eyes
- School Glue
Directions:
- First things first – grab your white cupcake liner and flatten it out with your fingers.
- Take your scissors and slightly trim up the flattened cupcake liner, to make it look like the insides of the egg, that was just cracked open. You don’t want to trim too much off, nor do you want it to be a perfect circle.
- Put some glue on the back of your flattened cupcake liner piece and glue it in the center of a single sheet of colored cardstock paper.
- If the edges are sticking up, add more glue so it really sticks down on the paper.
- Next up – the embellishments. Grab the yellow cardstock.
- Cut out a “yolk” for the egg.
- Go ahead and glue that to the cupcake liner piece.
- Now take your black marker and draw on a simple mouth shape.
- Finally, take the wiggle eyes and secure those in place as well.
- Add other embellishments if desired.
- Write some “punny” egg sayings on the outside and in with your Sharpie marker.
- NOW THIS IS EGG-CITING! You are done! Now set aside your cupcake liner egg yolk card masterpiece to let it dry completely before gifting them away!
Egg Sayings:
- I will get up at the CRACK OF DAWN for you.
- You egg-cerlerate my heart!
- I’m egg-cited for you!
- I can’t eggspresso how much I love you!
- You egg-cite me!
- You are EGG-QUISITE!
- You are EGGxactly what I need in my life.
- Happy FRY-day {for a Friday pick me up!}
- You are egg-straoridinarly amazing!
- You crack me up!
- Have an egg-cellant day!
- You are egg-ceptional!
- Have an egg-tastic day!
RELATED —> Cupcake Liner Unicorn

We absolutely LOVE sharing CREATIVE and INNOVATIVE cupcake liner craft ideas on Glued To My Crafts!
So be sure to check out our fun and funky Llama and Tough Cookie card tutorials!

Cupcake Liner Egg Yolk Card Craft Idea For Kids
This craft idea is perfect for my little one! It's cute, simple and EGG-xactly what you need to gift away this Easter season!
Here’s your checklist of supplies to bring this craft to life:
- School Glue
Prepare your creative haven by laying down a protective cover before the crafting magic begins!
Directions:
- First things first - grab your white cupcake liner and flatten it out with your fingers.
- Take your scissors and slightly trim up the flattened cupcake liner, to make it look like the insides of the egg, that was just cracked open. You don't want to trim too much off, nor do you want it to be a perfect circle.
- Put some glue on the back of your flattened cupcake liner piece and glue it in the center of a single sheet of colored cardstock paper.
- If the edges are sticking up, add more glue so it really sticks down on the paper.
- Next up - the embellishments. Grab the yellow cardstock.
- Cut out a "yolk" for the egg.
- Go ahead and glue that to the cupcake liner piece.
- Now take your black marker and draw on a simple mouth shape.
- Finally, take the wiggle eyes and secure those in place as well.
- Add other embellishments if desired.
- Write some "punny" egg sayings on the outside and in with your Sharpie marker.
- NOW THIS IS EGG-CITING! You are done! Now set aside your cupcake liner egg yolk card masterpiece to let it dry completely before gifting them away!

CLICK HERE TO PRINT THE DIRECTIONS FOR THIS CRAFT
If you've enjoyed our content or have any thoughts to share, we'd love to hear from you! Mention @gluedtomycrafts or tag #gluedtomycrafts on Instagram!