
There is absolutely NO drama with this latest idea from Glued To My Crafts. Check out our Cupcake Liner Llama Friend Card tutorial and recreate one for yourself today!

Llama Card Made From A Cupcake Liner
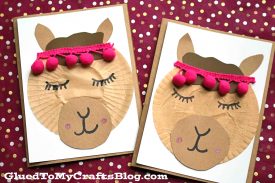
These smiling paper llama friend cards are just as clever as our previous cupcake liner craft tutorials. And just like before, these llama themed paper pieces are super easy to recreate and you can customize them to fit your style too!
Our handmade llama cards are perfect to give to friends who need a pick me up or a little “hello” to get them through the day. I’m sure the lucky recipient of this card will be thrilled to get something like this {especially those who love llamas as much as we do!}
So what are you waiting for? Find all the details below so you can whip up these simple DIY paper llama cards using cupcake liners, cardstock paper and tons of creativity to bring them to life! Be sure to give them your own spin and personality as well! Happy crafting {and gifting} my friends!
BTW – I found the pink pom pom ribbon at my local Walmart store in the craft aisle with the ribbon spools.
RELATED —> Paper Llama Fabulous Card

Is your child a fan of llamas and crafting? If so, they’re sure to love making this adorable cupcake liner llama card craft!
Craft Supplies:
- Large Tan Cupcake Liners – 1 per craft
- Cardstock Paper {I used white, tan and dark brown}
- Paper Trimmer
- Paper Craft Scissors
- Glue Stick
- lack Sharpie Marker
- Pink Pom Pom Ribbon
- School Glue
- Embellishments
Directions:
- First make your card and card front. I went with a square card. You just need to make sure your cupcake liner will fit to the front of the card.
- Now you are ready for the “llama” part. Grab your tan cupcake liner and flatten it out with your fingers.
- Put glue on the back of the flattened cupcake liner and place it in the center of the card you made earlier.
- Use your fingers to flatten out the cupcake liner some more and make sure it sticks to the card.
- Add more glue to the back of areas that aren’t sticking to the card.
- Next up – the embellishments. Grab all your remaining cardstock paper and scissors.
- Cut out ears, the llama’s nose, hair etc. from the cardstock.
- Go ahead and glue those to the card front.
- Now take your black marker and draw on eyes.
- Finally, take the pom pom ribbon and cut off a small piece.
- Use the school glue to secure it in face on the llama’s hair.
- Add other embellishments if desired.
- Now set aside your cupcake liner llama card masterpieces to let them dry completely before gifting them away!
RELATED —> Crinkle Paper Llama

We absolutely LOVE sharing CREATIVE and INNOVATIVE handmade card ideas on Glued To My Crafts!
So be sure to check out our fun and funky Polar Bear, Birthday Cake and Emoji craft posts!

Cupcake Liner Llama Card Craft Idea
Here’s your checklist of supplies to bring this craft to life:
- Cupcake Liners
- Cardstock Paper
- Pom Pom Ribbon
- School Glue
Prepare your creative haven by laying down a protective cover before the crafting magic begins!
Directions:
- First make your card and card front. I went with a square card. You just need to make sure your cupcake liner will fit to the front of the card.Cardstock Paper
- Now you are ready for the "llama" part. Grab your tan cupcake liner and flatten it out with your fingers.Cupcake Liners
- Put glue on the back of the flattened cupcake liner and place it in the center of the card you made earlier.
- Use your fingers to flatten out the cupcake liner some more and make sure it sticks to the card.
- Add more glue to the back of areas that aren't sticking to the card.
- Next up - the embellishments. Grab all your remaining cardstock paper and scissors.
- Cut out ears, the llama's nose, hair etc. from the cardstock.
- Go ahead and glue those to the card front.
- Now take your black marker and draw on eyes.
- Finally, take the pom pom ribbon and cut off a small piece.Pom Pom Ribbon
- Use the school glue to secure it in face on the llama's hair.
- Add other embellishments if desired.
- Now set aside your cupcake liner llama card masterpieces to let them dry completely before gifting them away!

CLICK HERE TO PRINT THE DIRECTIONS FOR THIS CRAFT