
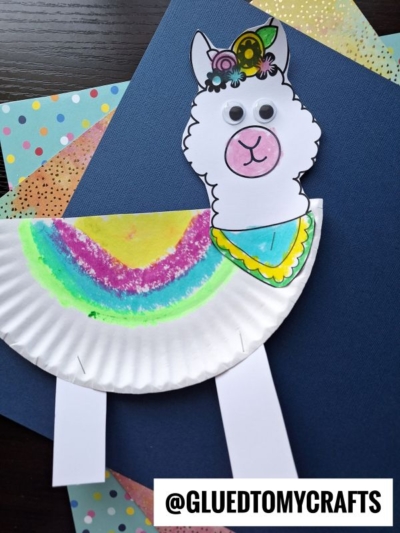
This Paper Plate Llama Friend is a great kids craft project that is both fun and easy to make. All you need is some simple supplies, including a free template, to get started on this creative art project today!

Llama Made From A Paper Plate
Save the drama for your mama! No negative energy with our latest llama kid craft tutorial from Glued To My Crafts. Promise.
Today we are making adorable paper llama friends that are sure to be loved by anyone who comes across them. There’s even a free printable located below, that you can print and color to make this craft come together with ease. We are talking minutes from start to finish!
These friends start with a simple small paper plate “body” and end with the free llama head cutout. I can’t stress it enough but this is an EASY paper llama craft idea that is perfect for any indoor plans you have today. You are going to want to bookmark this creative llama art project idea so you can refer back to it over and over again. You might even want to think about including it as a sleepover party craft this weekend.
Now friends… are you ready to make your own custom paper plate llama friend? Find all the details below!
Happy crafting and don’t forget to share those pictures with me! Seriously – it makes my day, keeps me tickin’ and inspires me to keep sharing these tutorials with you all! Just tag us on Instagram to make my day! #gluedtomycrafts
A HUGE thank you to LisaMarkleSparkles on Etsy for the awesome llama head graphic that I used as a starting point for today’s craft!

This llama craft is perfect for kids who love animals. Children can get creative and make their own version of this craft project by using the free template we’ve provided in the supply list below!
Craft Supplies:
- Llama Printable – on our summer landing page
- White Cardstock Paper
- Crayons, Colored Pencils, Markers etc.
- Scissors
- Large Paper Plate
- Stapler
- Wiggle Eye Stickers
- Black Sharpie Marker
Directions:
- First things first. We are going to print the FREE file listed above. One print will make TWO llama friends today.
- Now we are going to use our choice of coloring medium to color in the two llamas. Add as much or as little color as you like to really customize it.
- Go ahead and also draw on a nose/mouth, as well as gluing on the wiggle eyes for your llamas to see.
- Once done decorating the two pieces, use scissors to trim out each shape.
- Before you discard the excess white cardstock paper, cut out TWO legs for each llama.
- Use your black Sharpie marker to draw on hooves on the “legs” if you like.
- Set aside your paper pieces.
- Now grab your paper plate, the scissors and again, choice of coloring medium.
- Cut your paper plate in equal halves. Straight up the center to make two halves of a paper plate.
- Now you have TWO pieces that will be the bodies of the llamas. Go ahead and color in a half circle “blanket” on each half of the paper plate.
- When done decorating the paper plate pieces, grab your stapler and the paper cutouts from earlier.
- Go ahead and staple each llama head to their paper plate body.
- Follow that up with the legs.
- At this point you can also add other embellishments {like fun stickers, glitter, rhinestones} that you see fit to really make your own adorable llamas.
- Then display your custom llama paper plate masterpiece proudly for all to see!
RELATED —> Paper Plate Animal Crafts
Don’t let the fun creative stop here with today’s paper plate llama craft tutorial! We have tons of crafty inspiration to add to your plans today!
Check out our Paper Plate Shark Car and Paper Plate Clam to see what I’m talking about!

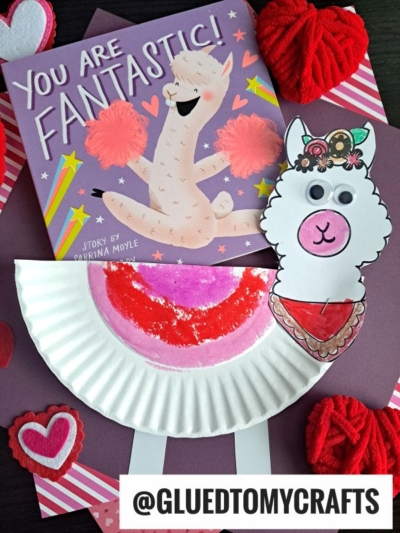
Paper Plate Llama Craft For Kids
Here’s your checklist of supplies to bring this craft to life:
Prepare your creative haven by laying down a protective cover before the crafting magic begins!
Directions:
- First print out our provided printable, in color, on a single sheet of white cardstock paper. You only need one print per craft.
- Now we are going to use our choice of coloring medium to color in the two llamas. Add as much or as little color as you like to really customize it.
- Go ahead and also draw on a nose/mouth, as well as gluing on the wiggle eyes for your llamas to see.
- Once done decorating the two pieces, use scissors to trim out each shape.
- Before you discard the excess white cardstock paper, cut out TWO legs for each llama.
- Use your black Sharpie marker to draw on hooves on the "legs" if you like.
- Set aside your paper pieces.
- Now grab your paper plate, the scissors and again, choice of coloring medium.
- Cut your paper plate in equal halves. Straight up the center to make two.
- Now you have TWO pieces that will be the bodies of the llamas. Go ahead and color in a half circle "blanket" on each.
- When done decorating the paper plate pieces, grab your stapler and the paper cutouts from earlier.
- Go ahead and staple each llama head to their paper plate body.
- Follow that up with the legs.
- At this point you can also add other embellishments {like fun stickers, glitter, rhinestones} that you see fit to really make it your own.
- Then display your custom paper llama masterpiece proudly for all to see!


NEED MORE HELP DOWNLOADING OUR FREE PRINTABLES? PLEASE REFER TO OUR FAQ PAGE