It's SUPER SIMPLE and sure to be loved by the littles in your home that absolutely love automobiles. Perfect for Shark Week too!

Don’t be SCARED! Today’s Paper Plate Shark Car kid craft tutorial is SUPER SIMPLE and is sure to be loved by the littles in your home that absolutely love cars and trucks, as much as my son does!
Keep scrolling for the FULL #sharkweek themed how-to tutorial. It’s original to us and you won’t find anything else like it on the web right now!

Rev up your creativity and take a bite out of boredom with this Paper Plate Shark Car craft idea! Perfect for Shark Week or any day your little ones are feeling crafty, this fun and easy project combines the excitement of cars with the thrill of sharks.
Using simple materials like paper plates, paint, and cardstock, kids can create their very own shark-inspired vehicles that are sure to make a splash.
Whether you’re crafting at home or in a group setting, this activity is guaranteed to bring smiles and spark imaginations. Let’s dive in and get those crafty engines running!
FOLLOW US ON FACEBOOK SO YOU NEVER MISS A NEW TUTORIAL FROM US!

This fun and easy paper plate shark car craft is perfect for kids of all ages! It’s a great way to celebrate Shark Week or any other day!
Craft Supplies:
- Large Paper Plate – 1 makes 2 sharks!
- Craft Scissors
- Silver or Gray Craft Paint
- Paint Brush
- Gray Cardstock Paper
- White Cardstock Paper
- Black Cardstock Paper
- Large Scallop Paper Punch
- School Glue and/or Stapler
Directions:
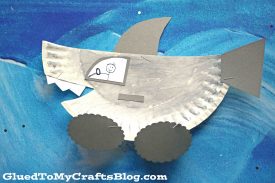
- First things first – cut your LARGE paper plate in half. Straight up the center! You only need ONE paper plate half per shark automobile {but this is the perfect excuse to make TWO cars today!}
- Now go ahead and cut out a small section from your paper plate half, to make the mouth of the shark. See our picture for an example. You can discard the small piece you cut off.
- Next up – paint the paper plate piece completely silver or gray.
- Set aside your painted piece to let it dry completely.
- Now it’s time for making the paper embellishments! Grab all your cardstock paper, paper punch and scissors.
- Start off by cutting out the fins for the shark from the gray cardstock.
- Next up, cut out two large circular wheels, triangle teeth, a small rectangle window and anything else you can think of to add to your piece.
- Once the paper plate is dry and you have everything cut out from the paper, it’s time to start assembling your paper shark car.
- Glue/staple the cardstock embellishments in place on the paper plate. The paper teeth will go in the opening you made earlier when you cut off the small piece of paper plate.
- Finally – if desired, add anything else you like for that custom look {maybe even draw a person sitting in the front seat of the car} before displaying proudly for all to see.
- Go ahead and admire your awesome Shark Car piece before you repeat the entire tutorial, for the second paper plate piece you have left over. I challenge you to make it even better the second time!
RELATED —> Paper Shark Mouth Frame

Make your summer extra memorable with tons of crafty inspiration from Glued To My Crafts!
We want YOU to check out our popular Paper Plate Shark, Popsicle Stick Smores and Shredded Paper Unicorn Hair craft posts!
We also LOVE talking crafts with our lovely readers. Come join our private Facebook group where we chit chat, share and laugh together! Everyone is welcomed, so come join in on the fun!!!

Paper Plate Shark Car Craft Idea For Summer
It's SUPER SIMPLE and sure to be loved by the littles in your home that absolutely love automobiles. Perfect for Shark Week too!
Here’s your checklist of supplies to bring this craft to life:
Prepare your creative haven by laying down a protective cover before the crafting magic begins!
Directions:
- First things first - cut your LARGE paper plate in half. Straight up the center! You only need ONE paper plate half per shark automobile.
- Now go ahead and cut out a small section from your paper plate half, to make the mouth of the shark. Discard excess piece.
- Next up - paint the paper plate piece completely silver or gray.
- Set aside your painted piece to let it dry completely.
- Now it's time for making the paper embellishments! Grab all your cardstock paper, paper punch and scissors.
- Start off by cutting out the fins for the shark from the gray cardstock.
- Next up, cut out two large circular wheels, triangle teeth, a small rectangle window and anything else you can think of to add to your piece.
- Once the paper plate is dry and you have everything cut out from the paper, it's time to start assembling your paper shark car.
- Glue/staple the cardstock embellishments in place on the paper plate. The paper teeth will go in the opening you made earlier when you cut off the small piece of paper plate.
- Finally - if desired, add anything else you like for that custom look {maybe even draw a person sitting in the front seat of the car} before displaying proudly for all to see.

Grab our favorite books via our Amazon affiliate link! In our Amazon storefront you will find books, toys and craft supplies we absolutely love using for our Glued To My Crafts tutorials!
If you've enjoyed our content or have any thoughts to share, we'd love to hear from you! Mention @gluedtomycrafts or tag #gluedtomycrafts on Instagram!