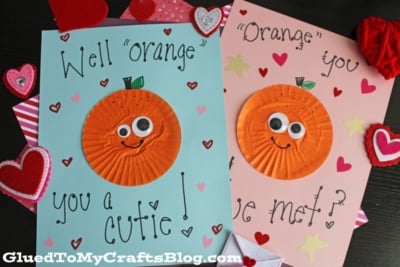
Help your kids explore their creative side with this fun and easy cupcake liner orange cutie card craft idea!

ORANGE you glad you landed on today’s post?! I’m “squeezing” my hands together in hopes that WE make this Cupcake Liner Orange Cutie Card craft tutorial go VIRAL this Valentine’s Day holiday!

Valentine’s Day is right around the corner, and what better way to celebrate the season of love than with a delightful and creative craft idea?
If you’re looking for a fun and unique project to do with your kids, friends, or even as a thoughtful gift for your significant other, then this Cupcake Liner Orange Cutie Card Craft is just what you need!
With its vibrant colors and simple yet charming design, this craft will surely make hearts flutter and bring a smile to anyone’s face.
Whether you’re a seasoned crafter or a novice, this project is perfect for all skill levels. So grab your scissors, glue, and, of course, some cupcake liners, because it’s time to get crafty and spread the love this Valentine’s Day!

Create something magical today with this adorable card tutorial from us!
Card Supplies:
- ORANGE Cupcake Liners
- Cardstock Paper
- Scissors
- Glue Stick
- Markers
- Wiggle Eyes
- School Glue
- Embellishments
Directions:
- First things first – grab your orange cupcake liner and flatten it out with your fingers.
- Put some glue on the back of your flattened cupcake liner piece and glue it to the center of a sheet of cardstock paper.
- If the edges are sticking up, add more glue so it really sticks down on the paper.
- Next up – the embellishments that will give it the look of an orange. Grab your markers.
- Using a brown and green marker, draw on a simple stem and small leaf on top of the orange liner.
- Now take your black marker and draw on a simple mouth shape. Add a few “dots” for texture as well.
- Finally, take the wiggle eyes and glue them in place.
- Now, add other embellishments and write a “punny” orange sayings around the design.
- When done decorating, set aside your cupcake liner orange card masterpiece to let it dry completely before gifting them away!
Punny Sayings:
- Orange you glad to see me?
- Hi CUTIE!
- Orange you glad we are friends?!
- You squeeze my heart!
- You are a CUTIE!
- I just want to SQUEEZE you!
- Squeeze the day!
- Have an orange-tastic day!
- I can’t CONCENTRATE when I’m with you!
- Orange you sweet!
RELATED —> Punny Toast Card

We absolutely LOVE sharing CREATIVE and INNOVATIVE handmade card ideas on Glued To My Crafts! So be sure to check out our fun and funky Cheesy Valentine and Avocado Friend cupcake liner card tutorials!
FOLLOW US ON PINTEREST SO YOU NEVER MISS A NEW TUTORIAL FROM US!

Cupcake Liner Orange Cutie Card Craft Idea
Help your kids explore their creative side with this fun and easy cupcake liner orange cutie card craft idea!
Here’s your checklist of supplies to bring this craft to life:
- School Glue
Prepare your creative haven by laying down a protective cover before the crafting magic begins!
Directions:
- First things first - grab your orange cupcake liner and flatten it out with your fingers.
- Put some glue on the back of your flattened cupcake liner piece and glue it to the center of a sheet of cardstock paper.
- If the edges are sticking up, add more glue so it really sticks down on the paper.
- Next up - the embellishments that will give it the look of an orange. Grab your markers.
- Using a brown and green marker, draw on a simple stem and small leaf on top of the orange liner.
- Now take your black marker and draw on a simple mouth shape. Add a few "dots" for texture as well.
- Finally, take the wiggle eyes and glue them in place.
- Now, add other embellishments and write a "punny" orange sayings around the design.
- When done decorating, set aside your cupcake liner orange card masterpiece to let it dry completely before gifting them away!

CLICK HERE TO PRINT THE DIRECTIONS FOR THIS CRAFT
If you've enjoyed our content or have any thoughts to share, we'd love to hear from you! Mention @gluedtomycrafts or tag #gluedtomycrafts on Instagram!