
Learn how to craft a cute and fun cupcake liner dinosaur card with your kids! CHA-CHING. It’ll keep them busy and create memories that will last forever!

Cupcake Liner Valentine Dinosaur Craft Idea For Kids
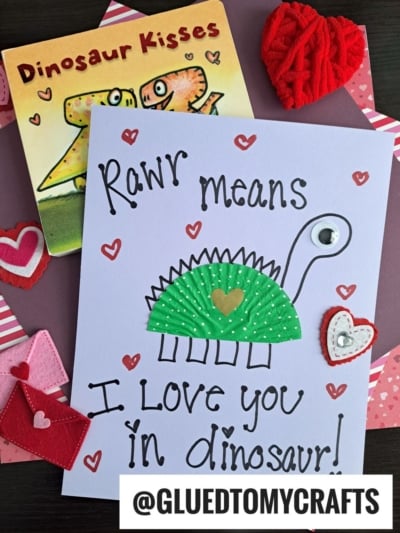
RAWR! It’s Stacey from Glued To My Crafts coming at ya with another CUPCAKE LINER CARD craft idea! This time we are focusing on DINOSAURS!
Using inexpensive red, purple and red cupcake liners, you too can create “dino-mite” cards within minutes. I think our latest handmade Valentine dinosaur card tutorial {whether you are a child or an adult} is the perfect craft to make this upcoming lovestruck season!
Besides the cupcake liners, all you need is some cardstock paper, markers, wiggle eyes and a glue stick. That’s it! That’s the ROAR-SOME thing about it – super simple supplies! I bet you could do this craft right now with what YOU have on hand already!
Plus you can easily write messages like “You are DINO-MITE” or “You make my heart SAUR!” in the inside, to really tie it all together.
On that note, I just hope you are inspired by my quick cupcake liner dinosaur craft idea that you will find below. I got my fingers {and toes} crossed that you will either decide to help your child make these dinosaur themed cards to spread some Valentine’s Day cheer in the classroom or perhaps you take on the challenge yourself & make a few for friends, family or your coworkers at work. Basically anyone who could use a smile right now! Whoever and whatever the reason behind you making your cards – I hope it all started from this very post on Glued To My Crafts today!
RELATED —> Handprint “Dino-Mite” Keepsake

Make a cute and easy cupcake liner dinosaur card – perfect for birthdays, greeting cards, thank you cards and more!
Craft Supplies:
- Large Cupcake Liners – 1 per craft
- White Cardstock Paper
- Cardstock Cards
- Glue Stick or Tape Runner
- Basic Craft Scissors
- Small Wiggle Eyes
- Black Marker
- Crayons or Coloring Pencils
- Valentine’s Day Embellishments
Directions:
- First things first – grab your cupcake liner {one per dinosaur card} and flatten it out with your hands.
- Go ahead and fold your cupcake liner in half and place a small amount of glue in the inside of it, so it won’t come apart.
- Now glue that folded cupcake liner onto your card front. This is your dinosaur’s body and where we are going to build from.
- Next grab your Sharpie marker and start drawing on your dinosaur embellishments. I suggest starting with the head, then add the tail, add the spikes and finally the legs.
- Now use the crayons to color in the dinosaur design.
- Follow that up by gluing on a wiggle eye so the dinosaur can see.
- To finish off the cupcake liner dinosaur card – take your Sharpie marker and write a quirky or punny message on the front of your card {there are few examples of sayings below!}
- Then add other embellishments you see fit {I added small heart stickers on the cupcake liner body of the dinosaur} Feel free to change it up and really make it your own!
- When done, allow it all to dry completely before you give it away proudly!
Sayings To Put Inside:
- Have a ROAR-SOME Valentine’s Day
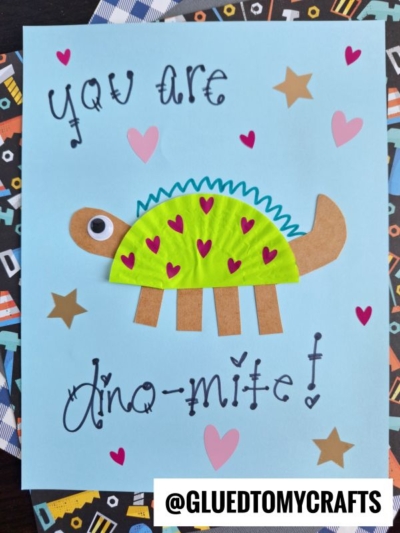
- You are DINO-MITE!
- You make my heart SAUR!
- RAWR means I LOVE YOU in dinosaur!
- You’re my favorite FRIENDOSAURUS!
RELATED —> Paper Plate Dinosaur
If you are looking for even MORE easy handmade card craft ideas that use cupcake liners, be sure to check out these fun posts listed below.
And “if” you decide to make this cupcake liner dinosaur valentine craft idea, please share a picture by tagging our page on Instagram or using #gluedtomycrafts for us to see. We love seeing our inspiration come to life and can’t wait to see your finished Valentine’s Day dinosaur cards!
- Cupcake Liner Orange Card
- Cupcake Liner Watermelon
- Cupcake Liner Olive Card
- Cupcake Liner Egg Card
- Cupcake Liner Cheesy Card
- Cupcake Liner Valentine Camper
- Cupcake Liner Sloth Cards

Cupcake Liner Dinosaur Card Craft Idea
Here’s your checklist of supplies to bring this craft to life:
Prepare your creative haven by laying down a protective cover before the crafting magic begins!
Directions:
- First things first - grab your cupcake liner {one per dinosaur card} and flatten it out with your hands.1 Cupcake Liners
- Go ahead and fold your cupcake liner in half and place a small amount of glue in the inside of it, so it won't come apart.
- Now glue that folded cupcake liner onto your card front. This is your dinosaur's body and where we are going to build from.1 Cardstock Cards
- Next grab your Sharpie marker and start drawing on your dinosaur embellishments. I suggest starting with the head, then add the tail, add the spikes and finally the legs.Cardstock Paper
- Now use the crayons to color in the dinosaur design.
- Follow that up by gluing on a wiggle eye so the dinosaur can see.2 Small Wiggle Eyes
- To finish off the cupcake liner dinosaur card – take your Sharpie marker and write a quirky or punny message on the front of your card {there are few examples of sayings below!}
- Then add other embellishments you see fit {I added small heart stickers on the cupcake liner body of the dinosaur} Feel free to change it up and really make it your own!
- When done, allow it all to dry completely before you give it away proudly!


CLICK HERE TO PRINT THE DIRECTIONS FOR THIS CRAFT