Christmas is the perfect time to use up all of those scraps of paper you’ve been saving.
This easy craft project will show you how to make some adorable paper Christmas tree cards using just a few simple steps.
These cards are perfect for sending holiday greetings to your loved ones, and they’re also a great way to use up all of those little bits of paper that might otherwise go to waste!

Christmas Tree Cards – A Clever Way to Use Up Your Scraps!
Hi friends! Today on Glued To My Crafts, I’m sharing a CREATIVE way to use up those random green paper scraps you just CAN’T bear to throw away just yet but in the same breathe, you know you need to purge! With the holidays here and 2020 just around the corner, I challenge YOU to start off the new year with a clean paper scrap bin and some handmade cards in the mail ASAP!
If you have been a long time follower of mine, you know that I absolutely LOVE to make & send cards to friends & family on various occasions {especially when I can get lil man involved in the making!} To me, it’s just more personal to send handmade through the mail, than any simple text, Facebook message or email could ever do!
And although these Christmas tree themed paper scrap cards are pretty simple and inexpensive to make – they still look pretty impressive {if I do say so myself!} Plus with them being totally customizable on what you have on hand – you can make these cards with different color schemes and personality that is sure to stand out from ANY store-bought card you will ever find!
So friends – let’s get to it. Take on my challenge, scroll on through the tutorial below and learn how YOU can make these paper scrap holiday tree cards in a matter of minutes! I can’t wait to see what you design when you share pictures on our Facebook page – wink wink! #gluedtomycrafts
RELATED: Gingerbread Man Cards and Christmas Camper Cards

These handmade cards are a fun and easy way to use up all of those little scraps of paper you’ve been saving. They’re perfect for Christmas, and they’ll add some festive cheer to your holiday greetings.
Craft Supplies:
- Cardstock Paper Cards
- GREEN Paper Scraps
- Scissors/Paper Trimmer
- Tape Runner Adhesive
- Brown Sharpie Marker
- Large Star Sticker
- Ink Pad & Christmas Stamp
Directions:
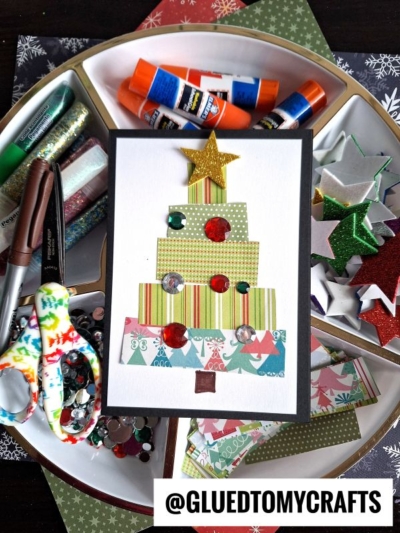
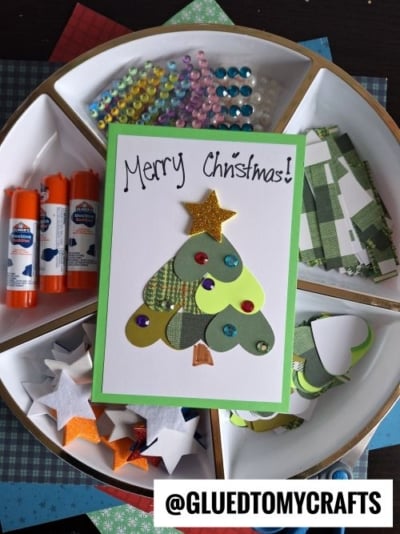
- First things first – grab all your paper scraps and craft scissors.
- Start laying out your scraps to see what patterned paper you want where in the stack.
- Then using your scissors, start trimming down each scrap piece so you can start “stacking” your Christmas tree. This is done by cutting out rectangle shapes out of the scraps and then trimming each one down a bit, as the tree gets taller {kinda like building a pyramid or layered cake.}
- Now go ahead and grab your cardstock card front.
- Using your adhesive tape runner, apply glue on the back of each scrap piece you just made and place them on the card, in the order you decided on.
- Once all the paper pieces are down on the card, use the brown Sharpie marker to draw on the tree “stump” below it all.
- Finally – just like decorating a tree – add the star “tree topper” on top of everything, to tie it all together.
- Go ahead and add any other embellishments you see fit.
- If desired, add a stamped “Christmas” sentiment somewhere on the card.
- Then write a sweet message inside and give it away! VIOLA!
- Repeat the above process for each paper scrap Christmas tree card you want to make!
- Don’t forget to share pictures of your finished DIY holiday cards with us! #gluedtomycrafts
RELATED —> Paper Scrap Birthday Cards
Deck the halls with CRAFT IDEAS for everyone!
Go ahead – our craft ideas are super easy, inexpensive and fun for all ages! Although I always encourage you to get the kids involved, these DIYs are also fun for adults to recreate as well!
Just check out my Fingerprint Snowman Frame, Christmas Tree Gnome and Santa Moon craft posts to see what I’m talking about!
