A quick-to-make design partnered with creative materials results in a stylish, handmade greeting card!

Add a little bit of whimsy to your Christmas cards this year with these easy-to-make camper cards. All you need is some cupcake liners, cardstock, and a few other basic supplies. Your friends and family will love receiving these charming cards in the mail!

This is a quick and easy way to make a festive, handmade card for the holidays. All you need are some cupcake liners and some creative materials! Try this fun project today!
Card Supplies:
- Silver Cupcake Liners – 1 per craft
- White Cardstock Paper
- Red Cardstock Paper
- Gray Cardstock Paper
- Black Cardstock Paper
- Cardstock Cards
- Glue Stick or Tape Runner
- Scissors
- Christmas Tree Stickers
- Thin-Tip Sharpie Markers
Directions:
- First things first – grab ONE silver cupcake liner {one per airstream camper card} and flatten it out with your hands.
- Next fold it in half and glue it together, in the center, to make the body of the camper.
- Now glue your cupcake liner piece to the center of a small white piece of cardstock, to be later glued to another a card front.
- Grab your remaining cardstock and scissors.
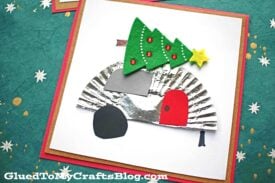
- Go ahead and cut out one small black circular wheel, a red door and a gray window for your camper.
- To finish off the cupcake liner holiday camper card – glue all your cardstock pieces in place, on the cupcake liner shape, as well as placing the Christmas tree sticker on top of the camper.
- Use the sharpie markers to draw on the details {like a doorknob on the door, the hitch, tree stump etc.}
- Then add other embellishments you see fit and mail away!!! {psst – this idea is awesome to frame and use as Christmas decorations as well!}
- Don’t forget to share pictures of your finished Christmas camper cards with us! #gluedtomycrafts
RELATED —> Popsicle Stick Christmas Truck


Celebrate this festive time of year with our easy step-by-step tutorials, while making memories that will last a lifetime!
If you loved today’s Cupcake Liner Christmas Camper Card idea, be sure to also check out these simply striking posts, listed below, for even MORE crafty inspiration!
And as always – if one of our crafts inspires you, be sure to share it on our Facebook page or group. We love seeing our inspiration come to life!
Paper Plate Santa
Paper Plate Gingerbread Man
Paper Plate Christmas Tree
Reindeer Clothespin Ornaments
Christmas Tree Gnome Keepsake
Spreading Some Cheer Keepsake
Popsicle Stick Christmas Mail Truck

Cupcake Liner Christmas Camper Cards
A quick-to-make design partnered with creative materials results in a stylish, handmade greeting card!
Here’s your checklist of supplies to bring this craft to life:
- 1 Cupcake Liner
- 1 Cardstock Cards
- Cardstock Paper
- Embellishments
Prepare your creative haven by laying down a protective cover before the crafting magic begins!
Directions:
- First things first - grab ONE silver cupcake liner {one per airstream camper card} and flatten it out with your hands.1 Cupcake Liner
- Next fold it in half and glue it together, in the center, to make the body of the camper.
- Now glue your cupcake liner piece to the center of a small white piece of cardstock, to be later glued to another a card front.Cardstock Paper, 1 Cardstock Cards
- Grab your remaining cardstock and scissors.
- Go ahead and cut out one small black circular wheel, a red door and a gray window for your camper.
- To finish off the cupcake liner holiday camper card – glue all your cardstock pieces in place, on the cupcake liner shape, as well as placing the Christmas tree sticker on top of the camper.Embellishments
- Use the sharpie markers to draw on the details {like a doorknob on the door, the hitch, tree stump etc.}
- Then add other embellishments you see fit and mail away!!!

CLICK HERE TO PRINT THE DIRECTIONS FOR THIS CRAFT
If you've enjoyed our content or have any thoughts to share, we'd love to hear from you! Mention @gluedtomycrafts or tag #gluedtomycrafts on Instagram!