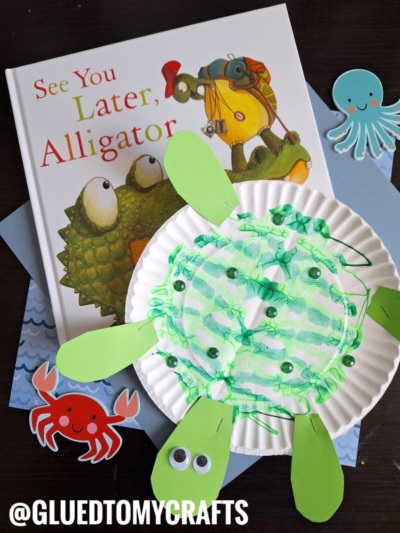
Turtles may be slow in real life BUT this Paper Plate Paint Splat Turtle craft idea is quick, easy & totally re-creatable for any skill level

Turtles may be slow in real life BUT this Paper Plate Paint Splat Turtle Friends kid craft idea is quick, easy and totally re-creatable for ANY skill-level!!!

Kids love turtles, and what better way to spark their imagination than by creating a colorful paper plate turtle of their own? This simple yet engaging paper plate and paint splat turtle craft is the perfect activity for a rainy day indoors or sunny afternoon outdoors.
Children can flex their creative muscles as they decorate their turtle “shells” with splashes of different colored paints and other materials.
By giving toddlers, preschoolers, and early elementary school kids a chance to uniquely design their turtle masterpieces from start to finish, this project nurtures independent self-expression while also providing an enjoyable learning through play experience.
The only limits are their imagination! Read on below for the simple step-by-step instructions for providing hours of turtle crafting fun for the young artists in your life.

This is a great kids craft idea that is both quick and easy to do, but also very re-creatable. Let your child’s imagination run wild as they create their own unique turtle using paint splatters made on paper plates!
Craft Supplies:
- Paper Plates – 1 per turtle craft
- Green Cardstock Paper
- Scissors
- Tulip Puffy Paint
- Small Wiggle Eyes
- Black Marker
- Stapler
- Baby Wipes
Directions:
- Please make sure you have a good working area that can get dirty because paint will squeeze out of the sides of this craft!!!
- First fold your paper plate in half {one per turtle craft you want to make.}
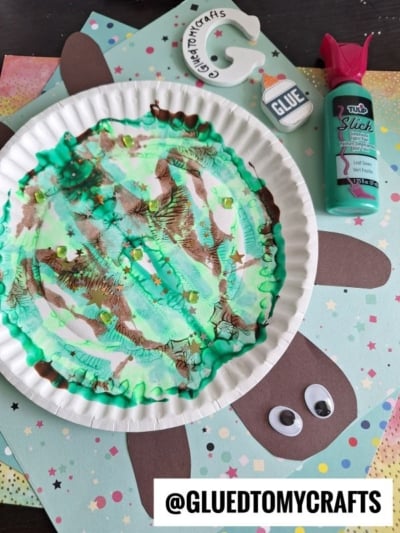
- Unfold and squirt some paint on one side of the paper plate. I did a mixture of brown, gold and green {I like the Tulip Puffy Paint for this particular step since it’s in a nice controlled squirt bottle}
- Be sure to keep the paint inside the paper plate and not place too much down. A squiggle of each color is perfect.
- Once the paint is down, go ahead and fold/squish your paper plate together again.
- Be sure to rub your hand all over the folded piece, so the paint will cover your the inside nicely {paint WILL more than likely squeeze out the sides, so be sure to pay attention to that and clean up with baby wipes!}
- Now carefully unfold your piece to reveal your turtle shell design inside.
- This step is optional – but if you want to, sprinkle some glitter/rhinestones on top of the wet paint if desired.
- Set aside your piece.
- To finish the Paper Plate Turtle – cut/staple some body parts out of the green cardstock to the paper plate.
- Glue on wiggle eyes for your turtle to see and draw on a mouth with the marker.
- Set aside to let it dry completely before displaying proudly.
RELATED —> Torn Paper Turtle Craft Idea
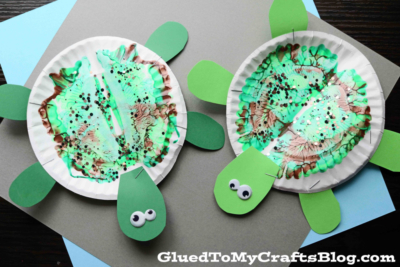
Don’t you just love our Colorful Paint Splat Turtle Friend craft?! Remember – you also change out the colors of the craft paint to make your own “version” of what the shell should look like!
Please also don’t forget to check out our Paint Splat Butterflies, Paint Splat Unicorn and Paint Splat Yeti craft posts. All three are just as easy as today’s idea but they create a different “paint smash” look!

Paint Splat Turtle Craft
Turtles may be slow in real life BUT this Paper Plate Paint Splat Turtle craft idea is quick, easy & totally re-creatable for any skill level
Here’s your checklist of supplies to bring this craft to life:
- 1 Large Paper Plate
- Cardstock Paper green
- Tulip Puffy Paint green and brown
- 2 Small Wiggle Eyes
- Loose Craft Glitter
Prepare your creative haven by laying down a protective cover before the crafting magic begins!
Directions:
- Please make sure you have a good working area that can get dirty because paint will squeeze out of the sides of this craft!!!
- First fold your paper plate in half {one per turtle craft you want to make.}
- Unfold and squirt some paint on one side of the paper plate. I did a mixture of brown, gold and green.
- Be sure to keep the paint inside the paper plate and not place too much down. A squiggle of each color is perfect.
- Once the paint is down, go ahead and fold/squish your paper plate together again.
- Be sure to rub your hand all over the folded piece, so the paint will cover your the inside nicely {paint WILL more than likely squeeze out the sides, so be sure to pay attention to that and clean up with baby wipes!}
- Now carefully unfold your piece to reveal your turtle shell design inside.
- This step is optional - but if you want to, sprinkle some glitter/rhinestones on top of the wet paint if desired.
- Set aside your piece.
- To finish the Paper Plate Turtle - cut/staple some body parts out of the green cardstock to the paper plate.
- Glue on wiggle eyes for your turtle to see and draw on a mouth with the marker.
- Set aside to let it dry completely before displaying proudly.

CLICK HERE TO PRINT THE DIRECTIONS FOR THIS CRAFT
If you've enjoyed our content or have any thoughts to share, we'd love to hear from you! Mention @gluedtomycrafts or tag #gluedtomycrafts on Instagram!