Craft a paint splat yeti face with your kids! This fun and creative winter DIY project is perfect for little hands and brings playful charm to seasonal crafting.

It’s our super popular and favorite “paint splat” technique incorporated into a holiday theme, inspired by the ape-like creature they call “yeti.”

Paint Splat & Paper Yeti Craft
The Abominable Snowman can be scary but this latest craft tutorial from Glued To My Crafts is not!
Go ahead and check out our NEW tutorial & get ready to recreate your own Paint Splat Yeti Face piece with your child today! It’s a winter boredom buster that is super easy to recreate!!!

Craft Supplies:
- Blue Cardstock Paper
- White Tulip Puffy Paint
- Black Tulip Puffy Paint
- Red Cardstock Paper
- Cotton Balls
- School Glue
- Scissors
RELATED —> Fork Painted Polar Bear


Directions:
-
First things first – fold your blue cardstock paper in half.
-
Open it back up.
-
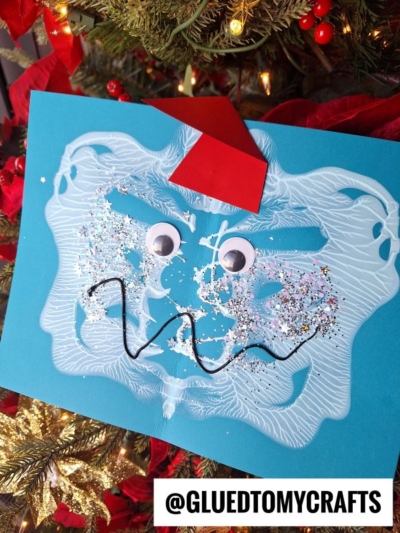
Now grab your white puffy paint and squirt several squiggles of it ON ONE SIDE of the paper, before closing it up again.
-
Once the paper is closed for the second time, gently caress the white puffy paint inside the folded paper, so it makes a fun symmetrical print design on both sides {please keep in mind – paint might ooze from the sides of the cardstock, so be sure to work in an area that can get dirty!}
-
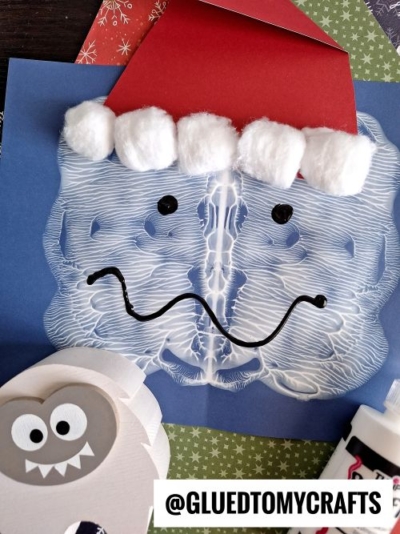
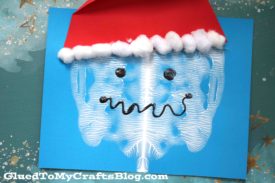
Next open it back up, to see the BEGINNING of what your yeti’s face will eventually be. From here, you will take the black puffy paint and draw on some eyes & a squiggly mouth, right on top of the paint splat design.
-
Now grab your red cardstock paper and cut out a large triangle piece.
-
Secured it to the paint splat paper with some school glue.
-
Finally – the last step is adding the white cotton balls to the brim of the hat.
-
When you are finished with your custom ABONIMABLE SNOWMAN ART masterpiece, set aside it to let it dry completely, before displaying proudly!
RELATED —> Paper Plate Sleeping Bear
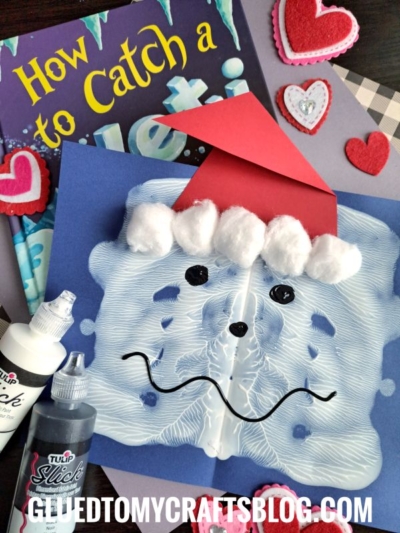
AFFILIATE LINK – PAIR OUR CRAFT IDEA WITH THE “HOW TO CATCH A YETI” BOOK
Our “Paint Splat Yeti Face” craft is an engaging, entertaining, and educational winter activity that kids of all ages will love. It’s simple enough for toddlers yet offers room for older kids to explore their creativity. From mixing paint colors to adding comical expressions, this craft is the perfect combination of fun and learning.
Gather your materials, roll up your sleeves, and get ready to craft a pack of quirky yetis that your kids will treasure. Who knows – you might just want to make one for yourself, too! Happy crafting, my friends!
RELATED —> Popsicle Stick Smores

Paint Splat Yeti Face Craft
Craft a paint splat yeti face with your kids! This fun and creative winter DIY project is perfect for little hands and brings playful charm to seasonal crafting.
Here’s your checklist of supplies to bring this craft to life:
Prepare your creative haven by laying down a protective cover before the crafting magic begins!
Directions:
- First things first - fold your blue cardstock paper in half.Cardstock Paper
- Open it back up.
- Now grab your white puffy paint and squirt several squiggles of it ON ONE SIDE of the paper, before closing it up again.Tulip Puffy Paint
- Once the paper is closed for the second time, gently caress the white puffy paint inside the folded paper, so it makes a fun symmetrical print design on both sides {please keep in mind - paint might ooze from the sides of the cardstock, so be sure to work in an area that can get dirty!}
- Next open it back up, to see the BEGINNING of what your yeti's face will eventually be. From here, you will take the black puffy paint and draw on some eyes & a squiggly mouth, right on top of the paint splat design.
- Now grab your red cardstock paper and cut out a large triangle piece.
- Secured it to the paint splat paper with some school glue.
- Finally - the last step is adding the white cotton balls to the brim of the hat.White Cotton Balls
- When you are finished with your custom ABONIMABLE SNOWMAN ART masterpiece, set aside it to let it dry completely, before displaying proudly!

Grab our favorite books via our Amazon affiliate link! In our Amazon storefront you will find books, toys and craft supplies we absolutely love using for our Glued To My Crafts tutorials!
If you've enjoyed our content or have any thoughts to share, we'd love to hear from you! Mention @gluedtomycrafts or tag #gluedtomycrafts on Instagram!