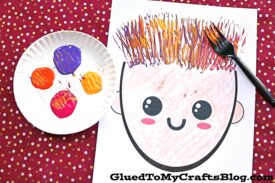
A simple plastic fork becomes your NEW paint brush with this SILLY HAIR paper craft idea for kids! We are mixing some inexpensive materials together and making unique pieces that ANY age can recreate!
Keep scrolling to score the free printable so you can make idea come to life within minutes today!!

Fork Painted Silly Hair Craft Idea
At Glued To My Crafts, we LOVE thinking outside the box! Today we going to show YOU how easy it is to take some ordinary inexpensive plastic forks {possibly from your party stash} and turn them into a paint brush for a creative abstract craft idea!
This silly hair art project includes easy to find craft materials that are probably in your home right now. All you need is our free provided printable, white cardstock paper, craft paint and a plastic fork. That’s it! Not to mention – the steps are even EASIER to follow with this craft idea since all you have to do is “paint” the hair on with a few strokes of the fork. Nothing too elaborate and you kids {if they want too} can go as simple or as WILD as they want on their painted hair.
To recreate this hair painted craft idea, you can find our full step-by-step tutorial below. Then set up shop on your kitchen table and watch your child’s imagination go WILD as they make some one-of-a-kind rainbow hair pieces with you!! Even adults will want to join in on the fun!
Happy crafting my friends! Don’t forget to share pictures of your finished plastic fork and paper rainbow hair creations with us on our Facebook page or tag us on Instagram to see them! #gluedtomycrafts
RELATED: Fork Painted Polar Bear and Thumbprint Troll Hair
This fun and easy kids craft is perfect for a rainy day. All you need is some paper, a plastic fork, and some paint. Come get the free file to recreate this silly hair paper craft today!
Craft Supplies:
- Face Printable – on our landing page
- White Cardstock Paper
- Crayons or Markers
- Craft Paint
- Small Paper Plate
- Clean, Plastic Fork
Directions:
- First download and print the printable listed above in the supply.
- Print it on white cardstock, in color or black & white. You will need ONE printable per silly hair craft.
- Next up – grab your skin-tone colored crayon and color in the head in the printable. You can also add/draw in anything else you like.
- Now for the painting step. Grab your various colors of craft paint, the plastic fork and the small paper plate.
- Squirt a small amount of each color on the paper plate. You don’t need a lot. The size of a quarter is a good starting point.
- Grab your fork and rub it in the craft paint.
- Using the fork as your paint brush, make several strokes, coming from the head, to make rainbow colored hair on the paper.
- Repeat over and over again until you have the look you want.
- When you are done with the painting step, set aside your paper to let it dry completely before displaying proudly!
- If desired – while the paint is still wet, you can sprinkle loose craft glitter on top to make it sparkle!
- You can also add stickers, rhinestones, small bows etc. to really make it your own!
- Then when done decorating, allow it to dry completely before you display it proudly!
- Don’t forget to also snap a few pictures of the finished paper silly hair creations and share them on our Facebook page to admire from a far!
RELATED —> Silly Leaf Hair Craft
If you are looking for even MORE easy kid craft ideas from Glued To My Crafts, be sure to check out these fun posts listed below.
And “if” you decide to make our Plastic Fork Silly Hair On Paper kids craft idea, please share a picture on our Facebook page or tag us on Instagram with #gluedtomycrafts for us to see. We love seeing our inspiration come to life and can’t wait to HEAR from you!
- Paper Plate Llama
- Paper Plate Honey Bee
- Crinkle Paper Pet Fish
- Popsicle Stick Flowers
- Paper Plate Bird Nest
- Chalk Art Hedgehog
- Handprint French Fries
- Wooden Spoon Scarecrow
Fork Painted Silly Hair Craft
Here’s your checklist of supplies to bring this craft to life:
Prepare your creative haven by laying down a protective cover before the crafting magic begins!
Directions:
- First print out our provided printable, in color, on a single sheet of white cardstock paper. You only need one print per craft.Cardstock Paper
- Next up - grab your skin-tone colored crayon and color in the head in the printable. You can also add/draw in anything else you like.
- Now for the painting step. Grab your various colors of craft paint, the plastic fork and the small paper plate.
- Squirt a small amount of each color on the paper plate. You don't need a lot. The size of a quarter is a good starting point.Craft Paint
- Grab your fork and rub it in the craft paint.
- Using the fork as your paint brush, make several strokes, coming from the head, to make rainbow colored hair on the paper.
- Repeat over and over again until you have the look you want.
- When you are done with the painting step, set aside your paper to let it dry completely before displaying proudly!
- If desired - while the paint is still wet, you can sprinkle loose craft glitter on top to make it sparkle!
- You can also add stickers, rhinestones, small bows etc. to really make it your own!Embellishments
- Then when done decorating, allow it to dry completely before you display it proudly!


NEED MORE HELP DOWNLOADING OUR FREE PRINTABLES? PLEASE REFER TO OUR FAQ PAGE


