
Put some sparkle and cheer in your Christmas décor this year with a stunning stained glass star ornament! Make this festive season one to remember with a beautiful addition to your home.

Christmas Stained Glass Star Ornament
Hi friends! I’m so glad you landed on our latest Christmas Star Stained Glass Ornament craft tutorial! You are seriously going to love this one! Not just for the holidays but beyond it as well!
With our easy step-by-step tutorial and free star shaped printable template that you will find below, you too can pull together this unique Stained Glass Star Ornament with your child in no time!
Ready to make it happen? Keep scrolling for ALL the details, as well as the free provided printable, so you can recreate it today!
Then, when you are done, come share some pictures of the end result on our Facebook page to admire! I just know you are going to make some beautiful tissue paper and contact paper Christmas star pieces! Happy crafting, my friends! #gluedtomycrafts
RELATED: Snowman Snowflake Ornament and Christmas Tree Wagon

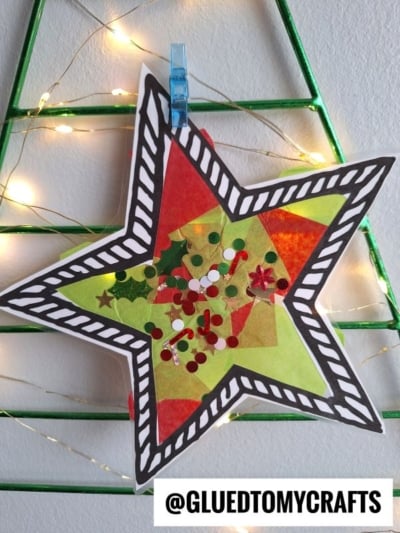
Find easy and fun Christmas crafts for kids that you can make with your child. This Stained Glass Star Ornament is a great project for all ages.
Craft Supplies:
- Free Star Outline Printable
- Clear Contact Paper
- Scissors
- Tissue Paper
- Single Hole Punch
- Twine or Ribbon
- Embellishments
RELATED —> Ho Ho Ho Keepsake
Directions:
- First grab and print the FREE printable on a single sheet of yellow cardstock paper {or any color you like!}
- Using your scissors, trim out the star design in the printable, as well as the center of it.
- Now grab your contact paper and cut two pieces the same length. Take off the protective paper off one and lay it on a flat surface.
- Lay your star cutout on the contact paper.
- If desired, shake some loose craft glitter inside the design before you move onto the next step.
- Next up – grab your tissue paper and cut it into small squares. Now have your child place it on the contact paper, to make a beautiful design.
- Once done, grab the other piece of contact paper and remove it’s protective sheet. Then lay it on top of the other piece and press firmly. Make sure every corner is stuck together.
- To finish off the craft, use your scissors to trim out the star shape.
- Finally, hole punch a single hole in the star design and string some twine {or ribbon} through it, for easy hanging.
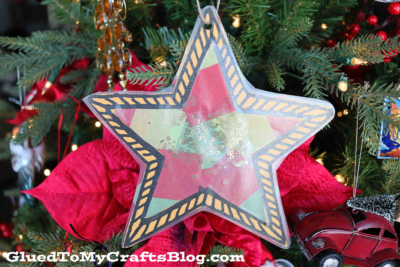
- Then display your finished Stained Glass Star proudly on the tree or maybe even a window, for everyone to see.
RELATED —> Paper Plate Snowman House
Create a holiday worth remembering with our easy step-by-step kid craft tutorials! Be sure to check out these fun posts, listed below, for even MORE crafty & festive inspiration.
And as always – if our “Stained Glass Star” post inspires you, be sure to share it on our Facebook page or in our group. We love seeing our inspiration come to life and can’t wait to see your mosaic snowmen pieces in action!
- Paper Plate Ornament
- North Pole Ornaments
- Paper Plate Grinch Heart
- Paper Reindeer Star
- Puffy Paint Sugar Cookie
- Reindeer Frame Gift Idea
- Polka Dot Ugly Sweater
- Cotton Ball Snowman
- Bubble Wrap Snowy Tree
- Star Shaped Gnome Craft

Stained Glass Christmas Star Ornament Craft Idea
Here’s your checklist of supplies to bring this craft to life:
Prepare your creative haven by laying down a protective cover before the crafting magic begins!
Directions:
- First print out our provided printable, in color, on a single sheet of yellow cardstock paper. You only need one print per craft.
- Using your scissors, trim out the star design in the printable, as well as the center of it.
- Now grab your contact paper and cut two pieces the same length. Take off the protective paper off one and lay it on a flat surface.
- Lay your star cutout on the contact paper.
- If desired, shake some loose craft glitter inside the design before you move onto the next step.
- Next up - grab your tissue paper and cut it into small squares. Now have your child place it on the contact paper, to make a beautiful design.
- Once done, grab the other piece of contact paper and remove it’s protective sheet. Then lay it on top of the other piece and press firmly. Make sure every corner is stuck together.
- To finish off the craft, use your scissors to trim out the star shape.
- Finally, hole punch a single hole in the star design and string some twine {or ribbon} through it, for easy hanging.
- Then display your finished Stained Glass Star proudly on the tree or maybe even a window, for everyone to see.

NEED HELP DOWNLOADING OUR FREE PRINTABLES? PLEASE REFER TO OUR FAQ PAGE