Get in the holiday spirit with this easy paper star Santa craft for kids!

Get creative this festive season with our Paper Star Shaped Santa craft! This easy-to-follow project is sure to put a twinkle in your holiday decorations!
Welcome Christmas into your home this holiday season with our SUPER EASY Paper Star Shaped Santa kid craft idea!
Sure you can buy any pre-made kids craft kit this year but WHY would you do that, when at Glued To My Crafts we make it the EASIEST, just for you!
Keep scrolling to see how we pulled this latest DIY idea together within minutes! There’s even a FREE star shaped printable to get you started even faster today! Enjoy!

This simple and fun paper star kids craft is a great Christmas decoration idea for children. And, it’s easy to make too! Just follow our step-by-step photo tutorial.
Craft Supplies:
- Red Cardstock Paper
- White Cardstock Paper
- Skin Tone Cardstock Paper
- Black Cardstock Paper
- Gold Cardstock Paper
- FREE STAR PRINTABLE – from our landing page
- Pattern Scrapbook Paper
- Craft Scissors
- School Glue
- Wiggle Eyes
- Small Rhinestones
- Black Sharpie Marker
Directions:
- First things first – download and print out the STAR shaped printable, on red {or green} cardstock paper.
- Go ahead and trim out the star shape from the printable.
- Discard excess paper.
- Now grab all your remaining cardstock pieces.
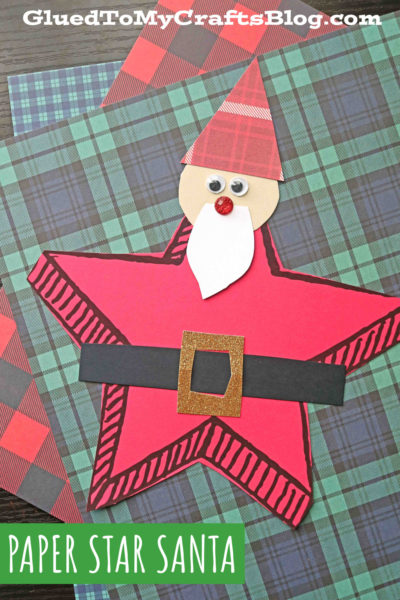
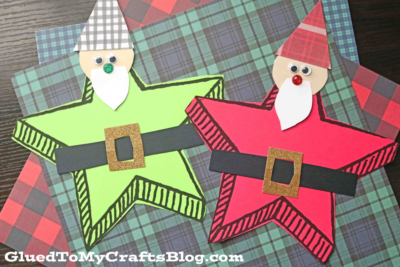
- Cut out a small circular head, a rectangular belt with square buckle, a beard and of course – a festive hat from the scrapbook paper.
- Next up – grab your red star shape, all the paper pieces and the school glue.
- Go ahead and start gluing your cardstock pieces in place, on the paper star shape in the designated areas. I suggest starting with the head.
- Finish off the Santa Star Paper Craft by gluing on some wiggle eyes and rhinestone nose on.
- Add other embellishments you see fit and display!
- If you would like to make this into an ornament for the tree, hole punch the top of the Santa piece and string some ribbon through it!
RELATED —> Star Santa Fox

From my craft table to yours. We hope this star shaped Santa post inspired you today!
But don’t let the crafty fun stop here! We also have our Christmas Snow Globe, Reindeer Ballerina Friends and Reindeer Frame craft tutorials for you to check out as well! All of which would pair nicely with today’s crafty idea!
And as always, we highly encourage you to share your pictures with us. It seriously makes our day and keeps us going on this website.
So come join our private Facebook community to share your pictures with ease!

Paper Star Shaped Santa Craft
Get in the holiday spirit with this easy paper star Santa craft for kids!
Here’s your checklist of supplies to bring this craft to life:
Prepare your creative haven by laying down a protective cover before the crafting magic begins!
Directions:
- First things first - download and print out the STAR shaped printable, on red {or green} cardstock paper.
- Go ahead and trim out the star shape from the printable.
- Discard excess paper.
- Now grab all your remaining cardstock pieces.
- Cut out a small circular head, a rectangular belt with square buckle, a beard and of course - a festive hat from the scrapbook paper.
- Next up - grab your red star shape, all the paper pieces and the school glue.
- Go ahead and start gluing your cardstock pieces in place, on the paper star shape in the designated areas. I suggest starting with the head.
- Finish off the Santa Star Paper Craft by gluing on some wiggle eyes and rhinestone nose on.
- Add other embellishments you see fit and display!
- If you would like to make this into an ornament for the tree, hole punch the top of the Santa piece and string some ribbon through it!


NEED HELP DOWNLOADING OUR FREE PRINTABLES? PLEASE REFER TO OUR FAQ PAGE
If you've enjoyed our content or have any thoughts to share, we'd love to hear from you! Mention @gluedtomycrafts or tag #gluedtomycrafts on Instagram!