A SUPER simple Christmas craft that can be made from wood star shapes, craft paint and twine!


The holidays are just around the corner, and what better way to celebrate than with a fun and festive DIY project that the whole family will love?
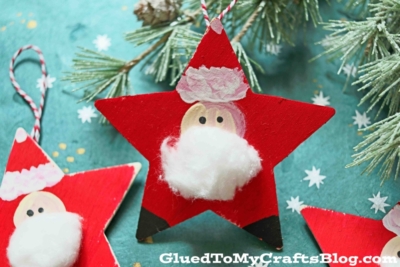
Crafting ornaments together is a wonderful way to make memories, spark creativity, and add a personalized touch to your holiday décor. This year, we’re sharing a delightful project idea perfect for kids of all ages – creating a charming wood Santa star ornament!
Not only is this craft easy to make, but it also uses simple materials that you may already have in your home. Whether you’re decorating your Christmas tree or looking for handmade gift ideas, this Santa-inspired wooden star is guaranteed to bring holiday cheer!

Holiday crafts like the wood Santa star ornament aren’t just about creating decorations. They’re about bonding with your family, celebrating the spirit of the season, and encouraging creativity. These moments are what kids will cherish most about the holidays as they grow older. Plus, handmade ornaments often become treasured keepsakes, capturing memories of when little hands worked together to make something special.
Craft Supplies:
Here’s what you need to get started. Most of these items are available at local craft stores or online.
- Large Unfinished Wood Stars – one per craft
- Craft Paint {Red, White, Black, Tan}
- Small Paint Brushes
- Small Paper Plate
- White Cotton Balls
- Craft Scissors
- Hot Glue Gun
- Glue Gun Sticks
- Twine/Ribbon
RELATED —> Reindeer Star
Directions:
Follow these simple steps to bring your wooden star to life!
- First things first – squirt your craft paints on the small paper plate.
- Next up – grab ONE star per ornament you want to make today.
- Have your child paint their stars completely red.
- Once done, paint on a Santa face in the center of the star.
- You will also want to paint on black boots on two of the star points, with a little bit white for his hat towards the top.
- Set aside to let your pieces dry completely.
- Now take a single cotton ball and cut it in half to make a smaller beard shape.
- Hot glue a cotton ball piece in the center of the design/near the face of Santa.
- To finish it off and turn it into a Santa Star ornament, hot glue some ribbon or twine to the back of the wood star.
- Then display proudly for all to see!
- Don’t forget to share pictures with us on our Facebook page or use our special branded hashtag #gluedtomycrafts for us to see!
Remember – Your child’s ornament doesn’t need to look perfect. What matters is that they have fun and express their creativity!
RELATED —> Ribbon Height Keepsake

Recreating this “wood Santa star ornament” is stress-free, budget-friendly, and full of fun for kids and parents alike. Whether you’re looking to spend quality time together or searching for unique gift ideas, this DIY project ticks every box.
Gather your materials, prepare your workstations, and get ready for a festive afternoon that everyone will enjoy. Oh, and don’t forget to snap a photo of your finished ornaments hanging on the Christmas tree! We’d love to see your creations, so share them on social media with the hashtag #SantaStarCraft.
If you love this holiday themed Santa star craft idea from Glued To My Crafts, you will also want to check out our Santa Puppet, Grinch Ornament and Christmas Bear craft posts! #gluedtomycrafts
Happy crafting, and may your holidays be merry, bright, and creative!

Wood Santa Star Ornament Craft Idea
A SUPER simple Christmas craft that can be made from wood star shapes, craft paint and twine!
Here’s your checklist of supplies to bring this craft to life:
Prepare your creative haven by laying down a protective cover before the crafting magic begins!
Directions:
- First things first - squirt your craft paints on the small paper plate.
- Next up - grab ONE star per ornament you want to make today.
- Have your child paint their stars completely red.
- Once done, paint on a Santa face in the center of the star.
- You will also want to paint on black boots on two of the star points, with a little bit white for his hat towards the top.
- Set aside to let your pieces dry completely.
- Now take a single cotton ball and cut it in half to make a smaller beard shape.
- Hot glue a cotton ball piece in the center of the design/near the face of Santa.
- To finish it off and turn it into a Santa Star ornament, hot glue some ribbon or twine to the back of the wood star.
- Then display proudly for all to see!

CLICK HERE TO PRINT THE DIRECTIONS FOR THIS CRAFT
If you've enjoyed our content or have any thoughts to share, we'd love to hear from you! Mention @gluedtomycrafts or tag #gluedtomycrafts on Instagram!