Whether for Christmas or Valentine's Day, our latest kids art project idea is extra SWEET to recreate!

This is a fun and festive kids art project that will keep them entertained for hours. All you need is cardstock paper, puffy paint, and some creativity! Let your little ones go wild with this one – it’s perfect for Christmas or Valentine’s Day.

Shaving Cream & Glue Cookie Craft Idea For Kids
Whether for Christmas, Valentine’s Day or just because you need something to pass the time, our latest kids craft idea is extra SWEET for those who want to get crafty with our simple art project idea!
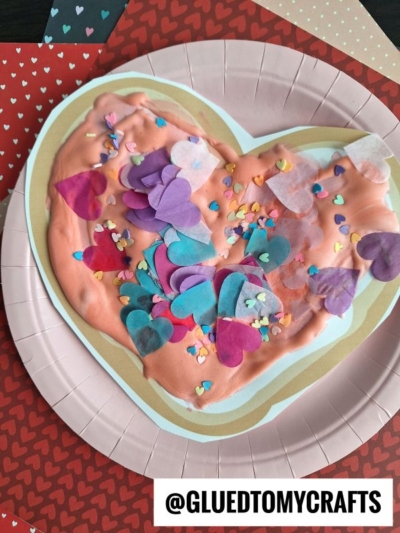
Ready to make it happen in your home today? Keep on scrolling to see how we made these HEART shaped paper sugar cookies come to life with our tried-and-true puffy paint recipe and FREE printable as well!
It’s super simple and sure to bring some smiles to you & your aspiring little crafter!
So enough chit chat from me! Keep scrolling to bake up these paper heart shaped cookies with shaving cream frosting today! Happy crafting, my friends!
RELATED: Paper Plate Cookie & Puffy Paint Cupcake

Puffy Paint Sugar Cookie Craft
Looking for a fun craft? This puffy paint sugar cookie is perfect to recreate with your kids and friends. Add food coloring for extra holiday cheer!
Craft Supplies:
- Cookie Printable – on our landing page
- White Cardstock Paper
- White Shaving Cream
- White School Glue
- Red Food Coloring
- Small Mixing Bowl
- Foam Paint Brush
- Loose Craft Glitter
Directions:
- First grab and print the FREE HEART SHAPED COOKIE PRINTABLE. You will want to print this file in color on thick cardstock and print one printable per child.
- Now you are ready to make your puffy paint! Place equal amounts of shaving cream and glue in a small dish.
- Mix together until well combined.
- Now add a drop of red food coloring and mix until you have a shade of light pink you like {remember, your puffy paint will also be a shade darker when completely dried}
- Once you have the consistency and color you like, have children “paint” their sugar cookie in the provided printable. They will want to stay within the lines of the template. This will be the frosting {but not edible!} for the cookie.
- After children are done with the puffy paint step, have them “sprinkle” on some sprinkles on top of wet puffy paint.
- Then set aside the paper sugar cookie masterpieces to let them dry completely before displaying proudly!
- If desired, once the puffy paint is COMPLETELY dry, go ahead and cut out the heart shape & glue it to another piece of colored cardstock paper. This will give your craft a cleaner look AND it adds another step to keep the craftiness going. Have fun!
RELATED —> Puffy Paint Cactus
Do you love our creative Paper and Puffy Paint Sugar Cookie idea? We sure hope so! Like I mentioned above, it’s perfect for Christmas AND Valentine’s Day. Heck – I could see this being done on a rainy day, while you bake the real deal in the oven – hint hint!
On that note, be sure to also check out our Puffy Paint Pizza and Puffy Paint Yeti craft tutorials as well! We also have our basic, fool-proof puffy paint recipe tutorial for you to check out as well!

Puffy Paint Sugar Cookie Craft Idea For Kids
Whether for Christmas or Valentine's Day, our latest kids art project idea is extra SWEET to recreate!
Here’s your checklist of supplies to bring this craft to life:
Prepare your creative haven by laying down a protective cover before the crafting magic begins!
Directions:
- First print out our provided printable, in color, on a single sheet of white cardstock paper. You only need one print per craft.
- Now you are ready to make your puffy paint! Place equal amounts of shaving cream and glue in a small dish.
- Mix together until well combined.
- Now add a drop of red food coloring and mix until you have a shade of light pink you like {remember, your puffy paint will also be a shade darker when completely dried}
- Once you have the consistency and color you like, have children "paint" their sugar cookie in the provided printable. They will want to stay within the lines of the template. This will be the frosting {but not edible!} for the cookie.
- After children are done with the puffy paint step, have them "sprinkle" on some sprinkles on top of wet puffy paint.
- Then set aside the paper sugar cookie masterpieces to let them dry completely before displaying proudly!
- If desired, once the puffy paint is COMPLETELY dry, go ahead and cut out the heart shape & glue it to another piece of colored cardstock paper. This will give your craft a cleaner look AND it adds another step to keep the craftiness going. Have fun!


NEED MORE HELP DOWNLOADING OUR FREE PRINTABLES? PLEASE REFER TO OUR FAQ PAGE
If you've enjoyed our content or have any thoughts to share, we'd love to hear from you! Mention @gluedtomycrafts or tag #gluedtomycrafts on Instagram!