When engaging in craft activities, it is important for young children to have adult supervision at ALL times. It is also recommended to use supplies that are suitable for your child’s age. Feel free to modify materials or steps to meet your specific requirements.

Cookie Jar Craft Idea For Kids
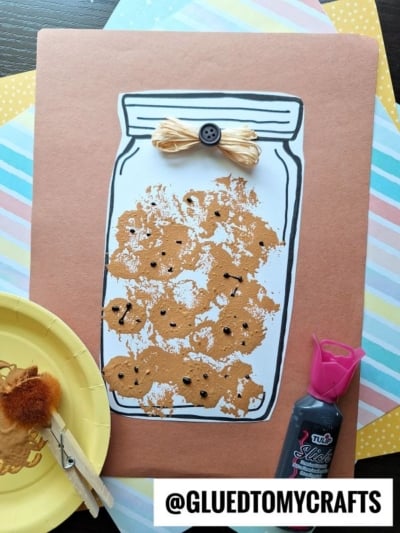
To complete our UNIQUE chocolate chip cookie craft idea, all you need is our free mason jar printable, some craft paint, a few craft pom poms and a wooden clothespin to make it happen!
Happy crafting, my dear friends! We hope you have fun making those paper and polka dot cookie creations with your little crafter this week!
RELATED —> Paper Plate Cookie

This fun and easy craft idea is perfect for kids of all ages! Learn how to make your own pom pom stamped cookie jar with our step by step tutorial!
Craft Supplies:
- Mason Jar Template – on our landing page
- White Cardstock Paper
- Crayons, Coloring Pencils or Markers
- Brown Craft Paint
- Small Paper Plate
- Wooden Clothespins
- Large Sized Pom Poms
- Black Puffy Paint
Directions:
- First print the free blank mason jar template listed above in the supply list. My suggestion is on white colored paper but feel free to change that up. You only need ONE print per cookie paper craft.
- At this point in time you can color in the lid of the jar with either crayons, markers or coloring pencils.
- Next up – making your paint brushes. For each paint color, you will need to pinch” one LARGE sized pom pom inside one clothespin.
- Now squirt each color of craft paint on the paper plate.
- Dip the pom pom paint brush in one of the colors, then on the printable, right inside the jar design.
- Repeat under you have the desired amount of “cookies” inside of it.
- To finish off the Pom Pom Stamped Cookie craft, use the black puffy paint to draw on “chocolate chips” all over.
- When done crafting, allow it all to dry completely before you display it proudly for ALL to see!
- If desired, trim out the painted design and attach it to another piece of cardstock paper {like I did for the example pictures.}
RELATED —> Popsicle Stick Cookie Monster
Once your masterpiece is complete, let it dry and proudly display your cookie jar on the fridge, gift it to someone special, or use it as a whimsical decoration for a cookie-themed celebration.
Don’t forget to capture a photo of your craft and share it with friends or on social media, tagging #gluedtomycrafts to inspire others. This isn’t just a craft – it’s a sweet memory in the making, filled with creativity and joy!


Pom Pom Stamped Cookie Jar Craft
It's super SWEET to recreate! Just download, print and add "stamps" for the cookies inside!
Here’s your checklist of supplies to bring this craft to life:
- White Cardstock Paper
- Mason Jar Printable Landing Page
- Craft Paint brown, light brown and black
- Large Pom Poms
- Wooden Clothespins
Prepare your creative haven by laying down a protective cover before the crafting magic begins!
Directions:
- First print the free blank mason jar template listed above in the supply list. My suggestion is on white colored paper but feel free to change that up. You only need ONE print per cookie paper craft.
- At this point in time you can color in the lid of the jar with either crayons, markers or coloring pencils.
- Next up - making your paint brushes. For each paint color, you will need to pinch" one LARGE sized pom pom inside one clothespin.
- Now squirt each color of craft paint on the paper plate.
- Dip the pom pom paint brush in one of the colors, then on the printable, right inside the jar design.
- Repeat under you have the desired amount of "cookies" inside of it.
- To finish off the Pom Pom Stamped Cookie craft, use the black puffy paint to draw on "chocolate chips" all over.
- When done crafting, allow it all to dry completely before you display it proudly for ALL to see!
- If desired, trim out the painted design and attach it to another piece of cardstock paper {like I did for the example pictures.}


NEED MORE HELP DOWNLOADING OUR FREE PRINTABLES? PLEASE REFER TO OUR FAQ PAGE
If you've enjoyed our content or have any thoughts to share, we'd love to hear from you! Mention @gluedtomycrafts or tag #gluedtomycrafts on Instagram!